INSTRUCTION MK IV/SERIES 80 AND 90 PISTOLS: GOVERNMENT MODEL™ M1S31A1® MODELS COMBAT TARGET™ COMBAT COMMANDER® COMMANDER® (LIGHTWEIGHT) COMBATELITE® -~ DELIBERATE OFFICER'S ACP®: COLT DEFENDER™ Copyright®1996 Colt’s Manufacturing Company, inc. All Rights Reserved. This instruction manual should always accompany.this pistol.
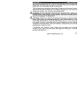
noninfectious jut frustum meantime & 1oe cox LT Koo bt Love L o ey FIGURE 1-COLT® GOVERNMENT MODEL* MK IV/SERIES 80 scrivener A CAUTION: ALWAYS KEEP AND CARRY YOUR PISTOL EMPTY, WITH THE HAMMER FORWARD EXCEPT WHEN YOU INTEND TO SHOOT, so that your pistol cannot be fired when you do not mean to fire it. CAUTION: USE ONLY CLEAN, DRY ORIGINAL HIGH DUALITY COMMERCIALLY MANUFACTURED AMMUNITION IN GOOD CONDITION which Is appropriate to the caliber of your pistol—see following table and Section 3 Caution 14.
READ AND UNDERSTAND ALL THE FOLLOWING PRECAUTIONS BEFORE REMOVING THIS FIREARM FROM ITS PACKAGE. This Colt product is classified by the Alcohol, Tobacco and Firearms Division of the Internal Revenue Service, U.S. Treasury Department, as a firearm or dangerous weapon; it is, therefore, potentially fetal! WARNING: IF THIS FIREARM IS CARELESSLY OR IMPROPERLY HANDLED UNINTENTIONAL DISCHARGE COULD RESULT AND COULD CAUSE INJURY, DEATH, OR DAMAGE TO PROPERTY.
NOTICE Colt shall not be responsible for injury, death, or damage to property resulting from either intentional or accidental discharge of this firearm, or from its unction when used for purposes or subjected to treatment for which it was not designed.
SECTION TITLE 1 PRECAUTIONS 2 Main Features 3 Safety Instructions: Cautions Safety Features: Trigger Guard Slide Lock Safety Grip Safety Safety Stop on Hammer 17 Dis connector Inertia Firing Pin Firing Pin Lock 4 Function: Ammunition Selection Loading To Load a Magazine To Load the Pistol PAGE | SECTION TITLE PAGE Carrying Modes 4 Unloading To Unload 7 Colt Accra Adjustable 7 Rear Sight 18 Firing 15 To Fire 12 5 Maintenance: Stripping for Cleaning 18 Assembling after Cleaning 18 When to Clean 19 How to Clea
Sy P4 MAIN FEATURES The Government Model MK IV Series 80 retains a quality of endurance acknowledged since 1911. Manual and automatic safety devices, including the Series 80 Firing Pin Lock, can be depended on to serve you reliably and safely provided you handle the pistol properly. The Delta Elite and Combat Elite are the same size, and have most of the features of the Government Model. The Combat Commander and Commander Model {Lightweight) semi-automatic pistols are identical in appearance and function.
CONVERSION UNITS... IMPORTANT If you purchase a Colt 22 or 9mm Conversion Unit, NOTE that only a Series 80 Conversion-Unit is compatible with a Series 80 pistol. Do NOT install a Series 70 Conversion Nil on a Series 80 pistol. Colt MK Riderless 80 Se ml-Automatic Pistols Barrel Magazine Postal Type Length Shoshones Capacity Sights Government Model 38 Super or smm Luger 5 Coll Blue S rounds Fixed square notch rear.
SECTION:3 E Gl SAFETY.INSTRUCTIONS: We want you to enjoy shooting your Colt pistol, but we want you to enjoy it safely. You may be an experienced sate shooter already familiar with the procedures in this instruction manual, or you may never have handled a gun before. Either way we urge you to READ THIS ENTIRE INSTRUCTION MANUAL CAREFULLY. YOU MUST FOLLOW THE SAFETY INSTRUCTIONS FOR YOUR SAFETY AND THE SAFETY OF OTHERS.
3. NEVER TAKE ANYONE'S WORD THAT A GUN IS UNLOADED: check for yourself with fingers off the trigger and gun pointed in a safe direction, so that you never fire the gun accidentally when you think it is unloaded. 4.
9. ALWAYS INSTRUCT CHILDREN TO RESPECT FIREARMS. If you teach your children to shoot, teach them or get them trained by a qualified instructor to treat and use the pistol properly, and always supervise them closely. Always stress safety so that your children will not fire the pistol when it s unsafe [RANGE caution S 10. ALWAYS BE SURE YOUR BACKSTOP IS ADEQUATE to stop and contain bullets before beginning target practice so that you do not hit anything outside the range shooting area.
13. ALWAYS BE SURE BARREL BORE, CHAMBER AND ACTION ARE CLEAN AND CLEAR OF OBSTRUCTIONS. Clean a fouled pistol immediately so that it will function correctly and safely. 14, ALWAYS USE ONLY CLEAN, DRY, ORIGINAL HIGH QUALITY COMMERCIALLY MANUFACTURED AMMUNITION IN GOOD CONDITION WHICH IS APPROPRIATE TO THE CALIBER OF YOUR PISTOL. (See Table on Inside front cover). Gun and ammunition manufacturers design their products within exacting engineering safety limits.
17. ALWAYS WEAR AND ENCOURAGE OTHERS TO WEAR EAR PROTECTION WHEN SHOOTING, especially on a range. Without ear protection, the nose of even one shot from your pistol, and other guns close to you, could leave a “ringing" In the ears for some time after firing, while the cumulative long term effect could be permanent hearing loss. 18. ALWAYS WEAR AND ENCOURAGE OTHERS TO WEAR PROTECTIVE SHOOTING GLASSES.
22, ALWAYS BE ABSOLUTELY SURE OF YOUR TARGET AND THE AREA BEHIND IT BEFORE YOU SQUEEZE THE TRIGGER. A built could travel through or past your target up to 1%z miles.. if in doubt, don’t shoot. THINK! What will you RIT If you MISS the target? 23. NEVER SHOOT AT A HARD SURFACE SUCH AS ROCK, OR A LIQUID SURFACE SUCH AS WATER, A bullet may ricochet and travel in any direction to strike you, or an object you cannot see, causing injury, death, or damage to property. 24.
position other than forward on an empty chamber, to eliminate risk of accidental discharge. When hunting, hold your pistol so that you can always control the direction of the muzzle. A MALFUNCTION CAUTIONS 28. FAILURE TO FIRE: ALWAYS HOLD PISTOL, KEEPING IT POINTED TOWARD THE TARGET OR A SAFE OPEN AREA AND WAIT 30 SECONDS when pistol fails to flee. If a hang fire (slow ignition) has occurred, round will fire with In 30 seconds.
CLEANING AND STORAGE CAUTIONS 30. ALWAYS MAKE SURE YOUR PISTOL IS NOT LOADED BEFORE CLEANING, STORING, TRAVELING, LAYING IT DOWN, OR HANDING IT TO ANOTHER PERSON, so that it cannot be fled when it Is unsafe ALWAYS KEEP AND STORE YOUR PISTOL AND AMMUNITION IN SEPARATE LOCKED RECEPTACLES OUT OF REACH AND SIGHT OF CHILDREN AND UNTRAINED PEOPLE, to minimize the risk of pistol and ammunition being easily available for loading and firing.
SAFETY FEATURES Colt MK (V/Series 80 and 90 semi-automatic pistols incorporate several positive safety devices which, if properly employed, can minimize the danger of accidental firing. These safety devices are described on the following pages. Trigger Guard The Trigger Guard is a metal loop around the trigger to protect it from damage and to help prevent accidental discharge. Slide Lock Safety The Slide Lock Safety is locales on the left rear of the pistol just below the slide.
until it fully engages slide lock notch (See Figure 2). When the Slide Lock Safety is down, the sear is free to release the hammer to fire the pistol when it is properly gripped and the trigger is squeezed. wean sued Lock sar SLIDE LOCK NOTCH SPUR ENGAGED savagery FIGURE 2-SLIDE LOCK SAFETY Grip Safety The Grip Safety is located on the upper rear part of the receiver (See Figure 1).
A Safety Stop on Hammer The Safety Stop is a fiat, sheaf-like surface on the hammer which functions as an automatic safety device. It will engage the sear in the unlikely event of primary sear notch failure. This will prevent the hammer from falling fully forward unintentionally and will insure against uncontrolled automatic fire.
Dis connector This safety device prevents a round being fired before it is in the chamber with slide and barrel locked. When slide is not fully forward the Dis connector is depressed; its lower part disengages the sear, so that the hammer cannot be released if the trigger is squeezed. However, when slide and barrel are locked, a spring pushes the Dis connector up into a recess in the slide; this links trigger and sear so that the pistol can be fired by squeezing the trigger.
Firing Pin Lock The Firing Pin Lock engages the firing pin to prevent its movement until the trigger is squeezed. Housed in the slide, the Firing Pin Lock is spring loaded into engagement with the firing pin to prevent it striking the cartridge primer. Squeezing the trigger disengages the Firing Pin Lock before the sear releases the hammer to strike the firing pin and discharge the pistol.
alley FUNCTION A Colt MK IV/Series 80 and 90 semi-automatic pistol is ready to fire when a loaded magazine is inserted into the pistol, the slide pulled back to cock hammer, and released to travel forward and feed a round from the magazine into the chamber. Final forward slide movement locks barrel and slide together and deactivates dis connector. When the pistol is grasped, the grip safety is released so that trigger may now be squeezed.
pressure is reduced to a safe level. Rearward slide travel depresses the dis connector, carries spent cartridge rearward on extractor until base of cartridge is struck by ejector to propel it through ejection port. Slide movement continues under momentum to fully cock the hammer, If last round has been fired, the magazine follower will activate the slide stop 1o hold slide to rear, but if a round remains in magazine, the slide will move forward to feed and lock the next round in the chamber.
CAUTION: TO MINIMIZE RISK OF UNINTENTIONAL DISCHARGE, LOAD LIVE AMMUNITION INTO PISTOL ONLY WHEN YOU INTEND TO SHOOT, AND THEN KEEP AN EMPTY CHAMBER UNDER THE HAMMER. CONSTITUTIONALITY EXERCISE EXTREME CARE TO KEEP MUZZLE POINTING IN A SAFE DIRECTION, WELL CLEAR OF YOUR BODY, particularly when loading and unloading. A 1. CAUTION: READ SAFETY INSTRUCTIONS (Section 3). 2. Use only ammunition recommended inside front cover of this instruction manual as suitable for your pistol.
magazine. Place next round on top of previous round and press down and back. Repeat unlit magazine is loaded, but do NOT exceed ils capacity. For magazine capacity, see Section 2—Main Features. RETAINING LIP— «n wacky Y FOLLOWER FIGURE 3-LOADING MAGAZINE AUTOMATION: TO MINIMIZE RISK OF UNINTENTIONAL DISCHARGE, LOAD LIVE AMMUNITION INTO PISTOL ONLY WHEN YOU ARE ABOUT TO SHOOT. A To Load The Pistol 1. CAUTION: READ SAFETY INSTRUCTIONS {Section PISTOL POINTING IN SAFE DIRECTION AND DO NOT TOUCH THE TRIGGER.
2, Remove magazine from pistol. Place SERRATED your hand under magazine to prevent it FINGER GRIPS {rom falling. Press magazine catch {located on left of pistol behind trigger guard) to drop the magazine out of the magazine well. (See Figure 4). 3. Hold pistol by stock with one hand. Keep other hand clear of ejection port and grasp serrated finger grips on both sides of slide. Pull slide back slightly and LOOK IN CHAMBER TO ENSURE iT IS EMPTY; allow slide to return larvae forward.
IMPORTANT: Do not strike base of magazine to drive it home—just push it firmly into piste. Otherwise, you could damage magazine and injure your hand. 5. When you are ready to shoot, grip the slide as described in Step 3 and pull it fully rearward to cock the hammer. Release slide to feed a round from the magazine into the chamber. THE PISTOL IS NOW LOADED, COCKED AND READY TO FIRE. 6.
KGN e e NOTE: This pistol may be carried in any one of the following three modes according to your needs: Mode 1: — MAGAZINE EMPTY, CHAMBER EMPTY. — Pistol cannot be discharged. — Use Mode 1 for storage, transporting, cleaning, repair, demonstrating and dry practice. Medea 2 — MAGAZINE LOADED, CHAMBER EMPTY, HAMMER DOWN. — Pistol cannot be fired unlit slide is cycled and trigger is squeezed. — Use Mode 2 when CARRYING THE PISTOL READY FOR USE.
UNLOADING ‘CAUTION: ALWAYS UNLOAD YOUR PISTOL IMMEDIATELY AFTER USE AND BEFORE CLEANING AND STORAGE to minimize the risk of accidental discharge. To Unload 1. Be sure you are familiar with Safety Instructions in Section 3. Keep pistol pointing In a safe direction, do not touch trigger and always keep hands away from muzzle and refection port. 2. Place hand under magazine to prevent it from falling and press magazine catch to release and eject magazine.
§. Keep piston! pointing in a safe direction, allow slide to return forward on empty chamber and squeeze the trigger to allow hammer to fall forward. (if sited is held 1o rear by the slide stop, pull slide back slightly, then release it). 6. Remove remaining live rounds by sliding them forward out of the magazine. 7. Collect undamaged live ammunition for safe storage and future use. Collect spent cartridge cases for disposal.
Before firing your Colt pistol, practice your stance, aim, rhythm and breathing for steady aim with your pistol UNLOADED. Practice firing on a range before going hunting or using your piston! for any other type of shooting. JAN cautions: | 1. ALWAYS WEAR AND ENCOURAGE OTHERS TO WEAR EAR PROTECTION WHEN SHOOTING, especially on a range.
A To Fire 1. CAUTION: READ SAFETY INSTRUCTIONS (Section PISTOL POINTING IN SAFE DIRECTION AND DO NOT TOUCH THE TRIGGER. 2. Load pistol as previously described. 38, Grasp pistol by stock and, with index finger resting along the outside of trigger guard, take aim. Aim by aligning target with front and rear sights. {See Figure 6) After identifying your target and seeing that it is clear to shoat, focus on the front sight. Be sure you have a safe backstop. THINK! What will you HIT if you MISS the target? 4.
will disturb your aim and spoil your accuracy. To fire the second and subsequent rounds, all that is necessary is to release the trigger and squeeze it again tater every shot until you have completed firing. 6. THIS IS A SEMI-AUTOMATIC PISTOL AND IS IMMEDIATELY LOADED AND COCKED READY TO FIRE AGAIN AFTER EACH SHOT UNTIL THE MAGAZINE IS EMPTY. NOTE: This pistol can be fired without a magazine in place. 7.
NOTE: Dispose of misfired rounds in accordance with the ammunition manufacturer's instructions 8. CAUTION: KEEP PISTOL POINTING IN A SAFE DIRECTION. Unload as previously described. IMPORTANT: If you cock your piston! but do not fire it, apply Slide Lock Safety until ready to fire If you lose the opportunity to fire, unload your pistol as previously described. Remember, if a round is in the chamber there is a risk of : accidental discharge.
izl (e MAINTENANCE Like any other precision mechanism, your pistol will function better, last longer, and remain safer when it is properly maintained. Follow the advice in this section to keep your pistol in peak condition. Keep your pistol clean and properly lubricated te prolong its reliable life. CAUTIONS: 1. ENSURE THAT MAGAZINE IS REMOVED AND THE PISTOL IS NOT LOADED BEFORE STRIPPING AND CLEANING, so that pistol will not fire. 2.
STRIPPING FOR CLEANING There are some differences between the Officer’'s ACF, Compact, Colt Defender and other Colt pistols which makes it necessary to identify them separately in the following procedure. A = Government Model, Della Elite, Combat Elite, Combat Target, Commander Models and M1991A1 models other than those listed Officer’'s ACP and Compact. C = Colt Defender. Ensure magazine is removed and pistol is NOT loaded. Be sure you are familiar with the Safety Instructions in Section 3.
With muzzle pointing upward, rest pistol on heel of butt and “grip safety” on a table or bench. Goth step 4. CAUTION: THE SPRINGS ARE STRONG AND COULD FLY OUT AND INJURE OR EVEN BLIND SOMEBODY If they are not handled with care. 3. (A) Push slide back about % inch, press down on recoil spring plug (located just below muzzle) and at same time rotate barrel bushing clockwise about % turn, using barrel bushing wrench if necessary; this will free plug and recoil spring.
LOCKED UNLOCKED BARREL BUSHING @ . RECOIL SPRING PLUG MUST BE FLUSH WITH GR STICKING OUT ONLY SLIGHTLY BEYOND FACE OF BARREL BUSHING BOTTOM RECOIL SPRING PLUG WHEN LOCKED. = PUSHED IN AND TURNED ALMOST Y% LUG ON RECOIL SPRING ;figflm%fi o8 PLUG MUST BE FULLY “li UNLOCKED POSITION,. ENGAGED IN SLOT ON BOTTOM OF SLIDE WHEN LOCKED. FIGURE B-OFFICER'S ACP RECOIL SPRING PLUG LOCKED AND UNLOCKED Cock hammer by pulling back on hammer spur.
Lift out slide stop. (See Figure Push slide forward off the receiver. Lift recoil springs and guide and pull them rearward out of slide. (See Figure 10). DISASSEMBLY NOTCH 8. (C) Compress and remove recoil spring assembly, then separate outer spring from it. Lift out recoil spring bushing; See Figure 11. 9. (A) Turn barrel bushing SLIDE stop counterclockwise, push barrel and barrel bushing forward until ' bushing is clear of slide, then FIGURE 8-REMOVING SLIDE STOP remove bushing from barrel. 9.
RECOIL SPRING RECOIL SPARING GUIDE ~ BARREL LINK FORWARD FIGURE 11-COLT DEFENDER DISASSEMBLY (6C) IMPORTANT: Do not strip your pistol further than previously described. Do not remove or alter parts, particularly safety parts. If additional maintenance is required, see “Service and Repair” later in this instruction manual.
ASSEMBLING AFTER CLEANING Remember: A = Government Model, Delta Elite, Combat Elite, Combat Target, Commander Models and M1991A1 models other than those listed Officer's ACP and Compact, C = Colt Defender. With slide upside down and barrel link forward, assemble barrel into the slide, as in Figure 10. 2, (A only) (See Figure 12). Place barre! bushing over muzzle of barrel and into slide until it is flush with the face of the slide, (STEP 1).
Note: Officer’s ACP, Compact and Delta Elite have two (2) recoil other Colt pistols have only one. Assemble the recoil spring/s and guide into the slide by pushing the open end of the spring/s through the slide from the rear, (STEP 3). Position the arched portion of the recoil spring guide over the outside surface of the barrel, (Step 4). 3. (C only) Flip barrel link back. Insert recoil spring bushing into slide.
Cock the hammer. Look at the top of the receiver and make sure the plunger lever is down (forward), tip the receiver forward to keep it down as you run the slide onto the receiver; (See Figure 14). Look through the side stop hole in the side of the receiver. Move the slide along the receiver until you see the hole in the barre! link line up with the hole in the side of the receiver. Insert the slide stop through the hole unit it is almost home; (See Figure 15).
Rest pistol on table or bench with muzzle pointing upward. 8. (A only) Push slide back about % inch, press down on recoil spring plug, compressing the recoil spring into the slide until the plug is fully home, then rotate the barrel bushing. Align the arched part of the bushing so that it straddles the recoil spring plug and locks it in place. 6. (B only) Place recoil spring plug over end of recoil springs.
A CAUTION: YOU COULD DAMAGE YOUR PISTOL WHEN YOU FIRE, OR ATTEMPT TO FIRE IF THE RECOIL SPRING PLUG IS NOT CORRECTLY SEATED AND LOCKED AS DESCRIBED ABOVE, After assembling the pistol, check its function as follows: Remove Magazine. Pull the slide back fully and let it go. It should fly forward and close over the empty chamber, The hammer should stay cocked, Push the safety up and squeeze the trigger. The hammer should stay cocked. Push the safety down and squeeze the trigger. The hammer should fall.
IMPORTANT: Do these checks only after you strip and assemble the pistol. Do not slam the slide forward at any other time, except when loading. If you exercise the slide, control! it with your hand. CAUTION: WHILE UNLIKELY, IT IS POSSIBLE THE FIRING PIN MAY STICK FORWARD. IF YOU FIND iT STICKING FORWARD, DO NOT LOAD OR ATTEMPT TO FIRE THE PISTOL. If you attempt to close the slide on a loaded chamber when the firing pin is sticking forward, the pistol may discharge.
Materials; Cleaning rod, cotton flannel patches {cut to fit snugly into the bore), a small toothbrush, good quality light gun oil, *gun cleaning solution, and *a brass wire bristle bore cleaning brush. NOTE: In freezing conditions {below 32°F or 0°C) avoid the use of oil for lubrication; instead apply dry lubricant sparingly. A 1. CAUTION: ENSURE THAT THE PISTOL IS NOT LOADED. 2. Strip for cleaning as previously described.
movement. If you try to change direction with brush in barter, the brush will stick. 6. Repeat steps 3 and 4. 7. Clean rear face of barrel and face of slide, using a small toothbrush. On Officer’s ACP models, also clean the lug on recoil spring plug and its locating slot in dower part of the receiver. (See Figure 8). 8. Lightly moisten a flannel patch with gun oil and pass it once through barrel, leaving a thin film of oil on the inside surface.
11. Again wipe external surfaces with oil moistened patch to remove any finger prints. (Finger moisture, if left, could start corrosion process}. (See NOTE on cold weather lubrication). 12. Remove any gun cleaning solution and il from the stock. CLEANING THE MAGAZINE It is advisable to clean the magazine(s) whenever the pistol is cleaned. To do s0, remove the magazine follower and spring and clean all components, taking care to remove carbon deposits from the lips of the magazine and the magazine follower.
To assemble this magazine, insert the follower and spring through the bottom of the magazine. Be sure that the top coil of the spring is installed towards the tron of the magazine. Compress the spring and slide the base lock under the two tabs an the bottom of the magazine.
Magazine For Most Other Calibers (See Figure 17) To remove this magazine follower and spring, depress them with a piece of wood (pen or pencil) about two inches lino the magazine and insert a thin rod {small screwdriver) through the lower of the front two holes in the magazine body. This will hold the spring under tension, Turn the magazine upside down and lightly tap it so that the follower falls away from the spring; lift out the follower from the magazine body.
MAGAZINE MAGAZINE FOLLOWER SPARING M. INE F WES MAGAZINE FOLLOWER MAGAZINE {SPRING LOOP) / THIN ROD OR SCREWDRIVER FIGURE~17 MAGAZINE ASSEMBLY WITHOUT REMOVABLE BASE Bakelite ]S CAUTION: ALWAYS UNLOAD YOUR PISTOL FOR STORAGE AND STORE AMMUNITION SEPARATELY. Keep and store your pistol and ammunition securely locked and in separate locations out of reach and sight of children. (Children are naturally curious and do not always believe the real danger of guns).
NOTE: Remove your pistol from its holster at the end of the day. Do not store your pistol in an air-tight container, and do not seal or attempt to seal the barrel to exclude dust, as the internal steel surface is more likely to corrode. Use the Colt packaging case, with a padlock on it 1o store your EMPTY pistol. SERVICING AND REPAIR Should your pistol require adjustment or repair, make sure it is NOT LOADED and send it to Colt's.
A THIS GUN 1S MANUFACTURED TO PERFORM PROPERLY WITH THE ORIGINAL PARTS AS DESIGNED. IT IS YOUR DUTY TO MAKE SURE ANY PARTS YOU BUY ARE INSTALLED CORRECTLY AND THAT NEITHER REPLACEMENTS NOR ORIGINALS ARE ALTERED OR CHANGED. That is why we say return it to Colt, YOUR GUN IS A COMPLEX TOOL WITH MANY PARTS THAT MUST RELATE CORRECTLY TO OTHER PARTS. PUTTING A GUN TOGETHER WRONG OR WITH MODIFIED PARTS CAN RESULT IN A DAMAGED GUN, DANGER, AND INJURY OR DEATH TO YOU AND OTHERS THROUGH MALFUNCTION.
2. Write a letter explaining the problem and your requirements in as much detail as possible. Include the model name and serial number of your pistol together with your return address, then enclose it with the empty pistol in the Colt packaging case or a well padded package. 3. Do not send presentation boxes, accessories or ammunition. 4. Colt’s address for receiving packages is: MCI Alcott Road West Hartford CT 06110 5.
SECTION 6 PARTS ILLUSTRATIONS AND LISTS This section is provided so that you may identify names of parts for your own interest. However, for adjustment, repair, or spare parts information, see Section 5, "Servicing and Repair." See pages 56 and 58 for illustrations.
MK IV/SERIES 80 DESCRIPTION 1. Barrel 2. Barrel Bushing 3. Barrel Link 4. Barrel Link Pin 5. Dis connector 6. Ejector 7. Ejector Pin 8. Extractor 9. Firing Pin 10. Firing Pin Plunger 11, Firing Pin Spring 12. Firing Pln Stop 13. Front Sight 14. Grip Salty 16, Hammer 16. Hammer Pin 17. Hammer Slut 18. Hammer Strut Pin 19, Magazine Assembly 20. Magazine Catch 21, Magazine Cal ch Lock 22. Magazine Catch Spring 23. Magazine Follower 24. Magazine Spring {sea insert) 25. Man Spring 26. Main Spring Cap 27.
COLT DEFENDER 23. Magazine Catch 47, Safety Lock 24. Magazine Catch Spring 48, Slide Stop DESCRIPTION 2 Gassing Galosh Lock~ 4. Ejector Pin holiday 26, Plunger Tube 50, Hammer Pin 2. Front Sight 27. Slide Stop Plunger 51. Sear Pin 3. Rear Sight Screw 28, Plunger Spring 52. Stock Set 4. Rear Sight 29, Safety Lock Plunger 53. Stock Screw &. Extractor 30. Grip Safety 54. Magazine 6. Firing Pin Spring a1. Dis connector 55, Magazine Follower 7. Firing Pin 32, Sear 56. Magazine Spring 8. Firing Pin Stop 33.
SECTION 7 i HE CUSTOMIZED GUN Our Coll Custom Shop offers a wide range of special services such as engraving, inlaying and special serializing to the same high standard of quality long synonymous with the name “COLT". Sometimes modifications, which meet our customer’s special requirements, necessitate deviations from standard design and manufacturing tolerances which result in functional differences from a standard gun.
FIREARM RECORD Colt Model Serial No.
WARRANTY STATEMENT Based on Magnon-Mass Warranty Act, Colt offers no express warranty on its product line. However, Colt recognizes its obligations concerning implied warranty. Colt also stands behind its products as it has historically, and will continue to provide service to its product line as it has over the years. Colt predicts will be serviced for a period of one year from the date of retail purchase, for defects in materials or workmanship, at no charge to the purchaser.
If your instruction manual becomes lost or destroyed, obtain a replacement by writing to Colt’s Manufacturing Company, Inc., Box 1868, Hartford, Connecticut 06144-1868 USA or call 1-800-962-COLT. Make a note of the address. When requesting a manual, include the information which is on the left side of your firearm together with its serial number or quote the Part No. as shown on the back cover of this manual. OLT.