
Maintenance Instructions


10044S
Colt Canada Proprietary 3-2-49 2005-09-20
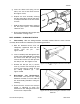
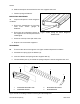
e. Place the bumper (7) in the tube and carefully press it into place;
f. Carefully clamp the assembly upright in a vice and fill the tube to the level of the guide
and plunger retaining pin hole with approximately 3.5 cc of hydraulic fluid MIL-H-5606
(NATO H-515) or equivalent;
g. Carefully press the plunger into the buffer tube from the front, until the "O" ring enters the
slightly enlarged section of the tube;
NOTE
This enlarged section is designed to permit the escape of air and excess fluid during
assembly.
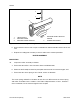
h. Slide the guide onto the buffer tube with the hole for the guide and plunger retaining pin
aligned with the hole in the buffer tube;
j. Press the plunger in until the elongated hole aligns with the holes in the buffer tube and
guide; and
NOTE
A pin punch is useful as a slave pin during this alignment procedure.
k. Install a new guide and plunger retaining pin and rivet both ends, flush with the surface
of the guide, to secure it in the assembly.
NOTE
After assembly, manually depress and release the plunger to check for correct function.
Ensure that there is no free end play in the plunger. Check the buffer for leaks to ensure
that the "O" rings were not damaged during installation.
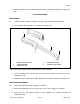
HYDRAULIC BUFFER ASSEMBLY
77. Hydraulic buffer assemblies that have become unserviceable or leak hydraulic fluid can
be reconditioned and returned to service by using the Hydraulic Buffer Repair Kit 10039C-1.
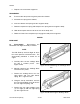
METAL MAGAZINE
DISASSEMBLY
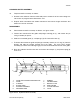
78. To disassemble the metal magazine check figure 3-2-62 and proceed as follows:
a. Insert a suitable punch through the hole in the baseplate;
b. Lift the baseplate lug clear of the magazine box;
c. Take control of the base plate to control the magazine spring;