
Maintenance Instructions


10044S
Colt Canada Proprietary 3-2-48 2005-09-20
NOTE
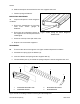
The bumper is normally damaged during removal and is not reused.
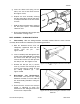
e. Carefully position a 0.092 in. (2.3 mm) pin punch through the hole in the orifice plate (9)
and push out the rear piston (10). Remove the "O" ring from the piston.
NOTE
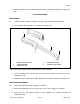
DO NOT move the orifice plate (9) or scratch the inside of the buffer tube with the punch.
Tubes with damaged cylinders or orifice plates, are not repairable.
REPAIR
76. To repair the buffer, carefully inspect the tube and polish out any scratches in the "O" ring
bearing area of the tube and replace non-servicable components. Then reassemble the buffer as
follows:
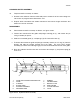
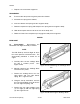
a. Assemble the plunger and guide assembly in the reverse order to the disassembly:
(1) Lightly lubricate the guide (2), plunger (3), retaining ring (6), and scraper
assembly (5) components with an inert silicon grease to facilitate assembly and to
prevent corrosion;
(2) Install the retaining ring and slide it forward to the front of the guide;
(3) Assemble the tapered rubber element and the two brass scrapers of the scraper
assembly, ensuring that the slots in the two brass scrapers are not aligned, and press
them forward in the guide until they are seated against the retaining ring;
(4) Insert the buffer tube (4) into the guide to support the scraper assembly;
(5) Insert the plunger into the front of the guide, until the head of the plunger is seated
against the front face of the guide;
(6) Carefully remove the assembled guide and plunger from the buffer tube;
(7) Assemble the "O" ring (11) to the plunger; and
(8) Set the assembled guide and plunger aside.
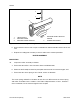
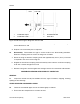
b. Lightly lubricate the rear piston (10), buffer tube, and "O" ring (11) with an inert silicon
grease to facilitate assembly and to prevent corrosion;
c. Place a new "O" ring on the rear piston and insert the piston into the tube, from the rear,
"O" ring end first;
d. Oil the piston spring (8) and insert it into the tube, from the rear;