
Maintenance Instructions

10044S
Colt Canada Proprietary 3-2-36 2005-09-20
c. Check the springs both helical and torsion, for kinks, cracks or distortion;
d. Check for sticking or drag between the hammer and disconnector. Polish the mating
surfaces to correct the problem;
e. Ensure that the trigger mechanism passes all safety, function, and trigger pull criteria
detailed in Part 4 of this instruction; and
f. Replace non-serviceable parts as required.
54. Reassembly and Replacement. Reassemble the fire control mechanism and replace it
in the receiver as follows:
a. Clean all parts prior to reassembly;
b. Reassemble the trigger mechanism using the slave pin to hold the mechanism together
prior to installation;
c. Position the trigger mechanism in the receiver and insert the trigger pin from the right,
with the grooved end leading;
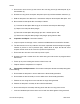
d. Install the hammer assembly by the following procedure:
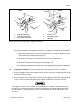
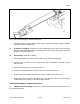
(1) Position the assembled hammer
and hammer spring with the torsion
legs resting on top of the trigger pin.
See Figure 3-2-49;
(2) Align the hammer pin holes; and
(3) Insert the hammer pin from the left
with the ungrooved end leading.
e. Manually cock the hammer, then install
the fire control selector and position it in
the “Auto” position;
f. Install the pistol grip, selector detent
and selector detent spring to retain the
fire control selector;
g. Install the automatic sear as follows:
(1) Position the automatic sear with the long leg of the spring positioned in front of the
fire control selector;
(2) Align the automatic sear pin holes; and
(3) Install the automatic sear pin from the right.
Figure 3-2-49 Position of the Hammer Spring