
Maintenance Instructions
10044S
Colt Canada Proprietary 3-2-34 2005-09-20
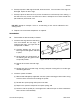
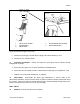
(2) Take control of the hammer and remove the punch;
(3) Remove the hammer assembly; and
(4) If required for replacement, carefully remove the hammer spring from the hammer by
spreading out one side at a time to prevent distortion of the spring.
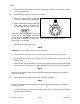
NOTE
On C7 Family weapons capable of 3 round burst firing mode, the burst cam and clutch
spring can be removed from the right boss of the hammer once the hammer spring has
been removed.
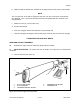
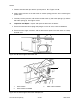
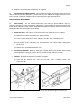
d. Trigger Mechanism. To remove the trigger mechanism, proceed as follows:
(1) See Figure 3-2-47. Insert a slave pin (1) from the left side of the receiver, to displace
the trigger pin (2);
NOTE
Locally manufacture a slave pin 16.75 mm (0.660 in.) long by 3.90 mm (0.154 in.) in
diameter, to aid with removal and disassembly of the trigger mechanism.
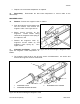
(2) Remove the trigger mechanism, which is now held together by the slave pin, from the
lower receiver; and
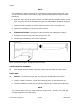
(3) To disassemble the auto trigger mechanism, see Figure 3-2-48 and proceed as
follows:
(i) Apply downward pressure on the semi disconnect (1) to take control of the
disconnect spring (3);
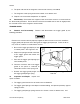
(ii) Remove the slave pin (2) and release pressure on the disconnect;
(iii) Remove the disconnect and disconnect spring; and
Figure 3-2-47 Removing the Trigger Mechanism
1. SLAVE PIN
2. TRIGGER PIN
1
2