
Cleaning Instructions

CLEANING INSTRUCTIONS
FOR
C7 FAMILY
OF COMBAT WEAPONS
5.56mm NATO Calibre
1036 Wilson Avenue, Kitchener, Ontario, Canada N2C 1J3
Tel: (519) 893-6840 Fax: (519) 893-3144
WWW.COLTCANADA.COM
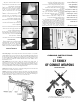
(1) Barrel Pullthrough. Assemble the slotted tip on one end and the knurled
obstruction remover on the other end to create a
"flexible cleaning rod". Allows proper "breech to muzzle"
cleaning and quick bore cleaning with out field stripping.
(2) Swab Holder. Attached to the end of either the chamber cleaning rod
(8) or barrel pullthrough (1) to hold a cleaning swab.
(3) Obstruction Remover. Attached to the end of the barrel pullthrough (1) to
remove stuck casings.
(4) Cotton Flannel Swab. Double napped for maximum absorbency.
(5) Pullthrough Handle. This "T" handle is used with the chamber cleaning
rod (8) and barrel pullthrough (1).
(6) Bore Cleaning Brush. Attached to one end of the barrel pullthrough (1) to
clean the bore.
(7) Chamber Cleaning Brush. Attached to the chamber cleaning rod (8) to clean
the chamber, shoulder, neck, and locking lugs.
(8) Chamber Cleaning Rod. Used with the "T" handle (5) and chamber cleaning
brush (7).
(9) Pipe Cleaners. Used to clean the gas tube and bolt carrier key.
(10)Cleaning Brush. Used for general cleaning of the receiver.
(11)Oil Bottle w/CLP. Cleaner Lubricant Preservative (CLP) is used as a
cleaner and general-purpose lubricant.
(12)Cleaning Kit Pouch. Used to hold all cleaning kit components.
C7 Cleaning Procedure
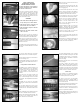
Assemble the flexible cleaning rod by putting
the slotted tip on one end of the barrel
pullthrough and the knurled obstruction
remover on the other end. This knurled part
allows turning the rod for chamber cleaning.
Swab Attachment
Method 1 Insert the point of the swab into the
slotted tip. Center the swab.
Method 2 Punch a hole in the center of the
swab. This insures that the swab will be tied
onto the forged brass tip to prevent it from
accidentally lodging in the bore.
Place the brass tip into the slot on the swab.
Take a pinch on the swab at the corner. Pinch
it upward to a point.
Feed the tip of the fold through the slot in the
brass tip.
Pull the tip tightly, as this ties the knot that will
give the efficient scrubbing action.
Notice that if tied correctly the swab now
forms a symmetrical cone. This will center
the tip and provide 360 degree scrubbing
action.
Always use a new clean surface each time
you pull the swab down the bore. This is
equivalent to rinsing out a mop. It prevents
abrasive dirt in the muzzle from getting
tracked into the chamber area.
The size of the swab can be varied by placing
the slot in a different location on the swab.
The Lockinq Lugs are the most important area to clean on the weapon. Loose powder
residue builds up in the recess in front of the lugs. This buildup may bind the bolt and
prevent it from cycling smoothly. The loose residue in this area will eventually pack if
not removed. One cause of buildup in the locking lugs is incorrect cleaning. If you pull
or push a brush back toward the chamber dirt from the bore and chamber can be
deposited in the recess.
The Chamber must be keep clean to allow easy extraction of the empty shell. If
scratches are present the case fire forms into these recesses and prevents the case
from ejecting. It is normal to get a gummy residue buildup at the chamber shoulder.
This is loosened with the chamber brush. The rotating swab will mop the loose residue
out. Pay special attention to this area after firing blank rounds.
The Neck and shoulder of the neck are cleaned by rotating the bore brush and swab
before the bore is cleaned. Keep this area clean.
The Bore should only be cleaned in the direction of the bullet. If you take abrasive dirt
from the muzzle and introduce it into the chamber and neck, the bullet will drag it down
the bore. This dirt can cause bore and throat erosion. The crown of the muzzle gives
a bullet its final direction. Take care not to nick or scratch this area.