
Owner's Manual


B. Removing the CO2 Cartridge
Put the air pistol "On Safe" (See Step 2A).
Make sure the air pistol is unloaded (See Step 4B).
Point the air pistol in a SAFE DIRECTION.
Swing the CO
2 cylinder lock downward carefully to allow any remaining CO2
gas to escape.
Important: Be sure to keep your hands and face away from escaping CO
2.
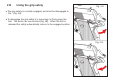
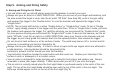
Push the grip release button on the left side to remove the right grip. (see Fig.4A)
Loosen the cylinder screw by turning it clockwise until it stops.
Remove the empty CO
2 cartridge by turning the air pistol over and shaking it to let the CO2 cartridge fall
out. The CO
2 cartridge may be cold. Avoid prolonged contact with the CO2 cartridge if it is very cold.
Close the cylinder lock by swinging it upward. Press the right grip cover back into place.
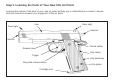
A. Installing the CO2 Cartridge
Make sure the air pistol is "On Safe" (See Step 2A).
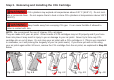
Push the grip plate release button on the left side to remove the grip. (see Fig.4A) Swing the CO
2 cylinder
lock downward and loosen the cylinder screw by turning it clockwise. (Fig.4B and 4C)
Insert a new CO
2 cartridge into the air pistol with the small neck of the cartridge pointing up toward the
piercing assembly (Fig. 4D).
Tighten the cylinder screw by turning it counterclockwise until it gently moves the CO2 cartridge up into
position. Do not over tighten it as this could damage the cartridge seal.
Close the cylinder lock by swinging it upward. This will pierce the CO
2 cartridge (Fig 4E).
Carefully press the grip back into place.
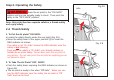
Point the air pistol in a SAFE DIRECTION, take "Off Safe" (See Step 2B) push in the grip safety, and pull
the trigger. If the air pistol does not make a popping noise after pulling the trigger, the CO
2 is not
being discharged. In that event, you will have to remove the grip, swing the cylinder lock downward and
tighten the cylinder screw a little more by turning it counterclockwise. Then close the cylinder lock, replace
the grip and test it again. Once there is a popping noise, the air pistol is releasing CO
2 with each pull of the
trigger.
Return the safety to the "On Safe" position (See Step 2A).