
Specifications


Planning for Installation
Unpacking
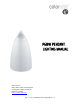
The pendant is shipped assembled with no additional assembly needed.
Any optional accessories are included in the package. Use the packing list located on
the outside of the box to ensure all accessories are included.
Survey the unit to make sure the pendant is intact—not cracked or damaged. Any
damages to the package or its contents are the buyer’s responsibility; please follow
protocol for filing damage claims. Please recycle or appropriately discard any packing
materials.
Preparation
Before Installation, Coloronix suggests:
• Consulting the provided submittal drawings to recognize layouts of luminaries,
power supplies, and wiring layouts.
• Drawing out a layout plan consisting of locations of luminaries and wiring.
• Record DMX addresses on a mapping grid for easy reference and addressing
(where applicable).
• An electrical inspector reviews all wiring plans.
Points to Consider About Data
• Use a Belden 9481 or similar cable for DMX data connectivity or Plenum rated
CAT5 8-wire cable.
• AC Power and DATA cables may NOT run in the same conduit due to possible
induced errors.
Quick Step-by-Step Instructions
To successfully install RGBW Pendants, the steps are:
1. Setting Color Mode or Setting Stand Alone Color Ray mode
2. Mounting and Alignment of Fixture
3. Installing Power Connections
4. Installing Data Connections
5. Install Pendant
6. Ready to Go!
Page 6—Coloronix RGBW Pendant Lighting Manual V1.0