
Assembly Instructions

This product carries a 1 year warranty from the date of shipment, as long as it is in original factory condition with no
field modifications by the customer and the factory stickers on the unit or sensors have not been violated or removed.
Installation Instructions
1. Remove items from box.
2. Mount or hang brackets with sensors on each side of the opening that is being protected. Sensor should be at least 10-15 feet before
the opening so there is adequate time to respond to the alerting box (includes selectable audible alert).
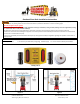
3. The Fit Package can e used to protect traffic entering an opening or doorway (Figure 1) or passing by it (Figure 2).
4. Adjust the sensors so that they are at the desired height. Sensor 1 will later plug into the 7-pin socket jack on the top of the alerting
box. Sensor 2 has its own three-prong plug that is independent and its own power source.
5. Mount the alerting box and selectable audible on the wall facing the area you want to protect where traffic will be passing through
the opening.
6. Plug the selectable audible into the alerting box by lining up the male and female pins on the wiring harness, pushing in, and
tightening until the harness is snug.
7. Plug sensor 1 into the alerting box (Figure 3) by lining up the male and female pins on the wiring harness, pushing in, and tightening
until the harness is snug (Figure 4).
8. Plug the sensor 2 into a standard outlet.
9. Locate ¼” plug from power supply and plug into the top of the alerting box (Figure 3).
10. Secure power cord to wall or supports.
11. Run power cord to a 110Vac duplex receptacle having a center screw.
A. Remove center screw of receptacle plate.
B. Secure power supply to receptacle plate by using center screw to prevent power supply from falling.
C. Plug power supply into receptacle.
This unit will flash and sound off (if quipped with audible) for up to two minutes as it runs through its warm up
Cycle every time it is energized.
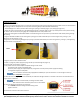
12. When the unit is energized and sensor activated, the small blue LED light indicator on the face of the sensor will illuminate for as
long as motion is detected.
If the sensor is disconnected, unit will go into fault mode
(will continue to flash and sound) unit sensor is reconnected.
13. Using the Switches (see figure 5 for reference):
A. The BLACK switch with change the flash timing of the
lights on the unit.
14. Save these instructions for future reference.
Figure 5
Figure 3
Figure 4
Power