
Assembly Instructions

Collision Awareness Toll Free 1.888.324.1920
3550 Legacy Blvd, St Charles, IL www.save-ty.com
Installation Instructions
1. Remove unit from box.
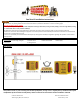
2. Mount the wall mount bracket (Figure 1) for the interior sensor onto the wall in the area that will be monitored.
3. Loosen the quick release thumb lever (Figure 2) and attached sensor to the wall mount bracket.
4. To adjust the sensor angle, adjust the sensor side to side angle for optimum field of view (see Figure 3 for viewing angles).
5. While holding the sensor in place, tighten the quick release thumb lever.
6. Mount rear of the exterior DOD box to the wall and drill a hole through the wall for
the wiring harness.
7. Connect the wiring harness to the bottom of the exterior DOD box by lining up
the male and female pins, pushing in, and then tightening the harness until snug.
8. Push the wiring harness through the hole drilled in step 6 from the exterior DOD box
to where the control box will be mounted.
9. Open the control box and mount the rear portion, then put the front panel back on.
10. Connect the wiring harness to the bottom of the control box by lining up
the male and female pins, pushing in, and then tightening the harness until snug.
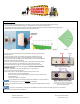
11. Plug the sensor into the top of the unit (Figure 4). PLUG ALL SENSORS IN BEFORE
ENERGIZING THE UNIT.
12. Locate ¼” plug from power supply and plug into top of unit (Figure 4).
13. Secure power cord to wall or supports.
14. Run power cord to a 110 VAC duplex receptacle having a center screw.
A. Remove center screw of receptacle plate.
B. Secure power supply to receptacle plate using center screw to prevent power
supply from falling.
C. Plug power supply into receptacle.
This unit will flash and sound off (if equipped with audible) for up to two minutes as
it runs through its warm up cycle every time it is energized.
14. When unit is energized and the sensor is activated, the small blue LED light indicator will illuminate for as long as motion
is detected.
If any sensor is disconnected, unit will go into Fault Mode (will continue to flash and sound) until sensor is reconnected.
15. Save these instructions for future reference.
Figure 3
Figure 1
Figure 2
Quick Release
Thumb Lever
Side View
Top View