
Installation guide


129098-UIM-H-1011
It
is
recommended
that the
appliance
is
installed
in
a
location
where
the
space
temperature
is
32
°F
(0°C)
or
higher.
If
the
appliance
is
installed
in
a
location
where
the
ambient
temperature
is
below
32
°F
(0°C),
the
combustion
by-products
could
condense
causing
damage
to
the
appli-
ance
heat
exchanger
and/or
the
Roof
Jack.
IMPORTANT
The
“VENT
SYSTEM”
must
be
installed
as
specified
in
these
instructions
for
Manufactured
(Mobile)
Home
and
Modular
Homes.
This
appliance
must
be
vented
with
an
approved
roof
jack
may
not
be
common
vented
with
another
gas
appliance.
Modular
Homes
must
be
vented
with
an
approved
roof
jack
and
may
not be
common
vented
with
other
appliances.
Failure
to
follow
all
venting
instructions
can
result
in
fire,
asphyxi-
ation,
or
explosion.
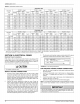
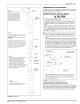
A
CAUTION
Only
use
the
appropriate
roof
jack.
See
Figures
21
and
22
for
correct
application.
Do
not
exceed
the
maximum
height
as
determined
from
Figures
27
and
22.
Installer
should
allow
an
additional
1-1/2"
travel
before
the
flue
pipe
assembly
is
fully
extended
against
the
built-in
stop.
This
provides
an
additional
safeguard
against
the
flue
assembly
being
pulled
from
the
roof
jack
during
transportation
or
other
stress
conditions.
EXISTING
FURNACE
REPLACEMENT
If
this
furnace
replaces
an
existing
furnace,
do
the
following:
1.
if
a
2nd
roof,
roof
cap
or
addition
has
been
made
to
the
existing
roof
of
the
home,
remove
the
old
roof
jack
completely!
To
avoid
the
possibility
of
an
improperly
installed
pipe
or
gaps
in
the
old
roof
jack,
INSTALL
A
NEW
ROOF
JACK.
Your
ceiling
and
roof
height
will
determine
the
correct
roof
jack
to
use.
Refer
to
the
vent
selec-
tion
table,
of
the
furnace
installation
instructions.
2.
After
unpacking
the
roof
jack,
check
the
rain
caps.
Insure
they
are
not
damaged,
tilted
or
crooked.
Do
not
twist,
crush
or
sit
on
the
roof
caps
during
installation.
Damaged
roof
caps
will
cause
improper
furnace
operation.
The
furnace
will
not
heat
properly
and
could
result
in
explosion.
3.
Before
inserting
the
roof
jack
into
the
furnace
top,
inspect
the
fur-
nace
flue
and
combustion
air
opening
for
debris
or
insulation
which
might
have
fallen
in
during
pre-installation
steps.
Do
not
pro-
ceed
unless
all
debris
has
been
cleaned
out
or
removed.
4.
After
installing
roof
jack
on
furnace
top
collar,
check
to
make
sure
there
is
no
gap
in
back
or
side
between
the
pipe
collar
and
the
fur-
nace
casing
top.
5.
Use
only
the
pipes
provided
with
the
roof
jack
assembly.
Do
not
add
to
or
adapt
other
sheet
metal
pipes.
Do
not
cut,
insert
or
add
other
pipes
to
this
assembly.
6.
Inno
case
should
there
be
a
gap
between
sections
of
the
flue
pipe
or
the
combustion
air
pipe.
NEW
HOME
INSTALLATION
If
this
furnace
is
installed
in
a
new
home
do
the
following:
1.
Inspect
the
furnace
top
collars
for
signs
of
insulation
or
ceiling
debris
which
might
have
fallen
in
during
cutting
of
the
ceiling
and
roof
holes.
Remove
ail
debris
before
continuing.
2.
After
unpacking
the
roof
jack,
check
the
rain
caps.
Insure
they
are
not
damaged,
tilted
or
crooked.
Do
not
twist,
crush
or
sit
on
the
roof
caps
during
installation.
Damaged
roof
caps
will
cause
improper
furnace
operation.
The
furnace
will
not
heat
properly
and
could
result
in
explosion.
3.
Before
inserting
the
vent
pipe
into
the
furnace
top,
inspect
the
fur-
nace
flue
and
combustion
air
opening
for
debris
or
insulation
which
have
fallen
in
during
pre-installation
steps.
Do
not
proceed
unless
all
debris
have been
cleaned
out
or
removed.
4.
After
installing
roof
jack
on
furnace
top
collar,
check
to
make
sure
there
is
no
gap
in
back
or
side
between
the
pipe
collar
and
the
fur-
nace
casing
top.
INSTALLATION
IN
SNOW
REGIONS
When
the
combustion
air
pipe
inlet
is
covered
or
blocked
with
snow,
the
furnace
will
not
operate
properly
due
to
the
depleted
combustion
air
supply.
Therefore,
if
the
furnace
will
be
located
in
regions
where
snow
accumu-
lation
on
the
roof
exceeds
4" or
in
H.U.D.
Snow
Load
Zones,
a
roof
jack
extension
(Part
No.
7680B65471)
is
recommended.
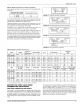
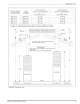
LOCATING
AND
CUTTING
ROOF JACK
OPENING
To
facilitate
the
proper
installation
of
the
roof
jack,
it
is
very
important
that
the
roof
jack
opening
in
the
ceiling
and
roof
be on
the
same
vertical
center
line
as
the
furnace
flue
collar.
See
Figure
21 or
22.
Mark
this
location
on
ceiling
and
scribe
a
circle
with
a
5"
radius
(10"
diameter)
around
this
mark.
Cut
opening
for
roof
jack
through
ceiling
and
roof.
(if
furnace
was
installed
during
construction,
cover
furnace
and
flue
opening
to
prevent
debris
from
entering
flue
when
hole
is
cut
for
roof
jack.)
INSTALLING
ROOF JACK
IN
THE
ROOF
(See
Figures
21
and
22
for
Dimensional
requirements.)
Insert
roof
jack
into
opening
in
the
roof.
The
roof
jack
should
be
secured
to
the
furnace
before
roof
flange
(flash-
ing)
is
secured
to
the
roof.
This
will
insure
a
better
alignment
of
the
flue
pipe
and
furnace
flue
collar.
Caulk
around
and
under
roof
flange
to
pro-
vide
a
water
tight
seal,
before
securing
roof
jack
flashing
to
roof.
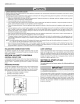
1.
Provide
protection
for
Vent
Connector
and
Air-Intake
Connector
from
damage
and
debris.
2.
Mark
Roof
Jack
center
line
on
ceiling.
Cut
a
5"
radius
(10"
diame-
ter)
hole
through
ceiling.
3.
|
Mark
Roof
Jack
center
line
on
roof.
Cut
oblong
hole
through
roof.
4.
Insert
Roof
Jack
through
roof
opening.
Do
not
secure
Roof
Jack
to
roof.
Connect
Roof
Jack
to
Furnace
1.
Verify
gasket
is
around
outside
of
Air-Intake
Connector.
install
new
gasket
if
missing
or
damaged.
2.
Pull
the
Roof
Jack's
telescoping
section
down
onto
furnace.
Fully
engage
Roof
Jack
onto
Vent
Connector
and
Air-Intake
Connector
and
compress
gasket.
See
Figure
24.
Refer
to
Interior
Roof
Jack
Extension
installation
instructions,
if
applicable.
3.
Align
holes
in
Roof
Jack
and
Air-Intake
Connector.
Secure
Roof
Jack
to
furnace
using
#10
x
1/2
-
1-1/2"
Type AB
or
Type
B
sheet
metal
screw.
Secure
Roof
Jack
to
Roof
1.
Apply
caulk
or
other
sealant
to
underside
of
Roof
Jack
flashing.
Locate
Roof
Jack
such
that
pipes
are
plumb.
Secure
Roof
Jack
flashing
with
nails,
screws
or
staples.
Install
roofing
material
over
Roof
Jack
flashing.
Seal
Roof
Jack
swivel
joint
with
Chemcaulk
900
Sealant.
Not
required
for
Roof
Jacks
with
fixed
slant
flashing.
Complete
Installation,
as
required
1.
Install
Exterior
Roof
Jack
Extension,
if
applicable.
Refer
to
installa-
tion
instructions
provided
with
Exterior
Roof
Jack
Extension.
Refer
to
Figure
23.
ak ON
14
Johnson
Controls
Unitary
Products