C Series Quick Start Guide Series Compact Industrial Printers “One Printer for your Entire Enterprise.” CognitiveTPG Headquarters 25 Tri-State International, Suite 200, Lincolnshire, IL 60069 Toll Free: 800-732-8950 Phone: 847-383-7900 Fax: 847-383-7949 www.CognitiveTPG.com Copyright 2009 CognitiveTPG. All Rights Reserved.
To Get Started: Unpack the Printer: Please refer to the User’s Guide on the CognitiveTPG Website for full details on setting up and using the C Series printer. Internet Users Go online to: http://www.CognitiveTPG.com and register your C-Series printer under “Warranty Registration.” Access and download the latest utility, drivers, and documentation. Non-Internet Users Call 800-732-8950, ext. 2474, to request a set-up CD-ROM. Remove the following contents from the Box: 1. The C Series Printer 2.
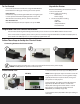
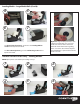
Loading Media -- Standard Size Rolls: NOTE: Before proceeding to Step 1, open the printer cover. Then follow Steps 2a or 2b depending on the media type being used. 1 2a Inward Wound Media 2b Outward Wound Media NOTE: Prior to loading media, take a moment to review media guides. They are spring loaded to provide improved media control during printing. The right media guide has a green locking tab which holds the guides in place.
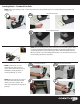
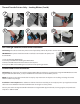
Loading Media -- Standard Size Rolls (Cont’d): 6 7 9 10 8 For thermal transfer printers, continue to the Loading Ribbon section of this Quick Start Guide. For direct thermal printers, go to the Self-Testing section of this Quick Start Guide. Loading Media -- Large Media Rolls: NOTE: Remove screws with a #2 Phillips screwdriver. Printer should be powered OFF before continuing. 1 2 3 NOTE: Prior to loading media, take a moment to review media guides.
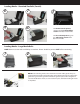
Loading Media -- Large Media Rolls (Cont’d): 4 5 6 7 For thermal transfer printers, continue to the Loading Ribbon section of this Quick Start Guide. For direct thermal printers, go to the Self-Testing section of this Quick Start Guide. Optional: CognitiveTPG provides 3” core adapters to work with all 3” core large media rolls. Please refer to the User’s Guide for more information regarding these accessories. Use of these adapters (P/N 470-064-01) is optional based on the media core size.
Thermal Transfer Printers Only -- Loading Ribbon (Cont’d): 7 8 9 10 11 12 Self-Testing & Software/Printer Driver Installation: Self-Testing: The self test checks the printer’s overall operability and lists th printer’s current settings. IMPORTANT! The printer should have media installed, be connected to AC power, and be turned ON. 1. Press and hold the FEED button. 2. Turn the printer ON while holding the FEED button. 3. Release the FEED button when the self test starts to print. 4.
Maintenance, General Tips, and Troubleshooting: Cleaning & Maintenance: 1. Open the print mechanism. Turn the printer off when cleaning the printhead. Make sure the printhead is completely dry before turning the printer back on. 2. Clean the printhead (A), platen (B), and the index sensors (C&D) with a soft, lint-free cloth saturated with 99 percent isopropyl alcohol or a certified cleaning pen. 3. Turn the printer on and press the FEED button to clean all sides of the roller.
Safety and Compliance: WARNING! Shock Hazard and Static Discharge: Never operate printer in a location where it can get wet. Personal injury could result. The discharge of electrostatic energy that accumulates on the surface of the human body or other surfaces can damage or destroy printhead or electronic components used in this device. DO NOT TOUCH printhead or electronic components under printhead carriage.