Advantage LX Desktop Label Printer USER GUIDE LXG-UG00000 Rev.
Copyright © 2012, CognitiveTPG CognitiveTPG™ is a trademark of CognitiveTPG, LLC. Microsoft® and Windows™ are trademarks of Microsoft Corporation. Other product and corporate names used in this document may be trademarks or registered trademarks of other companies, and are used only for explanation and to their owner’s benefit, without intent to infringe. All information in this document is subject to change without notice, and does not represent a commitment on the part of CognitiveTPG.
Table of Contents Chapter 1: Introduction........................................................................................4 Welcome.......................................................................................................4 Package Contents......................................................................................4 Operating Environment...........................................................................4 Printer Feature Overview...........................................
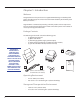
Chapter 1: Introduction Welcome Congratulations on the purchase of a CognitiveTPG Advantage LX desktop label printer. The Advantage LX carries on the well-known durability of the widely used Blaster printer line. CognitiveTPG is committed to providing a reliable product and user experience. This user guide provides information on how to install the printer and includes all necessary user support information.
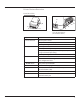
Printer Feature Overview Front/Rear View D D G H F A B Front View Component A - Power Indicator B - Ready Indicator C - Feed Button D - On/Off Switch E - Power Connector F - Serial Port G - Ethernet Port H - Parallel Port C E Rear View Serial, Parallel, Ethernet (4-inch Model Shown) Function Indicates power status ON – printer on and ready to print OFF- no power applied Indicates printer status GREEN – printer ready to accept data RED – printer error, empty media roll, or paused operation duri
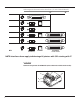
Advantage LX Communication Interfaces (2” and 4” Model Detail) 2” KEY DC SERIAL 9-PIN ETHERNET (DTE Device) 4” CENTRONICS Parallel 1284-B NOTE: Interfaces shown apply to Advantage LX printers with S/N’s starting with “L” Inside View Common Components for All Models (Direct Thermal and Thermal Transfer) D C A C B (TT Printer Shown) 6
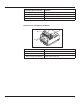
Component (DT & TT Models) A - Printhead B - Platen Roller C - Printhead Latches D - Media Guide & Spindle Function Printing mechanism Friction feed printing surface Latches for printhead mechanism Holds and guides label roll Components for Thermal Transfer Models E F G Component (TT Models) E - Ribbon Take-up Driver F - Ribbon Take-up Mount G - Ribbon Supply Core Mounts Function Ribbon take-up core mount and driver Flexible arm for ribbon take-up core mounting Holds ribbon supply roll 7
Chapter 2: Printer Installation Setting up the Advantage LX Printer Connecting the Interface and Power Cables IMPORTANT! PRIOR TO CONNECTING ANY INTERFACE CABLE AND POWER CABLE TO PRINTER, MAKE SURE PRINTER IS OFF. NOTE: The Advantage LX IS CONFIgured to use a standard null modem crossover serial cable when using the com/ser port to connect to a dte device such as a computer. POWER OFF 1. Make sure power switch is OFF 2. Connect power cable to AC adapter 3.
CAUTION! CAUTION: DO NOT TOUCH PRINTHEAD. ELECTROSTATIC DISCHARGE (ESD) FROM THE HUMAN BODY OR OTHER OBJECTS CAN DAMAGE PRINTHEAD. PLEASE USE STATICSAFE PROCEDURES WHEN WORKING WITH PRINTHEAD. PRINTHEAD MAY BE HOT AFTER PRINTING. ! 1. NOTE: USE ONLY COGNITIVETPG APPROVED MEDIA. FOR MORE INFORMATION ON COGNITIVETPG APPROVED SUPPLIES, CONTACT US AT 800-732-8950 or at cognitivetpg.com. Unpack and prepare outward wound or inward wound media for installation into printer. 2.
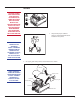
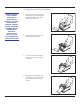
Loading Thermal Transfer Ribbon NOTE: this step is for thermal transfer (TT) Advantage LX printers. Use only CognitiveTPG approve thermal ribbon. For more information on CognitiveTPG approved supplies, call 800.732.8950 or visit our website cognitivetpg.com 10 1. Position ribbon in front of printer with supply core closest to printer and text on ribbon leader facing down. Raise dust cover. 2. Unlatch printhead and fully raise the printhead mechanism. 3.
Loading Thermal Transfer Ribbon (Continued) reminder: the text on the ribbon leader should be facing out and visible helpful tip: if power is already on, the Advantage LX will take up any excess ribbon upon latching the printhead 5. Gently lower the printhead but DO NOT LATCH printhead at this time. 6. Align the notch on the left side of the ribbon take-up core with the left ribbon take-up driver. 7. Gently pull the right ribbon takeup mount and insert the right side of the ribbon take-up core. 8.
NOTE: AFTER PRINTING A SELFTEST, PRINTER IS IN HEXIDECIMAL DUMP MODE. CYCLE PRINTER’S POWER TO RETURN TO NORMAL OPERATION. Self-Testing: 2 1 1. Press and hold the feed button while turning printer ON. 2. Release feed button when printing begins and printer will conduct a selftest and print a configuration label. ON OFF 3. 12 Power OFF printer to end hexadecimal dump mode. 4.
NOTE: installing cognitivetpg printer administrator will also load print drivers for cognitivetpg label printers. Cognitivetpg printer administrator utility is very useful for configuring, troubleshooting, and updating the Advantage LXprinter. NOTE: make sure you have administrative rights to your computer to download the utility and drivers.
CognitiveTPG Printer Administrator Utility Connection Settings Connecting Via Serial 1. Select Use Serial Connection radio dial 2. Select the Com Port to which the printer is connected 3. Select the printer’s Baud Rate setting 4. Click Connect. Note: for serial connection, THE Advantage LX DEFAULT BAUD RATE IS 9600. NOTE: WHEN PRINTER IS PROPERLY CONNECTED, COGNITIVETPG PRINTER ADMINISTRATOR WILL DISPLAY CONNECTED IN A GREEN BOX IN UPPER RIGHT CORNER.
Serial Connection Parameters • Baud Rate • XON/XOFF • Buffer Size • Buffer Overflow HELPFUL TIP: PRINT A SELF TEST TO DETERMINE PRINTER’S CURRENT SETTINGS. A SELF TEST CAN BE PERFORMED BY HOLDING THE FEED BUTTON WHILE TURNING PRINTER POWER ON. CONTINUE TO HOLD THE FEED BUTTON UNTIL SELF TEST PRINTS. Connecting Via Ethernet 1. Select the Use Network Connection radio dial 2.
No-Media Timeout The no media timeout value represents the number of inches of media fed through the printer without detecting an index mark prior to reporting an error. EXAMPLE: IF NO MEDIA TIMEOUT IS SET TO 12, THE PRINTER WILL CONTINUE TO FEED 12 INCHES OF MEDIA WITHOUT DETECTING AN INDEX MARK BEFORE REPORTING AN ERROR. Debug Report Level Specifies the method by which the printer reports error. Values: • None = Turns error reporting Off.
Media Adjust Adjusts print contrast on object leading edges for optimum print quality. Adjustment of this parameter is not normally required; refer to Cognitive Programming Language (CPL) Programmer’s Guide for more detail. Pitch The pitch represents the dots per inch (dpi) setting for the printer. Values: 100 or 200 for 200 dpi printers Darkness The Darkness value adjusts the print darkness. Darkness range: -200 to 800 NOTE: THE FACTORY DEFAULT FOR DARKNESS IS 0.
Auto Recalibration Check and Apply Enable Auto Recalibration and the printer will automatically attempt to recalibrate in the event an index mark is not detected. Auto Top Of Form Check and Apply Enable Automatic TOF and the printer will feed a label when the printer is turned ON or the printhead is latched. Indexing Indexing indicates to the printer the index type of the media being used. The Indexing On check box must be checked when using Bar, Gap, or Notch style indexing.
Top of Form Adjust Top of Form (TOF) sets the top of the label with relation to the print head. Increasing the TOF value moves the printed text down the label. Decrease the TOF setting to move the printed test up the label. This value is set at the factory and typically will not need to be changed. Shift Left Shift left moves the printed image left across the label. Fonts and Objects The Fonts and Objects tab lists the Fonts, Formats and Graphics currently stored in the printer.
Profile Management Manage the settings of the Advantage LX using the Profile Management section of CognitiveTPG Printer Administrator. Profile Management displays a list of the printer’s current variable settings. Obtaining Printers Current Profile 1. Select the Profile Management tab in CognitiveTPG Printer Administrator. 2. Click the Get Printer’s Current Profile button. Saving the Current Printer’s Profile 1. Select the Profile Management tab in CognitiveTPG Printer Administrator. 2.
Firmware Upgrade 1. Select the Firmware Upgrade tab. CAUTION! TURNING THE PRINTER OFF DURING FIRMWARE INSTALLATION COULD DAMAGE THE PRINTER. NOTE: If your computer is connected to the internet, use the “get latest firmware from cognitivetpg” button. This action will also load current fonts. Update will take a few minutes. 2. Click the Select Firmware File button. 3. Select the appropriate Firmware file and click Ok. 4. Click the Update Firmware button.
Script Editor Use the Script Editor in CognitiveTPG Printer Administrator to send programming language code to the printer. For more information on programming CPL please refer to the CPL Programmers guide located on the CognitiveTPG Web site www. CognitiveTPG.com. Sample Test Script in CPL: ! 0 100 195 1 VARIABLE WIDTH 200 TEXT 3 5 15 PRINTER TEST END For a simple printer test, type in the sample code shown above in the “Printer Input” window and click “Send to Printer” button.
Chapter 4: Cleaning and Maintenance IMPORTANT! DISCONNECT POWER PRIOR TO CLEANING THE Advantage LX. For optimal printhead performance CognitiveTPG recommends cleaning the interior components (printhead, platen roller, media sensor, peel bar (if installed), ribbon, and media paths) every 20,000 inches (508 m). The thermal printhead should be cleaned every 5,000 inches if pre-printed labels are used.
Chapter 5: Troubleshooting & Default Settings Use the chart below for troubleshooting your Advantage LX printer prior to contacting Technical Support. If you are unable to resolve the problem using the chart below, please contact our Technical Support.
The Advantage LX ships with the following default settings: Parameter Programming Language Speed Label Width Default Setting CPL - Cognitive Programming Language 3 ips (76 mm/sec) 2” Models: 220 (2.2” or 56 mm) 4” Models: 409 (4.09” or 104 mm) Label Length Measure label (automatically measures and sets label length at power up) Indexing Type Gap Reference Point 0,0 (upper left corner) Auto Top of Form On Enable Label Present Off Advance Label 75 (0.75” or 19 mm) Retract Label 75 (0.