
User`s guide

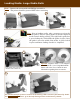


Connecting Power to the CRx Printer
Plug power supply to power source and a green LED will illuminate on the power supply.
Note: Do NOT power the printer on until instructed.
Proceed to the Printer Power Test section.
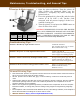
Setting Up: Connecting Power and Performing a Power Test
Printer Power Test
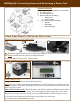
1. Press the Power Connector (D) to the ON position.
Note: The Power Light (A) on the top user interface cover will turn green to indicate the unit
is receiving power. The Ready Light (B) will first turn red, then auburn, then green once the
printer is ready to print.
CRx w/LCD Printers Only: The LCD display will briefly state Press Right Arrow for Menu
for about one second. Then the display will read Cognitive CXI for about one second. Once
the printer is ready to print the display will read COGNITIVE (see CXI Only figure above).
2. Press the Power Switch (D) to OFF before proceeding to the next steps.
Proceed to the Loading Media section.
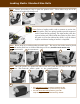
Unpack the Printer
Remove the following contents from the Box:
1. The CRx Printer
2. The Companion CD
3. Power Supply Kit including
!" Power Cord
!" Power Supply
4. The Accessory Box including
!" Spindle
!" USB Cable
!" Documentation
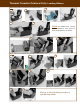
Follow these Steps To Set Up the CRx Printer:
1 2
3
1 2
&
CRx w/LCD only
4