CODIJY User Guide CODIJY 3.7.0 by CODIJY Register CODIJY……………………………………………………….…….………………………………….………...…………..……….........1 Interface Overview……………………………………………….….….…….…………………….…...………..……….............................3 Why my interface looks differently…………………….……...….…….……………………..……..…….…….……..…………..….4 Toolbars overview……………………………….……………….………….………….……...…………...…..…….…….……………….…...5 Enable Missing Toolbars & Dock Windows…………....……………….………..……….….….……………….….……...…..…….6 Reposition Toolbars..…………….…...
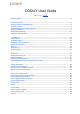
Register CODIJY To register CODIJY: 1. Copy/paste CODIJY a Serial Number into Registration dialog. NOTE: If you have to type it in, keep in mind that zerosand Osmay look alike; same applies to letters L,Iand 1. 2. Click Register. 3. Restart CODIJY. TIP:TheSerial Number is not accepted immediately . You may need to work in CODIJY for a minute or two, before the Trial watermarks disappear from the Result preview.
Option 1. Click theRegisterbutton on the toolbar Option 2. Go to A bout-> Register Option 3. Click C ODIJY logoon the toolbar to call theAboutdialog. Then click theKeyicon in its bottom right corner. 2 © CODIJY 2019.
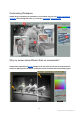
Interface CODIJY interface offers a convenient workspace for easy manipulation of photo colors. All the tools and features are at hand. You can switch between Editor, Result and Split Viewsusing Tabs (5) at the bottom of the Work Area(1) Editor -the canvas displaying a B&W image, where you are supposed to draw color masks. Result- preview of the colorized image, generated while image processing. When the program switched to Result, it disables editing tools.
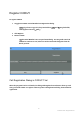
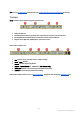
Customizing Workspace CODIJY lets you organize your workspace in a convenient way. You can disable unnecessary elements, and rearrange the other e.g. m ake float , reposition ,h ide under tabs Why my screen looks different than on screenshots? CODIJY offers 8 predefined layoutsdesigned to fit most critical tools onto screens with lower resolution. When you install CODIJY, it identifies screen resolution and sets matching layout. 4 © CODIJY 2019.
TIP: You can change layoutin Preferences or enable missing toolbars and dialogsmanually. Toolbars Toolstoolbar hosts main drawing and repaint tools. 1. 2. 3. 4. Arm Tool & Zoom Drawing Tools: Pen Tool, Gradient Pen, Color Protect Pen, De-color Pen, Eraser. Drawing Modes: Freehand & Line work with all Pen tools and Eraser Repaint Tools: Repaint, HSB Repaint, Color Picker Tool Other major toolbars are: 1. 2. 3. 4. 5. 6.
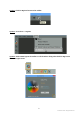
Enable Missing Toolbars & Dock Windows You can enable disabled toolbars and Dock Windows, from the Context or Main Menus. Option 1. Right click(Win) / Cmd + Click(Mac) over empty toolbar area to call Context Menu. Option 2.Go to View-> T oolbars (Dock Windows) 6 © CODIJY 2019.
Reposition Toolbars You can change position of the toolbars by dragging and dropping them over new position. Same applies to dock windows. Step 1. Click the toolbar handle and drag it over the work area. Step 2. Move it to a new position on the toolbar area (at the top) Step 3. Once the frame, displaying potential position, shows up, release the mouse. The toolbar will snap to it. NOTE: If you drop the toolbar, before the frame shows up, the toolbar will remain floating over the working area.
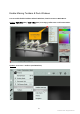
Dock Windows Dock windows area hosts (A) Color Libraries(B) History, (C) Undo Stack, (D) Navigator , (E) Gradient Settings, (F) Color PickerNOTE: the order of dock windows may vary. To fit a single column, the Dock Windows are hidden under the tabs . 8 © CODIJY 2019.
Reposition Dock Windows To change the order of the dock windows: Step 1. Click Window header Step 2. Drag the window over the w indow area , until the black frame shows up. Step 3. Release the mouse button. The window will snap to its new position. Alternatively, drop it over the working area to keep it at hand. 9 © CODIJY 2019.
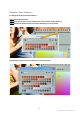
Color Picker Pick colors (a) using palette, (b) channel by channel, (c) by typing in HEX values. Color Picker works with Pen Tool and Color Picker Tool. Add selected color to the Library. 10 © CODIJY 2019.
Disable Auto-Accept Colors By default, the colors you pick get accepted automatically. When you disable auto-accepting colors, the Color Picker dialog will display both previous and new color. To draw with the new color, you will need to click Accept Color button. You can disable Auto-Accept Color Mode in Preferences, under the Tools Tab. 11 © CODIJY 2019.
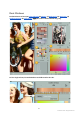
Color Libraries Color Libraries window offers access to ready color sets on 100 popular topics. It lets: (A) select libraries from the drop down list, (B) open selected library to the floating window , (C) (Pro Edition Only) create / rename / export / import libraries. TIP: You can add colors to libraryfrom Color Picker, add gradientsfrom Gradient Settings, export Color Historyto library. 12 © CODIJY 2019.
Gradients Settings Gradient Settings lets edit gradient masksby moving, adding or deletingmarkers and editing their colors. Gradient Settings work with Gradient Pen tool. Gradient Settings dialog gives access to: (A) Apply Gradients command (use it, after you draw or edit a gradient mask) (B) (Pro Edition Only)show/hideGradient Capture Dialog, (C) (Pro Edition Only) add gradient to a library.
Edit Colors in Gradients (A) Click a marker to call Color Picker dialog (B) Pick new color 14 © CODIJY 2019.
History CODIJY records all used colors and gradients, to the documentHistory. History window displays colors & gradients in the order you added them and lets: (A) switch between browsing colors/gradients/ both. (B) (Pro Edition Only) export History to a new library. TIP: You can also removecolors from from History by calling a Context Menu over the color. Undo Stack Undo Stack lets you navigate past actions with ease. You can go back and forth, skipping multiple steps. 15 © CODIJY 2019.
Navigator Navigator enables you to (a) zoom, (b) navigate the image, (c) switch between Editor and Result, (d) enable/disable Scale Synchronizationbetween views. Preferences Preferences contain settings related to language, interface, tools, processing quality etc. To call Preferences dialog: Option1. Press Ctrl+K (Win) /Cmd + K (Mac) Option 2. Go T ools-> Preferences Option 3. Click P referencesbutton on the toolbar 16 © CODIJY 2019.
Layouts To make all critical elements fit onto screens with lower resolution, CODIJY offers 8 predefined layouts. NOTE: Location of toolbars and dock windows in each layout may vary. Some interface elements may be disabled to make the work area fit your screen. You can change the layout as described below or choose to enable missing elements manually. To change a layout, open Preferencesand open Tools tab. Step 1. Select a new layout under Predefined Layouts Step 2.
Enable Main Menu Some interface layouts may have disabled main menu. You can enable Main Menu in Preferences, under the GUItab. Step 1. Tick S how Main Menubox. Step 2. Click OK 18 © CODIJY 2019.
Adjust Interface Brightness CODIJY interface is best viewed in two color schemes - the bright and the dark one. You can adjust skin brightness to the comfortable level in Preferences, under the GUI Tab. 1. Use UI gammascroller. 2. Click OK Enable/Disable Scale Synchronization Between Views When you disable Sync Scale between views, you will be able to zoom and move the pictures in each view independently. 19 © CODIJY 2019.
Supported Formats CODIJY supports its proprietary file formats (MGD, CML, CMSK ), as well most popular image formats. 27MGD - is the file format of CODIJY documents. When you save your work to MGD, the file will store the image, strokes/masks, color History and document information. MGD files are cross-platform and can be opened by CODIJY across all supported platforms. CML is the format of CODIJY Color Libraries. CMSK serves storing the CODIJY Pro strokes (masks).
Open Document or Image CODIJY lets you open CODIJY document(*mgd file) or an image saved to one of the supported file formatse.g. PNG, JPG or TIFF Option 1.Press Ctrl+O (Windows) / Command +O (Mac) Option 2. Go to File -> O pen Document or Image Option 3. Click the O pen Document or Image b utton on toolbar You can open new and recent files and examples using Project Explorer ( View ->Project Explorer). 21 © CODIJY 2019.
Save your work as CODIJY document If you want to save your work in progress or the source file, save it to CODIJY document (*mdg). Option 1. Go to File -> S ave Document Option 2. Use S ave Documentbutton on the toolbar Export Preview of Result to the Image After you generated the result preview, you can export it to supported image formats. Option 1. Go to F ile-> E xport Image Option 2. 1. Click S ave Documentbutton 2. Hold mouse button down for 2-4 seconds, 3.
How to draw color strokes (masks) Most of colorization is done with solid colors. Use Pen Tool (P) to draw color strokes (masks) over different photo areas. Pick colors from Color Librariesor using Color Picker. NOTE: CODIJY automatically detects borders between objects, once you provide colors for all neighbouring areas. Enable Pen Tool(P). Start with ready colors. Select a Color Libraryfrom the drop down list. 23 © CODIJY 2019.
Pick a color and draw a stroke within an area, close to the border. By default, you will be drawing in Freehand Mode(F). When the area has a regular shape, switch toLineD rawing(L). Line masks are faster to draw. Space bar will cut off lines in Line mode, while Escape button will delete the previous line, when you hold the mouse button down. Long-press Space bar to switch between Line and Freehand mode, without releasing the mouse button. 24 © CODIJY 2019.
To change brush size, useBrush Sizetool on the toolbar or call Context Menu over the mask . You can access previously used colors in the History. NOTE: you can enable History, if its disabled in your layout. 25 © CODIJY 2019.
Process the image( Ctrl + R (Win) / Cmd + R (Mac)), when you are done or want to preview result. How to edit colors of strokes (masks) If you want to change the mask color, you can adjust it Hue/Saturation/Brightness. Step1. Enable HSB Repaint Tool (press (H or click the button with a “paint roller” on the toolbar). 26 © CODIJY 2019.
Step 2. Click the mask. The HSB dialog will pop up. Step 3. Adjust Hue/Saturation/Brightness parameters using handles or digital values. The mask color will change in real time. Process image (Ctrl+R / Command+R) to preview result. Alternatively, use Color Picker tooland Repaint Busket. 27 © CODIJY 2019.
How to Draw Gradient Strokes Gradient masks let you add multiple colors and their transitions with a single stroke. Use the Gradient Pen tool (G) to draw gradient strokes. Gradient Pen draw gradients from Gradient Settings. Used Gradients are saved to History . To draw a gradient mask: 28 © CODIJY 2019.
Step 1. Select Gradient Pen tool on toolbar. Step 2. Compose, captureor select a previously-used gradient(as in example). NOTE: We use gradient mask saved to the History of the example file. Step 3. Draw gradient mask trying to match colors of the gradients with the areas you mean its colors to get applied to. Step 4. Apply Gradient after you draw mask complete with the mask. Press (B) or click A pply Gradientbutton in Gradient settings.
Capture Gradients from Color Images Gradient Capture tool lets capture gradients from color images. NOTE: This tool is available in Pro Edition. Step 1. Click the S how/Hide Gradient Capture Dialogbutton in Gradients Settings. Step 2. Click O pen Imageand select the color image. 30 © CODIJY 2019.
Step 3. Click the to set the pin onto the pixel with the color that should be added to gradient. Step 4. Complete a gradient with a few more pins. Independent colors and gradient can be previewed on the right. 31 © CODIJY 2019.
Delete PinsIf you wish to delete color, switch to Delete Pin (2) and click the pin. Edit GradientIf you want to visually edit a gradient color, switch to Move PIns tool (3) and reposition one of the pins over to pin the new color. 32 © CODIJY 2019.
When you are done, click the G radient Capturebutton or press (Ctrl+G / Cmd + G). New gradient will show up in G radient Settings . Apply Captured Gradient After you captured a gradient, draw gradient mask following the route, in which you have set pins, while capturing the gradient. Apply Gradient (B) in Gradient Settings. 33 © CODIJY 2019.
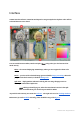
How to protect original colors In some cases you may want to protect original photo colors, e.g. when you want to keep the color of some objects intact while CODIJY will process the image. TIP: To protect colors cover the area with protection mask completely. How to de-color areas You may want to convert some areas e.g. white clothes, silver or iron parts, to black and white. UseDe-color pen (D)to draw de-coloring masks over such objects. 34 © CODIJY 2019.
Masks Strokes you sketch in CODIJY are also referred to as masks. Masks appear in two modes: (a) Normal and (b) Transparent Overlay Mask. When you save you work to MGD file, the masks get saved along. You can repaint colormasks and edit gradientmasks. In Professional Edition, you can export masks to CMSK file and import them for another image using the toolbar buttons or from the Filemenu. TIP : Export/import saves time when you colorize similar images e.g. movie screens.
Option 2. Go to Processing-> Process Image Option 3. Click the Process Imagebutton. Wait a few moment, until CODIJY generates preview. The processing speed will depend on the size of the image. TIP: You can adjust processing quality under Settings in Preferences 36 © CODIJY 2019.
After preview is generated, CODIJY will switch to the Result view. TIP: To view Editor side-by- side with Result, switch to Split view. 37 © CODIJY 2019.
Partial Processing In case the image is large or your want to speed up image processing process the part of the image you work upon. YOu can select the part to process in the Partial Processingdialog. To open it: Option 1. Press Alt + R Option 2. Go toProcessing-> Partial Image Processing Option 3. Click the Partial Image Processingbutton. Step 1. In the Partial Processing dialog, select the area to process using handles on the sides or the Selection box. 38 © CODIJY 2019.
Step 2. Click and drag the selection box over the area. Step 3. Click P rocessing. CODIJY will generate the preview of the selected area. 39 © CODIJY 2019.
Instant Preview Mode NOTE: Instant Preview Mode is available in Pro Edition. CODIJY Pro enables you to preview colorization result in real time. To enable Instant Preview Mode Step 1. Call Partial Processing Dialog Step 2. Select area to process with the help of the handles of the selection box. Smaller area will ensure faster output. 40 © CODIJY 2019.
Step 3. 1. Tick Instant Preview b ox in the bottom left corner 2. Click Instant Previewbutton. When the Instant Preview mode gets enabled, CODIJY will generate result each time you add or modify a mask. For your convenience, when you enable Instant Preview, CODIJY switches to Split Viewdisplaying the Editor and the Result side by side. TIP: The tiny progress bar will appear over the partial processing icon, while processing is in progress. 41 © CODIJY 2019.
Have Questions? Please contact CODIJY team at support@codijy.comWe offer 24/7 unlimited email support to CODIJY users. 42 © CODIJY 2019.