P remium Leisure Prod ucts Owner’s Manual C
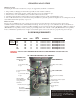
Table Of Contents Page i Introduction Important Safety Instructions 1-2 Choosing A Location 2-3 Power Requirements 3-7 Start-Up Instructions 8-10 Programming filtration Cycles 11 Error Identification 11 Troubleshooting 12-13 Spa Care and Maintenance 14-15 Water Quality and Maintenance 16-19 Spa Care and Maintenance Record 20 Wiring Diagrams Cs6200 & CS6230 21-22 Warranty 23 Warranty Card 24 P remium Leisure Prod ucts P R E M I U M LEISURE PRODUCTS 13055 49th St. N.
Introduction Please take time to read this manual before you install and operate your spa. This manual will acquaint you with the operating features, installation procedures, maintenance requirements, and safety procedures needed to ensure an enjoyable experience right from the start. The Manufacturer has tried to anticipate all of your needs and desires; however, if you need any additional information, feel free to call your authorized dealer.
IMPORTANT SAFETY INSTRUCTIONS When installing your spa and using this equipment, basic safety precautions should always be followed and include the following: ! ! READ AND FOLLOW ALL INSTRUCTIONS! The following instructions are required by UL 1563 standards. These instructions contain important safety information we that strongly urge you to read and apply. DANGER - TO REDUCE THE RISK OF INJURY: Do not permit children to use spa unless they are closely supervised at all times.
IMPORTANT SAFETY INSTRUCTIONS ! FOR SPAS EQUIPPED WITH AUDIO COMPONENTS: CAUTION - Risk of electrical shock. Do not leave compartment door open. CAUTION - Risk of electrical shock. Replace components only with identical components. Do not operate the audio controls while inside the spa. WARNING - Prevent Electrocution. Do not connect auxiliary components (for example cable, additional speakers, headphones, etc.) to the system.
CHOOSING A LOCATION Outdoor Location In selecting the ideal outdoor location for your spa, we suggest that you take into consideration: 1. The proximity to changing area and shelter (especially in colder weather conditions). 2. The pathway to and from the spa (free of debris, dirt, leaves as not to be tracked into spa). 3. The closeness to trees and shrubbery (leaves and birds could create extra work). 4.
MODEL 510 (see wiring diagram page 21) Model 510, as it comes from the factory is designed for 120 Volts, 20 Amp Circuit. The spa is also convertible to a 240 Volt, 40 Amp System. The circuit must have a neutral wire and ground wire when converting the spa wiring to 240 Volts, 40 Amp using a minium AWG 6/3 wires with ground (see page 3). The wiring must be connected to a grounded type G.F.C.I. (Ground fault circuit interrupter) electrical service with copper conductor.
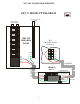
240 VOLT POWER REQUIREMENTS G.F.C.I. HOOK-UP DIAGRAM NEUTRAL/GROUND BAR INPUTS FROM TRANSFORMER HOT B OFF ON OFF ON ON OFF OFF ON OFF ON CIRCUIT BREAKER PANEL SPA 120V/240V LOAD See Page 6 L2 Red N Neutral ON OFF WHT Ground HOT BLK L1 Black GRN GROUND HOT RED CONDUIT CONDUIT HOT A SIEMENS G.F.C.I.
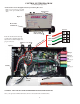
CONTROL SYSTEM DIAGRAM (see wiring diagrams pages 21-22) CS6230/CS6200 Control Equipment Pack System Wiring Directions Remove 2 screws from cover panel figure 1 and open carefully and set Panel Screws aside. Figure 1 Heater Tube and Element Conector Heater Light Indicator Light Red Route the electrical wires through conduit of the equipment pack and attach wires as shown in figure 2 to proper connectors.
ELECTRICAL WIRING INSTRUCTIONS IMPORTANT NOTICE: The electrical wiring of this spa must meet the requirements of the National Electrical Code (NEC) and any applicable state or local codes. The electrical circuit must be installed by a qualified electrician and approved by a local building/electrical inspection authority. 1. This spa must be permanently connected (hard-wired) to the power supply. No plug-in connections or extension cords are to be used in conjunction with the operation of this spa.
START-UP INSTRUCTIONS FILLING THE SPA Clear all debris from inside the spa. At the factory your spa shell was cleaned and polished but you may want to treat it with a specially formulated spa cleaner available from your dealer prior to filling it for the first time. Make sure the spa has been installed correctly, including electrical wiring connections as specified in the wiring diagram, and that the spa is level. Do Not Over Fill.
START-UP INSTRUCTIONS Safety Check Open the cabinet access door panel and check all pump unions to make sure they are hand tight. Loosening can occur during shipping and handling. Check Shut-Off Valves and insure both are open fully, otherwise your pumps will not function. Turn on Power Turn on power to spa at the circuit breaker box. The heater and pump 1 (low speed) will automatically activate.
START-UP INSTRUCTIONS Blower Key (if equipped). Press this key to turn blower on. A second press will turn blower off. Blower will run for 20 minutes once you press the blower key unless you turn it off by pressing the blower key a second time. Blower can be used to cool the spa. Light Key: Press this key to turn the light on. A Second press will turn the Light off. The light will automatically shut off after 2 hours. The Light icon will appear while the light is on.
PROGRAMMING FILTRATION You may choose to filter the spa 1, 2, or 3 times per day as required to keep the water clean and sanitary. Duration and frequency of a filtration cycle is user programmable. FC - Filtration Cycle. To set frequency press and hold Jets 1 Key for 5 seconds. Use the Temperature Keys to set FC frequency (1, 2, or 3 times a day). To save the data press the Jets 1 Key within 5 seconds after adjustment.
TROUBLESHOOTING Nothing Operates Main Breaker is Off - Set to On. Sub-Panel Breaker Off - Set to On. Equipment GFCI Off - Set to On. Power switch in Off position - Set to On Over or High Temperature Protection On - Refer to Error Identification (High Temperature) System Fuse Indicator Illuminated Replace system fuse If power to electrical pack is OK (check L1 & L2 power using power test switch) - Replace circuit board or pack No, Low Or Surging Water Flow Air Lock in Plumbing System - “Bleed” the system.
TROUBLESHOOTING No Heat Temperature Not Set Correctly - Adjust Set Point. Over temperature error.- Off - On power to reset. Current Limiting Jumper Is On - LC System (jumper 1 on CB is in right side pos on board.) Will not heat if High Speed or Blower is on. Contact manufacturer. No Power - Reset breaker at service panel. Low Water Flow - Clean or Replace filters(s). Pressure switch is open - Replace pressure switch with correct setting 1.75 psi. Low Water level - Add water to spa.
SPA CARE AND MAINTENANCE Draining Your Spa Remove screws from cabinet panel door and set aside as shown below. ! ! ! ! ! ! Turn power off Select a safe suitable drainage area capable of safely assimilating 300 plus gallons of water, which may contain both unsanitary contaminants and chemical residue that could cause harm to plants or grass. Twist the drain fitting counter clockwise to open valve, and pull outward to open completly. Remove cap and connect garden hose and drain.
SPA CARE AND MAINTENANCE Care Of Spa Cover To clean and condition the vinyl cover: ! Remove the cover from the spa and gently lean it up against a wall or fence. ! Using a garden hose, spray the cover to loosen and rinse away any dirt or debris. ! Using a sponge and/or a soft bristle brush, and using a very mild soap solution (one teaspoon dishwashing liquid with two gallons of water), or baking soda (sodium bicarbonate), scrub the vinyl top in a circular motion.
WATER QUALITY AND MAINTENANCE Your Water In Your Spa The quality of your water in your spa is important to keeping it clean. Your dealer can guide you through the process of achieving and maintaining perfect water in your spa in your given local conditions. Your program will vary depending on your water’s mineral content, and how often you use your spa, and the amount of people using it. Here are our suggested step-by-step procedures: General Information - The three fundamental areas of water maintenance.
WATER QUALITY AND MAINTENANCE Balancing Total Alkalinity (TA) ! ! ! ! ! ! The recommended Total Alkalinity (TA) for your spa water is 125-150 ppm. Total Alkalinity is measure of the total levels of carbonates, bicarbonates, hydroxides, and other alkaline substances in the water. TA is referred to as the water’s “pH buffer”. It’s a measure of the ability of the water to resist changes in pH level. If the TA is too low, the pH level will fluctuate widely from high to low.
WATER QUALITY AND MAINTENANCE Maintaining Sanitizer Level ! ! Sanitizer is extremely important for killing algae, bacteria and viruses, and preventing unwanted organisms from growing in the spa. At the same time, you don’t want too high a sanitizer level, or it can irritate your skin, lungs, and eyes. Always maintain the sanitizer level in your spa at the recommended level for each type of sanitizer. Ozone The Ozonation System in your spa drastically reduces the need for chemicals in the water.
WATER QUALITY AND MAINTENANCE Reagent: A chemical material in liquid, powder, or tablet form for use in chemical testing. Sanitizer: Sanitizers are added and maintained at recommended residuals to protect bathers against pathogenic organisms which can cause disease and infection in spa water. Scale: Rough calcium-bearing deposits that can coat spa surfaces, heaters, plumbing lines, and clog filters. Generally, scalling is caused by mineral content combined with high pH.
& Cl ea nS Notes: 20 Se rv ice Sp pa ra yC lea no rS Re oa pla kF ce ilt Fi er lte El r em W El en em int t er en iz e t Sp a Cl ea n& Co nd iti Cl on ea nC Vi ny ab lC in ov et er Dr ain Da te SPA CARE AND MAINTENANCE RECORD
CS6200 ELECTRICAL DIAGRAM 21
CS6230 ELECTRICAL DIAGRAM 22
W A R R A N T Y This warranty applies to all 10 series spas sold on or after June 1, 2005. Shell Structural Warranty - Lifetime Hydro Spa warrants the 10 Series spa shell structure against the loss of water through the fiberglass laminate of the shell caused by defects in materials and workmanship for as long as the original purchaser owns the spa.
WAR RAN TY CAR D Cut out and mail in! IMPORTANT WARRANTY INFORMATION The Warranty Card Must Be Filled Out Completely and Mailed Within Ten (30) Days of Purchase To Validate Warranty. remium P Leisure Prod ucts PLEASE PRINT CITY: STATE: DATE OF PURCHASE: ) (8 Digit Number) SPA SERIAL NO.: CUSTOMER NAME: STORE PURCHASED FROM ADDRESS: PHONE NUMBER: ( MODEL: By signing this warranty card you have read & understand the owners manual in its entirety.
P remium Leisure Prod ucts Owner’s Manual P R E M I U M LEISURE PRODUCTS 13055 49th St. N. Clearwater, Florida 33762 (727) 573-9611 P remium Leisure Prod ucts 13055 49th St. N.