Remote Vehicle Control System SRT 9000 Owner's Manual Deluxe Vehicle Security and Remote Start System with 900Mhz Two Way Confirming OLED Remote Control IMPORTANT NOTE: The operation of the Security and Convenience System as described in this manual is applicable to most vehicles. However, due to the configuration of some vehicles, some functions AND/OR SAFETY PRECAUTIONS may not apply. Please see your installing dealer for more information.
Table of Contents 2-Way Transmitter Main Display Screen ........................................................................................ 4 2-way transmitter button descriptions and locations Charging the Battery ....................................................................................................................... 5 2-way transmitter main display page Vehicle Menu Option on the 2-Way Transmitter ..........................................................................
Table of Contents, continued Using Your Remote Control, continued ..................................................................................... 15 Activating optional AUX 1* Activating optional AUX 2* Activating optional AUX 3* Activating optional AUX 4* Using the progressive car finder feature Using the personal protection alarm Using Valet Mode ..........................................................................................................................
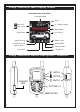
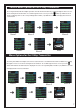
2-Way Transmitter Main Display Screen OLED MAIN DISPLAY SCREEN Transmitter Name Timer Door Lock In Range Indicator Door Unlock Alarm Status Temperature Car Jacking Engine Running Battery Level Count Down Timer Parking Timer Melody Mode Timer Start Vibration Mode Alert Alarm 2-Way Transmitter Button Descriptions / Locations SWITCH BUTTON CHARGING PORT SWITCH BUTTONS 1 -4 RESET BUTTON 4
Charging the Battery Your 2-way transmitter is powered by a built-in 3.7V lithium polymer battery. When the screen displays low battery or the icon is flashing it is time to recharge your remote transmitter. Charge the transmitter battery using the supplied plug-in home charger. While the battery of the transmitter is being charged you can push the “ ” side button to check it’s charging status. When the screen displays “BATTERY FULL” unplug the charger.
2-Way Transmitter Main Display Page, continued When the remote start “ ” icon is flashing press the “ ” icon button to display the remote start status. When the count down timer “ ” icon is flashing press the “ ” icon button to display the count down timer. Use buttons numbered 1-4 to start, stop or exit the countdown timer mode.
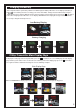
Vehicle Menu Options on the 2-Way Transmitter The 2-way transmitter allows multiple operations from the main four buttons by scrolling through the menu screens and selecting the desired function. To scroll through the menu screens press the “ ” switch up until the desired function is displayed. Press the corresponding button number (1-4) within five seconds as displayed to the left of each function.
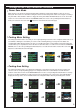
Settings for the 2-Way Transmitter Button Beeps The 2-way transmitter buttons will respond with a short “beep” sound when pressed. To turn this feature on or off scroll to menu 1 and select BUTTON BEEPS, then use the corresponding transmitter buttons to make your selections. Press the side “ ” button in to exit and return to the main page.
Settings for the 2-Way Transmitter, continued Power Save Mode While in power save mode the 2-way transmitter will not attempt to communicate with the vehicle to conserve battery life. This feature is useful when leaving the vehicle for extended periods of time or if using the secondary 1 way transmitter. Note that if the alarm is to trigger the 2-way transmitter will NOT indicate the event.
Settings for the 2-Way Transmitter, continued Lighting for 2-Way Transmitter This setting adjusts the amount of time the 2-way transmitter’s display will remain active without activity. To adjust the amount of time the display stays active scroll to menu 2 and select LIGHTING FOR OLED, then use the corresponding transmitter buttons to make your selections. Press the side “ main page.
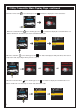
Settings for the 2-Way Transmitter, continued Count Down Timer The 2-way transmitter is equipped with a count down timer that will sound an alert once the time reaches 0:00. To adjust the count down time, scroll to menu 3 and select COUNT DOWN TIMER, then use the corresponding transmitter buttons to make your selections. Daily Start Timer To adjust the daily start time scroll to menu 3 and select DAILY START TIMER, then use the corresponding transmitter buttons to make your selections.
Settings for the 2-Way Transmitter, continued Name of Channel Setting The 2-way transmitter’s AUX output names can be modified to reflect the accessory in which it controls, such as window automation or garage door control. To edit the AUX output name, scroll to menu 5, then use the corresponding transmitter buttons to make your selections.
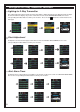
Using Your Remote Control Arming the Security System To arm the system, exit the vehicle, close all doors, then press the LOCK button on the remote control. The system will sound 1 time and the parking lights will flash 1 time, indicating the system is armed, has locked the doors (if equipped and connected) and activated the starter disable feature. The status indicator (blue warning light on the dash) will blink steadily, once per second.
Using Your Remote Control, continued Disarming the Security System To disarm the system press the UNLOCK button. The system will sound and the parking lights will flash 2 times, and the doors will unlock (if equipped and connected). To disarm the system silently, press and hold the UNLOCK button for 2 seconds. The parking lights will flash, indicating the system is disarmed and has unlocked the doors (if equipped and connected).
Using Your Remote Control, continued Activating Optional AUX 1 (Optional) If this feature is enabled on your system, scroll to vehicle menu 3 and press the AUX 1 button OR simultaneously press and release the LOCK and TRUNK buttons on the remote control to activate an optional feature. This feature can be programmed for a wide range of functions like power window or sunroof automation, please consult your installing dealer to determine functionality of your system.
Using Valet Mode Using Valet Mode To engage valet mode: 1. Turn the ignition key to the ON position. 2. Press and hold the emergency override button. 3. The blue dashboard mounted LED will light solid indicating that the system is in valet mode. When valet mode is activated the dash mounted status LED will light solid, and all security functions will be disabled. To disengage valet mode: 1. Turn the ignition key to the ON position. 2. Press and hold the emergency override button. 3.
Using Your Remote Vehicle Starter, continued Preheating or Precooling the Vehicle’s interior Before exiting the vehicle, set the temperature controls to the desired setting and operation. After the system starts the vehicle, the heater or air conditioning will activate and heat or cool the vehicle’s interior to your setting.
Using Your Remote Vehicle Starter, continued Operating the Daily Start Timer The system has the ability to start your vehicle based on a preset time entered into the 2-way transmitter. Prior to activating this feature it will be necessary to enter the desired start time, refer to Daily Start Timer on page 11. The daily start timer will only start the vehicle once per activation. When you have finished using the vehicle for the day, follow the steps below to active the daily start timer. 1.
Additional System Features Page Call Out From within the vehicle, press and hold the emergency override button for 4 seconds, the 2-way remote control will emit a beep and the vehicle call page will be displayed to indicate that someone is calling you to the vehicle. Check Vehicle Status To check the vehicle status, scroll to vehicle menu 4 and select STATUS CHECK.
Anti Hi-Jack Mode Anti Hi-Jack Active Anti Hi-Jack When Active Anti Hi-Jack is selected it must be activated by the transmitter each time it is needed. 1. While the ignition is ON, scroll to vehicle menu 1 and select CAR JACKING or press simultaneously press START and UNLOCK for 5 seconds. 2. If the vehicle’s door is opened and closed while the ignition is ON, anti hi-jack will be triggered. Passive Anti Hi-Jack When Passive Anti Hi-Jack is selected it is activated each time the ignition is turned on. 1.
Quick Reference Operation Guide, continued Remote control button operation.
Replacing Remote Control Batteries 1-way 5 Button Remote Control: The two 3 volt lithium batteries inside the remote control should last approximately 1 year under normal use. When the battery becomes weak you will notice the remote control range (the distance from the vehicle the remote control will work) deteriorate and the small LED on the remote control will dim. To replace the remote control batteries: 1. Using a small (#1) philips screwdriver, remove the screw from the back of the remote control. 2.
Emergency Override Procedure, continued Coded Override Procedure The system has an optional override mode that allows you to program a 2-digit personal code using the emergency override button offering a higher level of security. This feature must be enabled by your installing dealer, the default override code is 11. 1. Enter the vehicle (the security system will trigger). 2. Turn the ignition switch to the ON position. 3.
Code Systems, Inc. Limited Lifetime Warranty Code Systems Inc.
Code Systems, Inc. Customer Service 1-800-421-3209 WWW.CODE-ALARM.COM FCC COMPLIANCE This device complies with Part 15 of the FCC rules and with RSS-210 of Industry Canada. Operation is subject to the following two conditions: 1. This device may not cause harmful interference, and 2. This device must accept any interference received, including any interference that may cause undesired operation.