O9Head_68007024014_a.
O9Head_68007024014_a.book Page 3 Wednesday, June 9, 2010 5:36 PM m 1 2 3 4 ® ASTRO APX™ 7500 Series Digital Mobile Radios Quick Reference Card Product Safety and RF Exposure Compliance Before using this product, read the operating instructions for safe usage contained in the Product Safety and RF C a u t i o n Exposure booklet enclosed with your radio. ! ATTENTION! This radio is restricted to occupational use only to satisfy FCC RF energy exposure requirements.
O9Head_68007024014_a.book Page 4 Wednesday, June 9, 2010 5:36 PM Sending an Emergency Alarm 1 Press the Emergency button. A tone sounds and the display shows EMERGENCY and the current zone or channel. If silent emergency alarm is used with emergency call, pressing the PTT button exits the silent mode and initiates the emergency call. RECEIVED display follows. AND, Trunking Only: A high-pitched tone indicates that the alarm has been received by the trunked system’s central controller.
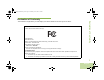
O9Head_68007024014_a.book Page i Wednesday, June 9, 2010 5:36 PM Declaration of Conformity DECLARATION OF CONFORMITY Per FCC CFR 47 Part 2 Section 2.1077(a) Responsible Party Name: Motorola, Inc. Address: 1301 East Algonquin Road, Schaumburg, IL 60196-1078, U.S.A. Phone Number: 1-800-927-2744 Declaration of Conformity This declaration is applicable to your radio only if your radio is labeled with the FCC logo shown below.
O9Head_68007024014_a.book Page ii Wednesday, June 9, 2010 5:36 PM Note: This equipment has been tested and found to comply with the limits for a Class B digital device, pursuant to part 15 of the FCC Rules. These limits are designed to provide reasonable protection against harmful interference in a residential installation.
O9Head_68007024014_a.book Page iii Wednesday, June 9, 2010 5:36 PM Contents Declaration of Conformity . . . . . . . . . . . . . . . . . .i What Your Dealer/System Administrator Can Tell You . . . . . . . . . . . . . . . . . . . . . . . . . . . . . . 3 Preparing Your Radio for Use . . . . . . . . . . . . . .3 Turning On the Radio . . . . . . . . . . . . . . . . . . . . . . . . 4 Important Safety Information . . . . . . . . . . . . . .ix Validating Compatibility During Power Up . . . . . . . .
O9Head_68007024014_a.book Page iv Wednesday, June 9, 2010 5:36 PM Using the Keypad . . . . . . . . . . . . . . . . . . . . . . . . . 12 Keypad Characters – Uppercase Mode . . . . . . . . . 12 Keypad Characters – Lowercase Mode . . . . . . . . . 13 Keypad Characters – Numeric Mode . . . . . . . . . . . 14 Keypad Characters – Hexadecimal Mode . . . . . . . 15 Push-To-Talk (PTT) Button . . . . . . . . . . . . . . . . . . 16 Identifying Status Indicators . . . . . . . . . . . . . .16 Status Icons . . . . . .
O9Head_68007024014_a.book Page v Wednesday, June 9, 2010 5:36 PM Using the Dynamic Regrouping Feature (Trunking Only) . . . . . . . . . . . . . . . . . . . . . . . . . . . .41 Contacts . . . . . . . . . . . . . . . . . . . . . . . . . . . . . . . . . 43 Making a Private Call from Contacts . . . . . . . . . . . .43 Adding a New Contact Entry . . . . . . . . . . . . . . . . . .44 Deleting a Contact Entry . . . . . . . . . . . . . . . . . . . . .46 Adding a Contact to a Call List . . . . . . . . . . . . . .
O9Head_68007024014_a.book Page vi Wednesday, June 9, 2010 5:36 PM Appending a Priority Status to a Text Message . . . 68 Removing a Priority Status from a Text Message . 69 Appending a Request Reply to a Text Message . . 69 Removing a Request Reply from a Text Message . . . . . . . . . . . . . . . . . . . . . . . . . . . . . . . . 69 Appending a Priority Status and a Reply Request to a Text Message . . . . . . . . . . . . . . . . . . . . . . . . .
O9Head_68007024014_a.book Page vii Wednesday, June 9, 2010 5:36 PM Viewing the Current Site . . . . . . . . . . . . . . . . . . . . 92 Changing the Current Site . . . . . . . . . . . . . . . . . . . 92 Using the Trunked Announcement . . . . . . . . . . . . .93 Initiating an Announcement . . . . . . . . . . . . . . . . . . 93 Utilities . . . . . . . . . . . . . . . . . . . . . . . . . . . . . . . . . . 94 Viewing the Recent Calls List . . . . . . . . . . . . . . . . .94 Selecting the Power Level . . . . .
O9Head_68007024014_a.book Page viii Wednesday, June 9, 2010 5:36 PM Accessories . . . . . . . . . . . . . . . . . . . . . . . . . . .112 Antennas . . . . . . . . . . . . . . . . . . . . . . . . . . . . . . . 112 Audio . . . . . . . . . . . . . . . . . . . . . . . . . . . . . . . . . . 113 Control Station . . . . . . . . . . . . . . . . . . . . . . . . . . . 114 Footswitches and PTTs . . . . . . . . . . . . . . . . . . . . 114 Direct Entry Keypad, Siren and URC . . . . . . . . . . 115 Microphones . . . . .
O9Head_68007024014_a.book Page ix Wednesday, June 9, 2010 5:36 PM Software Version Product Safety and RF Exposure Compliance All the features described in the following sections are supported by the radio's software version R04.00.00 or later. ! Caution Before using this product, read the operating instructions for safe usage contained in the Product Safety and RF Exposure booklet enclosed with your radio.
Computer Software Copyrights O9Head_68007024014_a.book Page x Wednesday, June 9, 2010 5:36 PM Computer Software Copyrights Documentation Copyrights The Motorola products described in this manual may include copyrighted Motorola computer programs stored in semiconductor memories or other media.
O9Head_68007024014_a.book Page 1 Wednesday, June 9, 2010 5:36 PM Getting Started How to Use This Guide . . . . . . . . . . . . . . . . . . . . . . . . . page 1 Notations Used in This Manual . . . . . . . . . . . . . . . . . . . page 1 Additional Performance Enhancement . . . . . . . . . . . . . page 2 What Your Dealer/System Administrator Can Tell You. . . . . . . . . . . . . . . . . . . . . . . . . . . . . . . .
O9Head_68007024014_a.book Page 2 Wednesday, June 9, 2010 5:36 PM The following special notations identify certain items: Example Description Home button Buttons and keys are shown in bold print or H or as an icon. Phone Menu entries are shown similar to the way they appear on the radio’s display. > This means “Press the right side of the 4-way Navigation button.
O9Head_68007024014_a.book Page 3 Wednesday, June 9, 2010 5:36 PM What Your Dealer/System Administrator Can Tell You You can also consult your dealer or system administrator about the following: • Is your radio preprogrammed with any preset conventional channels? • Which buttons have been preprogrammed to access other features? • What optional accessories may suit your needs? Assemble your radio by following these steps: Turning On the Radio . . . . . . . . . . . . . . . . . . . . . . . . . . .
O9Head_68007024014_a.book Page 4 Wednesday, June 9, 2010 5:36 PM Turning On the Radio Press the Power On/Off Button briefly to power on the radio. If Ch mismatch appears, means that either the Control Head has been connected to an incompatible transceiver, or vice versa. If your radio does not power up, contact your dealer. To turn off the radio, press the Power On/Off Button after the LEDs light up.
O9Head_68007024014_a.book Page 5 Wednesday, June 9, 2010 5:36 PM Validating Compatibility During Power Up To increase the volume, rotate the Volume Knob clockwise. To decrease the volume, rotate the Volume Knob counterclockwise. Procedure: 1 The display shows Maintenance Mode Remote Device promptly followed by other maintenance statuses. 2 The display shows Update done Please reset upon completion. OR The display shows Update failed Please reset when it fails to update.
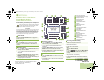
O9Head_68007024014_a.book Page 6 Wednesday, June 9, 2010 5:36 PM Adjusting the Display Backlight You can change the intensity of the radio’s display backlight as needed to suite the environment conditions. Note: The backlight setting also affects the Menu Select buttons, the Menu Navigation buttons and the keypad backlighting accordingly. Identifying Radio Controls Procedure: Press and hold + on the n button to increase brightness. Release the button to stop.
O9Head_68007024014_a.
O9Head_68007024014_a.book Page 8 Wednesday, June 9, 2010 5:36 PM Programmable Features Any reference in this manual to a control that is “preprogrammed” means that the control must be programmed by a dealer or qualified radio technician using the radio's programming software, in order to assign a feature to that control.
O9Head_68007024014_a.book Page 9 Wednesday, June 9, 2010 5:36 PM Phone – Allows you to make and receive calls similar to standard phone calls. Private Call (Trunking Only) – Allows a call from an individual radio to another individual radio. Radio Profiles – Allows for easy access to a set of preprogrammed visual and audio settings of the radio. Recent Calls – Allows for easy access to the list of calls recently received or made.
O9Head_68007024014_a.book Page 10 Wednesday, June 9, 2010 5:36 PM Assignable Settings or Utility Functions Horns/Lights – Toggles horns and lights feature on or off. Keypad Lock – Toggles the keypad lock on or off. Voice Announcement – Audibly indicates the current feature mode, Zone or Channel the user has just assigned. Voice Mute – Toggles voice mute on or off.
O9Head_68007024014_a.book Page 11 Wednesday, June 9, 2010 5:36 PM Using the Navigation Buttons The H button returns you to the Home (default) screen. In most cases, this is the current mode. For selected radio features, the H button is also used to save user-edited radio settings or information before returning you to the Home screen. Note: Some features do not require you to press H to go to the Home screen.
O9Head_68007024014_a.book Page 12 Wednesday, June 9, 2010 5:36 PM Using the Keypad You can use the 3 x 4 alphanumeric keypad to access your radio’s features. The keypad functions in a manner similar to a standard telephone keypad when entering numeric digits. When the keypad is used to edit a list, each key can generate different characters of the alphabet. The tables below show the number of times a key needs to be pressed to generate the required character.
O9Head_68007024014_a.book Page 13 Wednesday, June 9, 2010 5:36 PM Keypad Characters – Lowercase Mode Key 1 2 3 4 5 6 7 8 9 10 11 12 13 14 15 16 17 18 19 20 21 A B C D E F G H I K J L 1 . , ? ! ; @ _ - * # & $ / + = \ “ ‘ ( ) a b c d e f g h i j k l m n o p q r t u v w x y s z Identifying Radio Controls Number of Times Key is Pressed Toggle between mixed case mode, uppercase mode, and lowercase mode.
O9Head_68007024014_a.book Page 14 Wednesday, June 9, 2010 5:36 PM Keypad Characters – Numeric Mode Identifying Radio Controls Number of Times Key is Pressed Key 1 2 3 4 5 6 7 8 9 10 11 12 13 14 15 16 17 18 A B C D E F G H I K J L 1 . , ? ! ; @ _ - * # & $ / + = \ “ 14 English 2 3 4 5 6 7 8 9 0 Space Toggle between numeric and letter mode.
O9Head_68007024014_a.
O9Head_68007024014_a.book Page 16 Wednesday, June 9, 2010 5:36 PM Push-To-Talk (PTT) Button The PTT button on the side of the microphone serves two basic purposes: • While a call is in progress, Identifying Status Indicators the PTT button allows the radio to transmit to other radios in the call. Press and hold down PTT button to talk. Release the PTT button to listen. The microphone is activated when the PTT button is pressed.
O9Head_68007024014_a.book Page 17 Wednesday, June 9, 2010 5:36 PM Status Icons Selected icons are also shown on the first row of the 112 x 32 pixel top monochrome display screen of your radio. The following icons are for the front display screen unless indicated otherwise. Receiving Radio is receiving a call or data. O F Received Signal Strength Indicator (RSSI) The number of bars displayed represents the received signal strength for the current site, for trunking only.
O9Head_68007024014_a.book Page 18 Wednesday, June 9, 2010 5:36 PM Priority Channel Scan • Blinking dot = Radio detects activity on channel designated as Priority-One. Location Signal G • Blinking = Location feature is enabled, but no Identifying Status Indicators designated as Priority-Two. • On steady = View mode • Blinking = Program mode k location signal is available. User Login Indicator (IP Packet Data) n • Off = Clear operation. • Blinking = Receiving an encrypted voice call.
O9Head_68007024014_a.book Page 19 Wednesday, June 9, 2010 5:36 PM Text Messaging Service (TMS) Icons Status Icons The following icons appear on the radio’s display when you send and receive text messages. Inbox Full The Inbox is full. Message Sent The text message is sent successfully. Message Unsent The text message cannot be sent. Unread Message Y r Normal Message User is composing a message with normal priority and without a request for a reply.
O9Head_68007024014_a.book Page 20 Wednesday, June 9, 2010 5:36 PM Priority Status and Request Reply • User is composing a message with a priority status and a request for a reply. • Messages in the Inbox folder are flagged with “Priority” and “Request Reply”. Identifying Status Indicators Numeric Indicates that the text entry is currently in numeric mode. 20 English Mixed Case Indicates that the text entry is currently in normal text mode.
O9Head_68007024014_a.book Page 21 Wednesday, June 9, 2010 5:36 PM Call Type Icons U % Landline phone number. Landline phone number added to a Call List. Radio number. Incoming call or data. Radio number added to a Call List. Outgoing call or data. ? Mobile number. Mobile number added to a Call List.
O9Head_68007024014_a.book Page 22 Wednesday, June 9, 2010 5:36 PM LED Indicator The LED indicator shows the operational status of your radio. Red LED Identifying Status Indicators Yellow LED 22 Green LED Solid red – Radio is transmitting. Rapidly blinking red – Radio has failed the self test upon powering up or encountered a fatal error. Solid yellow – Channel is busy. Blinking yellow – Radio is receiving a secured transmission.
O9Head_68007024014_a.book Page 23 Wednesday, June 9, 2010 5:36 PM Intelligent Lighting Indicators Note: This feature must be preprogrammed by a qualified radio technician. Backlight and Bar Color Notification Orange Emergency Alerts When The radio initiates an emergency alarm or call. The radio receives an emergency alarm or call. The radio is out of range. Red Critical Alerts The radio enters failsoft mode. The radio is unable to establish a full connection with the system.
O9Head_68007024014_a.book Page 24 Wednesday, June 9, 2010 5:36 PM Alert Tones An alert tone is a sound or group of sounds. Your radio uses alert tones to inform you of your radio’s conditions. The following table lists these tones and when they occur. Identifying Status Indicators You Hear 24 English Short, Low-Pitched Tone Tone Name Radio Self Test Fail When radio fails its power-up self test. Reject When unauthorized request is made.
O9Head_68007024014_a.book Page 25 Wednesday, June 9, 2010 5:36 PM You Hear Tone Name Radio Self Test Pass Short, Medium-Pitched Tone Clear Voice Priority Channel Received Emergency Alarm Entry Central Echo Long, Medium-Pitched Tone Volume Set Emergency Exit Failsoft Automatic Call Back Talk Permit A Group of Medium-Pitched Tones Keyfail Console Acknowledge Received Individual Call When correct key is pressed. When radio passes its power-up self test. At beginning of a non-coded communication.
O9Head_68007024014_a.book Page 26 Wednesday, June 9, 2010 5:36 PM You Hear Tone Name Fast Ringing Identifying Status Indicators Ringing Heard When system is searching for target of Private Call. Enhanced Call Sent When waiting for target of Private Call to answer the call. Phone Call Received When a land-to-mobile phone call is received. Gurgle Dynamic Regrouping (When the PTT button is pressed) a dynamic ID has been received.
O9Head_68007024014_a.book Page 27 Wednesday, June 9, 2010 5:36 PM Phone Call Display and Alert Prompts You Hear You See When A Long Tone No phone You press the PTT button and the phone system is not available. Press H to hang up. The radio returns to the Home screen. Phone busy The phone system is busy. Press H to exit the phone mode and try your call later. Phone busy When a channel is not available. The radio automatically connects when a channel opens.
O9Head_68007024014_a.book Page 28 Wednesday, June 9, 2010 5:36 PM Selecting a Zone General Radio Operation General Radio Operation Once you understand how your APX 7500 Mobile is configured, you are ready to use your radio. A zone is a group of channels. Use the following procedure to select a zone. Use this navigation guide to familiarize yourself with the basic Call features: Note: Selecting a Zone . . . . . . . . . . . . . . . . . . . . . . . . . . . . . Selecting a Radio Channel . . . . . . . .
O9Head_68007024014_a.book Page 29 Wednesday, June 9, 2010 5:36 PM Selecting a Radio Channel Use the following procedure to select a channel. Note: Your radio must be preprogrammed to allow you to use this feature. If you select a channel that is not within the preprogrammed band, the radio indicates that it is on an unsupported frequency with both audio and visual warnings. Procedure: Rotate the Mode knob until the display shows the desired channel.
O9Head_68007024014_a.book Page 30 Wednesday, June 9, 2010 5:36 PM Receiving and Responding to a Radio Call Once you have selected the required channel and/or zone, you can proceed to receive and respond to calls. Red LED Yellow LED General Radio Operation Green LED The LED lights up solid red while the radio is transmitting, and solid yellow when the radio is receiving a transmission (conventional mode only). There is no LED indication when the radio receives a transmission in trunking mode.
O9Head_68007024014_a.book Page 31 Wednesday, June 9, 2010 5:36 PM Receiving and Responding to a Private Call (Trunking Only) These one-to-one calls between two radios are not heard by others in the current talkgroup. The calling radio automatically verifies that the receiving radio is active on the system and can display the caller ID. Note: The radio automatically exits the feature, if the feature inactivity timer is enabled, when the radio is left idle and the timer expires.
O9Head_68007024014_a.book Page 32 Wednesday, June 9, 2010 5:36 PM Receiving and Responding to a Telephone Call (Trunking Only) This feature allows you to receive calls similar to standard phone calls from a landline phone. General Radio Operation Note: The radio automatically exits the feature, if the feature inactivity timer is enabled, when the radio is left idle and the timer expires. You will hear the Menu Inactive Exit Tone upon feature exit.
O9Head_68007024014_a.book Page 33 Wednesday, June 9, 2010 5:36 PM Making a Radio Call Turn the Mode Knob to select the channel with the desired talkgroup. 2 Hold the microphone vertically 1 to 2 inches (2.5 to 5.0 cm) • The preprogrammed Zone switch 3 Press the PTT button to make the call.
O9Head_68007024014_a.book Page 34 Wednesday, June 9, 2010 5:36 PM 2 Press the Menu Select button directly below Call. The display shows the last transmitted ID, received ID and your radio ID. 3 U or D to the required ID. OR Press the Menu Select button directly below Cntacts to scroll through and select the required ID. OR Use the keypad to enter the required ID. General Radio Operation 4 Press the PTT button to start the Private Call. 5 The display shows Calling... or Calling... .
O9Head_68007024014_a.book Page 35 Wednesday, June 9, 2010 5:36 PM 5 The display shows Calling... or Calling... . your mouth. 7 When you are connected, the display shows the ID of the target radio. Press and hold the PTT button to talk. Release the PTT button to listen. OR If no acknowledgment is received, the display shows No acknowledge. OR If the target radio does not respond before the time out, the display shows No answer. 8 Press H to return to the Home screen.
O9Head_68007024014_a.book Page 36 Wednesday, June 9, 2010 5:36 PM Monitoring Features Repeater or Direct Operation The REPEATER operation increases the radio’s range by connecting with other radios through a repeater. The transmit and receive frequencies are different. General Radio Operation The DIRECT or “talkaround operation” allows you to bypass the repeater and connect directly to another radio. The transmit and receive frequencies are the same.
O9Head_68007024014_a.book Page 37 Wednesday, June 9, 2010 5:36 PM 2 Press the Menu Select button directly below Monitor tone and the t indicator lights steadily, then proceed with your message. momentarily to activate monitoring. The display shows Monitor on. 3 Release the PTT button to receive (listen). If you are not in the range of the system, you may hear a continuous low-pitched tone and the display shows Out of range.
O9Head_68007024014_a.book Page 38 Wednesday, June 9, 2010 5:36 PM Advanced Features Advanced Features Use this navigation guide to learn more about advanced features available with your radio: Advanced Call Features . . . . . . . . . . . . . . . . . . . . . . . page 38 Contacts . . . . . . . . . . . . . . . . . . . . . . . . . . . . . . . . . . . page 43 Scan Lists . . . . . . . . . . . . . . . . . . . . . . . . . . . . . . . . . . page 50 Scan . . . . . . . . . . . . . . . . . . . . . . . . . . . . . . .
O9Head_68007024014_a.book Page 39 Wednesday, June 9, 2010 5:36 PM Receiving and Making a Selective Call (ASTRO Conventional Only) Receiving a Selective Call Procedure: 1 When you receive a Selective Call, you hear two alert tones and the LED lights up solid yellow. The call received icons blinks and the display shows Call received. 2 The speaker unmutes. 3 Hold the microphone vertically 1 to 2 inches (2.5 to 5.0 cm) from your mouth. 4 Press and hold the PTT button to talk.
O9Head_68007024014_a.book Page 40 Wednesday, June 9, 2010 5:36 PM 6 Release the PTT button to listen. 7 Press H to return to the Home screen. Using the Talkgroup Call Feature (Conventional Operation Only) This feature allows you to define a group of conventional system users so that they can share the use of a conventional channel. Advanced Features Note: Encryption keys are associated to talkgroups. When talkgroups are associated, encryption keys are changed by changing the active talkgroup.
O9Head_68007024014_a.book Page 41 Wednesday, June 9, 2010 5:36 PM Sending a Status Call Each status can have up to a 14-character name. A maximum of eight status conditions is possible. Note: The radio automatically exits the feature, if the feature inactivity timer is enabled, when the radio is left idle and the timer expires. You will hear the Menu Inactive Exit Tone upon feature exit. Procedure: Press the preprogrammed Status button and proceed to Step 3. OR Follow the procedure below.
O9Head_68007024014_a.book Page 42 Wednesday, June 9, 2010 5:36 PM Procedure: 1 When your radio is dynamically regrouped, it automatically switches to the dynamically regrouped channel. A “gurgle” tone sounds and the display shows the dynamically regrouped channel’s name. 2 Press the PTT button to talk. Release PTT button to listen. When the dispatcher cancels dynamic regrouping, the radio automatically returns to the zone and channel that you were using before the radio was dynamically regrouped.
O9Head_68007024014_a.book Page 43 Wednesday, June 9, 2010 5:36 PM Contacts Note: Contacts manages up to 2,500 contact entries, alphabetically sorted according to entry alias. Each alias can have up to 5 IDs of different call types associated with it. Additionally, each entry, depending on context (conventional, trunking, or phone), associates with one or more of the four types of calls: Phone Call, Selective Call, Private Call, or Call Alert.
O9Head_68007024014_a.book Page 44 Wednesday, June 9, 2010 5:36 PM 7 Hold the microphone vertically 1 to 2 inches (2.5 to 5.0 cm) from your mouth. 8 Press the PTT button to initiate the call. During the call, the display shows the subscriber alias. 9 Press and hold the PTT button to talk. The LED lights up solid red. OR Release the PTT button to listen. 10 If there is no voice activity for a preprogrammed period of Advanced Features time, the call ends.
O9Head_68007024014_a.book Page 45 Wednesday, June 9, 2010 5:36 PM Press J to add a space. Press K to toggle between mixed case mode, uppercase mode, and lowercase mode. Press L to toggle between numeric and letter mode. 6 Press the Menu Select button directly below OK once you have entered the name. OR Press the Menu Select button directly below Cancel to return to the previous screen. 7 U or D to {Add Number} and press the Menu Select button directly below Select.
O9Head_68007024014_a.book Page 46 Wednesday, June 9, 2010 5:36 PM 13 The display shows Stored, confirming that the contact entry has been added. 14 The radio returns to the main Contacts screen. Deleting a Contact Entry Procedure: 1 < or > to Cntacts. 2 Press the Menu Select button directly below Cntacts. The entries are alphabetically sorted. 3 U or D to the entry you want to delete and press the Menu Advanced Features Select button directly below Options.
O9Head_68007024014_a.book Page 47 Wednesday, June 9, 2010 5:36 PM Removing a Contact from a Call List 1 < or > to Cntacts. 2 Press the Menu Select button directly below Cntacts. The entries are alphabetically sorted. 3 U or D to the entry you want to remove from a call list and press the Menu Select button directly below Options. 4 U or D to Delete and press the Menu Select button directly below Select. 5 The display shows Delete confirm?.
O9Head_68007024014_a.book Page 48 Wednesday, June 9, 2010 5:36 PM 7 Press the Menu Select button directly below OK once you have finished. The display returns to the Edit Contact screen. 8 Press the Menu Select button directly below Done to save your changes and return to the main screen for Contacts. Editing as Entry ID Procedure: 1 < or > to Cntacts. 2 Press the Menu Select button directly below Cntacts. The entries are alphabetically sorted.
O9Head_68007024014_a.book Page 49 Wednesday, June 9, 2010 5:36 PM Viewing Details of a Contact Procedure: Procedure: 1 < or > to Cntacts. 1 < or > to Cntacts. 2 Press the Menu Select button directly below Cntacts. The 2 Press the Menu Select button directly below Cntacts. The entries are alphabetically sorted. 3 U or D to the entry you want to edit and press the Menu Select button directly below Options. 4 U or D to Edit and press the Menu Select button directly below Select.
O9Head_68007024014_a.book Page 50 Wednesday, June 9, 2010 5:36 PM Scan Lists Scan lists are created and assigned to individual channels/ groups. Your radio scans for voice activity by cycling through the channel/group sequence specified in the scan list for the current channel/group. Your radio can support up to 125 different scan lists. These lists must be preprogrammed by a qualified radio technician. Viewing a Scan List Procedure: Advanced Features 1 < or > to ScanList.
O9Head_68007024014_a.book Page 51 Wednesday, June 9, 2010 5:36 PM 5 U or D to select more channels to be added or deleted. 6 Press H to exit scan list programming and return to the Home screen. See Viewing and Changing the Priority Status on page 52 for more information on how to add and/or change the priority of the currently displayed channel in the scan list. Changing the Scan List Status Procedure: 1 Long press the preprogrammed side button and proceed to Step 3. OR < or > to ScanList.
O9Head_68007024014_a.book Page 52 Wednesday, June 9, 2010 5:36 PM Viewing and Changing the Priority Status Procedure: 1 Below the Select, Delete, and Recall screen, press the Menu Select button directly below Select to view and/or change the priority status of the currently displayed channel. OR Below the Select, Delete, and Recall screen, press the Select button one or more times to view and/or change the scan list status icon of the currently displayed channel.
O9Head_68007024014_a.book Page 53 Wednesday, June 9, 2010 5:36 PM Radio Programmed for Non-Talkback Scan Procedure: 1 Press the PTT button at any time to transmit on the selected channel or fixed channel. Transmitting While the Scan is On Radio Programmed for Talkback Scan Procedure: 1 Press the PTT button to transmit on the channel indicated by the display. The radio does not begin scanning again for a predetermined hang time after you release the PTT button, allowing the other party to respond.
O9Head_68007024014_a.book Page 54 Wednesday, June 9, 2010 5:36 PM 2 The radio continues scanning the remaining channels in the list. Procedure: Using the preprogrammed button: 1 When the radio is locked onto the channel to be deleted, OR press the preprogrammed Nuisance Delete button. Using the Menu Select button: 1 Press the Menu Select button directly below DynP to change the priority of a non-priority channel in the scan list to Priority-Two.
O9Head_68007024014_a.book Page 55 Wednesday, June 9, 2010 5:36 PM Hang Up (HUB) Note: Priority Scan List members are continuously scanned only when the Scan List, Designated Tx Member field is set to “Talkback” in the radio programming. Otherwise, all scan mode operation is suspended. This feature allows your radio to work like a pager. Even if other users are away from their radios, or if they are unable to hear their radios, you can send them an individual Call Alert page.
O9Head_68007024014_a.book Page 56 Wednesday, June 9, 2010 5:36 PM Receiving a Call Alert Page Sending a Call Alert Page Procedure: Note: 1 You hear four repeating alert tone and the green LED blinks. OR You hear one alert tone and the green LED blinks if Call Alert Tone Auto Reset is enabled. 2 The call received icons blinks and the display shows Page received. 3 Press the PTT button to answer. Advanced Features OR Press any button to clear the Call Alert page.
O9Head_68007024014_a.book Page 57 Wednesday, June 9, 2010 5:36 PM If the call alert page is not acknowledged, a low tone sounds and the display shows No acknowledge. OR Press the Menu Select button directly below OK to return to the main screen for Contacts. OR Follow the procedure below. 1 < or > to Call. 2 Press the Menu Select button directly below Call. 3 U or D to select the alias or ID, and press the PTT button to initiate the call. 8 The radio returns to the Home screen.
O9Head_68007024014_a.book Page 58 Wednesday, June 9, 2010 5:36 PM Emergency Operation The Emergency feature is used to indicate a critical situation. If the Top (Orange) button is preprogrammed to send an emergency signal, this signal overrides any other communication over the selected channel.
O9Head_68007024014_a.book Page 59 Wednesday, June 9, 2010 5:36 PM Sending an Emergency Call (Trunking Only) Note: The radio operates in the normal dispatch manner while in Emergency Call, except, if enabled, it returns to one of the following: • Tactical/Non-Revert – You talk on the channel you selected before you entered the emergency state. • Non-Tactical/Revert – You talk on a preprogrammed emergency channel. The emergency alarm is sent on this same channel.
O9Head_68007024014_a.book Page 60 Wednesday, June 9, 2010 5:36 PM 7 Press and hold the preprogrammed Emergency button for about a second to exit the Emergency Call mode. Turning the radio off also cancels the emergency state. Sending a Silent Emergency Alarm This feature allows you to send an Emergency Alarm to another radio without any audio or visual indicators.
O9Head_68007024014_a.book Page 61 Wednesday, June 9, 2010 5:36 PM Using the Emergency Keep-Alive Feature Note: The radio only exits the Emergency state using one of the ways mentioned in the previous sections. See Sending an Emergency Alarm on page 58, Sending an Emergency Call (Trunking Only) on page 59, Sending an Emergency Alarm with Emergency Call on page 59, or Sending a Silent Emergency Alarm on page 60.
O9Head_68007024014_a.book Page 62 Wednesday, June 9, 2010 5:36 PM Advanced Automatic Registration Service (ARS) This feature provides an automated data application registration for the radio. When you turn on the radio, the device automatically registers with the server. This feature allows you as the user to be associated with the radio. With this association, every data application (Example: Text Messaging Service) takes on a friendly username.
O9Head_68007024014_a.book Page 63 Wednesday, June 9, 2010 5:36 PM Logging In as a User 1 < or > to User. characters, or an invalid character in it, the display momentary shows Invalid ID. Repeat Step 4. OR A blinking cursor appears beside PIN:. Use the keypad to enter your Personal Identification Number (PIN) number. The maximum PIN length is 4 digits. The PIN number appears as asterisks. 2 Press the Menu Select button directly below User. 6 Press the Menu Select button directly below Login.
O9Head_68007024014_a.book Page 64 Wednesday, June 9, 2010 5:36 PM Press the Menu Select button directly below Cancel to cancel the login in progress screen and return to the initial user login screen. OR Wait for the logged in confirmation screen. If the login process is successful, the display shows the successful user login indicator (IP indicator) icon and Logged in, with Logout and Exit. Text Messaging Service (TMS) This feature allows you to send and receive text messages.
O9Head_68007024014_a.book Page 65 Wednesday, June 9, 2010 5:36 PM Composing and Sending a New Text Message Note: Note: The radio automatically exits the feature, if the feature inactivity timer is enabled, when the radio is left idle and the timer expires. You will hear the Menu Inactive Exit Tone upon feature exit. Press the Menu Select button directly below Back at any time to return to the previous screen.
O9Head_68007024014_a.book Page 66 Wednesday, June 9, 2010 5:36 PM 5 A blinking cursor appears on the Compose screen. Use the keypad to type or edit your message. Press < to move one space to the left. Press > to move one space to the right. Press the Menu Select button directly below Delete to delete any unwanted characters. Press J to add a space. Press K to toggle between mixed case mode, uppercase mode, and lowercase mode. Press L to toggle between numeric and letter mode.
O9Head_68007024014_a.book Page 67 Wednesday, June 9, 2010 5:36 PM Sending a Quick Text Message Each Quick Text message has a maximum length of 50 characters. Procedure: Press the preprogrammed Quick Text button and proceed to Step 4. OR Follow the procedure below. blinking cursor at the end of it. Use the keypad to edit the message, if required. Press < to move one space to the left. Press > to move one space to the right.
O9Head_68007024014_a.book Page 68 Wednesday, June 9, 2010 5:36 PM Press J to add a space. Press K to toggle between mixed case mode, uppercase mode, and lowercase mode. Press L to toggle between numeric and letter mode. 10 Press the Menu Select button below Send or the PTT button to send the message. 11 The display shows the Send Message screen and Sending msg. Advanced Features 12 If the message is sent, a tone sounds and the display shows Msg sent.
O9Head_68007024014_a.book Page 69 Wednesday, June 9, 2010 5:36 PM Removing a Request Reply from a Text Message Procedure: Procedure: After the outgoing message is composed (see Composing and Sending a New Text Message on page 65 for more information): After the outgoing message is composed (see Composing and Sending a New Text Message on page 65 for more information): 1 Press the Menu Select button directly below Options. 1 Press the Menu Select button directly below Options.
O9Head_68007024014_a.book Page 70 Wednesday, June 9, 2010 5:36 PM U or D to Req Reply and press the Menu Select button directly below Select to request for a reply. 3 The priority status and request reply icons appear beside the normal message icon on the label bar.
O9Head_68007024014_a.book Page 71 Wednesday, June 9, 2010 5:36 PM Viewing a Text Message from the Inbox Note: U or D to read the message if fills more than one screen. Procedure: Press the preprogrammed Data Feature button or the TMS Feature button to access the TMS feature screen, and proceed to Step 3. OR Press and hold the preprogrammed Data Feature button or the TMS Feature button to access the Inbox and proceed to Step 4. OR Follow the procedure below. 1 < or > to TMS.
O9Head_68007024014_a.book Page 72 Wednesday, June 9, 2010 5:36 PM OR U or D to scroll through the list of messages and press the Menu Select button directly below Select to select the required message. 4 A blinking cursor appears on the Compose screen. OR The predefined message appears on the Compose screen, with a blinking cursor at the end of it. 5 Use the keypad to type or edit your message. Press < to move one space to the left. Press > to move one space to the right.
O9Head_68007024014_a.book Page 73 Wednesday, June 9, 2010 5:36 PM Function of each option: • Select Delete to delete the message. • Select Back to return to the previous screen. Managing Sent Text Messages Once a message is sent to another radio, it is saved in the Sent folder. The most recent sent text message is always added to the top of the Sent list. The Sent folder is capable of storing a maximum of ten (10) last sent messages.
O9Head_68007024014_a.book Page 74 Wednesday, June 9, 2010 5:36 PM Sending a Sent Text Message Procedure: 1 Press the Menu Select button directly below Options while viewing the message. 2 U or D to Send Message and press the Menu Select button directly below Select. Advanced Features 3 U or D to scroll through the address list and highlight the required address. OR U or D to {Other Recpnt} and press the Menu Select button below Edit. A blinking cursor appears on the Enter Address screen.
O9Head_68007024014_a.book Page 75 Wednesday, June 9, 2010 5:36 PM 4 Press the Menu Select button directly below Clear. Procedure: 5 The display shows Delete All Messages Confirm?. Press the preprogrammed Data Feature button or the TMS Feature button to access the TMS feature screen, and proceed to Step 3. OR Follow the procedure below. 6 Press the Menu Select button directly below Yes to delete 1 < or > to TMS. 2 Press the Menu Select button directly below TMS to access the TMS feature screen.
O9Head_68007024014_a.book Page 76 Wednesday, June 9, 2010 5:36 PM Secure Operations Secure radio operation provides the highest commercially available level of voice security on both trunked and conventional channels. Unlike other forms of security, Motorola digital encryption provides signaling that makes it virtually impossible for others to decode any part of an encrypted message.
O9Head_68007024014_a.book Page 77 Wednesday, June 9, 2010 5:36 PM 7 Press the Menu Select button below Load to load the key to your radio. sounds a short tone for single-key radios. OR When the key has been loaded successfully, the radio sounds an alternating tone for multikey radios. Using the Multikey Feature This feature allows the radio to be equipped with as many as 48 different encryption keys and supports the DES-OFB algorithm.
O9Head_68007024014_a.book Page 78 Wednesday, June 9, 2010 5:36 PM Selecting a Keyset 4 Press the Menu Select button directly below Select to save This feature allows you to select one or more groups of several encryption keys from among the available keys stored in the radio.
O9Head_68007024014_a.book Page 79 Wednesday, June 9, 2010 5:36 PM Note: 7 Press H, the PTT button, or the Menu Select button directly below Exit to exit. Refer to your local key management supervisor for more information. Requesting an Over-the-Air Rekey (ASTRO Conventional Only) This feature, also known as OTAR, allows the dispatcher to reprogram the encryption keys in the radio remotely. The dispatcher performs the rekey operation upon receiving a rekey request from the user.
O9Head_68007024014_a.book Page 80 Wednesday, June 9, 2010 5:36 PM Hear Clear Security There are two components of Hear Clear. 1 Companding: Reduces the channel noise, e.g. OTA transmission, that is predominantly present in UHF2 and 900 MHz channel with the following features. This feature changes your radio to a more robust security system that protects the use of the secure encryption keys.
O9Head_68007024014_a.book Page 81 Wednesday, June 9, 2010 5:36 PM 3 If the password is correct, the radio unlocks. If you enter three incorrect passwords in a row, the display shows Deadlock. Turn the radio off and then on, and begin again at Step 1. IMPORTANT: For Secure Radios Only – After a total of 17 consecutive incorrect passwords (turning the radio off and on does not reset this number), the radio erases all of its encryption keys and shows Deadlock. See a qualified radio technician.
O9Head_68007024014_a.book Page 82 Wednesday, June 9, 2010 5:36 PM Enabling or Disabling the Radio Lock Feature The Global Positioning System (GPS) (Secure Radios Only) This feature allows you to enable or disable the radio lock feature. It is programmable by a qualified radio technician. Procedure: 1 < or > to LogOff. 2 Press the Menu Select button directly below LogOff. 3 Display shows Pswd enabled, indicating that the radio lock Advanced Features feature is enabled.
O9Head_68007024014_a.book Page 83 Wednesday, June 9, 2010 5:36 PM Enhancing GPS Performance • Between tall buildings or under dense tree-cover Sometimes, the GPS feature may be unable to complete a location calculation successfully. You then see a message indicating that your radio cannot connect to enough visible satellites.
O9Head_68007024014_a.book Page 84 Wednesday, June 9, 2010 5:36 PM The radio also stores four (4) preprogrammed waypoints. These coordinates cannot be deleted. Programmable Waypoints Preprogrammed Waypoints Fixed location coordinates: • Home User-configurable location coordinates. • Emergency • Last Known Location Advanced Features • Destination Only the alias is editable, not the coordinates. The Home and Destination coordinates are editable. Coordinates can be deleted one at a time, or all at once.
O9Head_68007024014_a.book Page 85 Wednesday, June 9, 2010 5:36 PM 6 Press the Menu Select button directly below Refresh to obtain a new location fix. location is being determined. While the new location is being determined, the location signal can be a solid or blinking icon. 8 Once the location coordinates are fixed, the display shows the current latitude and longitude, along with the UTC (Zulu) time and date that the location fix was obtained.
O9Head_68007024014_a.book Page 86 Wednesday, June 9, 2010 5:36 PM 6 Press the Menu Select button directly below Exit to exit the feature and return to the main screen. OR Press H, the PTT button, or the preprogrammed GPS button to return to the Home screen. Viewing a Saved Waypoint Procedure: While in the current location display: 1 Press the Menu Select button directly below Options. 2 U or D to Waypoints and press the Menu Select button Advanced Features directly below Select.
O9Head_68007024014_a.book Page 87 Wednesday, June 9, 2010 5:36 PM Press K to toggle between mixed case mode, uppercase mode, and lowercase mode. 7 Press the Menu Select button directly below OK once you are done. OR Press the Menu Select button directly below Cancel to return to the Waypoints main screen. 8 The display shows Updated and the radio returns to the Waypoints main screen. 9 Press the Menu Select button directly below Back to return to the previous screen.
O9Head_68007024014_a.book Page 88 Wednesday, June 9, 2010 5:36 PM 7 A blinking cursor appears in the Edit Location screen. Press < to move one space to the left. Press > to move one space to the right. Press the Menu Select button directly below Delete to delete any unwanted characters. 8 Press the Menu Select button directly below OK once you are done. OR Press the Menu Select button directly below Cancel to return to the previous screen.
O9Head_68007024014_a.book Page 89 Wednesday, June 9, 2010 5:36 PM Deleting All Saved Waypoints 1 Press the Menu Select button directly below Options. 2 U or D to Waypoints and press the Menu Select button directly below Select. 3 The display shows a list of waypoints. 4 U or D to a saved waypoint, and press the Menu Select button directly below Options. 5 U or D to Delete All and press the Menu Select button directly below Select. 6 The display shows Delete All saved waypnts Confirm?.
O9Head_68007024014_a.book Page 90 Wednesday, June 9, 2010 5:36 PM Using the Location Feature While in Emergency Trunking System Controls Mode When the Emergency feature is activated by pressing the emergency button, the radio exits the Location menu and returns to the Home (default) screen so that you can see which channel the emergency signal is going out on. However, you may re-enter the Location menu while still in emergency mode, provided that Silent Emergency has not been activated.
O9Head_68007024014_a.book Page 91 Wednesday, June 9, 2010 5:36 PM SmartZone™ When your radio goes out of the range of the system, it can no longer lock onto a control channel. The SmartZone™ feature extends communications beyond the reach of a single-trunked site (antenna location) when operating in a SmartZone system. SmartZone units provide expanded wide-area coverage. Procedure: 1 A low-pitched tone sounds. AND/OR The display shows the currently selected zone/channel combination and Out of range.
O9Head_68007024014_a.book Page 92 Wednesday, June 9, 2010 5:36 PM Locking and Unlocking a Site Viewing and Changing a Site This feature allows your radio to lock onto a specific site and not roam among wide-area talkgroup sites. This feature should be used with caution, since it inhibits roaming to another site in a wide-area system. This feature allows you to view the number of the current site or force your radio to change to a new one.
O9Head_68007024014_a.book Page 93 Wednesday, June 9, 2010 5:36 PM Initiating an Announcement The announcement capability allows you to make announcements to the entire user group, as well as monitor talkgroup calls and other announcements. If your radio has been programmed to allow announcement calls: Announcement calls are handled in two different ways, depending on the trunked central controller configuration. The two types are called ruthless and non-ruthless preemption.
O9Head_68007024014_a.book Page 94 Wednesday, June 9, 2010 5:36 PM Utilities Viewing the Recent Calls List This feature allows you to view the recent incoming and outgoing call information of the following call types: • Call Alert • Selective Call • Private Call • Phone Call (Outgoing Only) Advanced Features Note: 94 The radio can also be preprogrammed to log only the radio IDs associated with incoming Dispatch Calls. Check with your dealer or system administrator for more information.
O9Head_68007024014_a.book Page 95 Wednesday, June 9, 2010 5:36 PM Selecting a Radio Profile You can select the power level at which your radio transmits. The radio always turns on to the default setting. This feature allows you to manually switch the visual and audio settings of the radio. The display, backlight, alert tones, and audio settings are defined according to the preprogrammed radio settings of each radio profile. Note: This feature must be preprogrammed by a qualified radio technician.
O9Head_68007024014_a.book Page 96 Wednesday, June 9, 2010 5:36 PM 5 The radio returns to the Home screen. The profile name on the Home screen indicates the current selected radio profile. Toggling the Day or Night Display Mode j allows you to toggle between Day or Night Mode. Procedure: Press j to toggle between Day or Night Mode of the display. The last selected mode can be saved during power off and reloaded upon radio power up if preprogrammed.
O9Head_68007024014_a.book Page 97 Wednesday, June 9, 2010 5:36 PM Using the Time-Out Timer You can enable and disable voice transmission as needed. This feature turns off your radio’s transmitter. You cannot transmit longer than the preset timer setting. Procedure: Press the preprogrammed Voice Mute button to turn the feature on or off. OR Follow the procedure below. 1 < or > to VMute. 2 Press the Menu Select button directly below VMute.
O9Head_68007024014_a.book Page 98 Wednesday, June 9, 2010 5:36 PM Using the Conventional Squelch Operation Features This feature filters out unwanted calls with low signal strength or channels that have a higher than normal background noise. Digital Options One or more of the following options may be preprogrammed in your radio. Check with your dealer or system administrator for more information.
O9Head_68007024014_a.book Page 99 Wednesday, June 9, 2010 5:36 PM Using the Digital PTT ID Feature Mode Description Transmit Inhibit on Busy Channel with Carrier You cannot transmit if any traffic is detected on the channel. Transmit Inhibit on Busy Channel with Wrong Squelch Code You cannot transmit on an active channel with a squelch code or (if secure-equipped) encryption key other than your own. If the PL code is the same as yours, the transmission is not prevented.
O9Head_68007024014_a.book Page 100 Wednesday, June 9, 2010 5:36 PM Using Quick-Key Override Accessing the Radio Information As Smart PTT feature prevents your radio to transmit when the current channel is busy, you can perform a Double PTT to force a key-up and transmission to override the Smart PTT. This feature displays the following information of your radio: Note: Double PTT is quick press of the PTT twice.
O9Head_68007024014_a.book Page 101 Wednesday, June 9, 2010 5:36 PM Viewing the IP Information 1 < or > to Info. Note: 2 Press the Menu Select button directly below Info. 3 U or D to Radio Info and press the Menu Select button This feature displays the device name, IP address, and status of your radio. The device name of your radio is preprogrammed. Check with your dealer or system administrator for more information. 4 The display shows the Information screen.
O9Head_68007024014_a.book Page 102 Wednesday, June 9, 2010 5:36 PM Viewing the Control Assignments Using the Directional Buttons This feature displays the programmable radio functions assigned to the controls of your radio for the channel currently selected. The function of these buttons are only available with a Universal Relay Controller (URC). These buttons allow you to trigger the lights on the lightbar on or off. Each button is dedicated for different direction of lights.
O9Head_68007024014_a.book Page 103 Wednesday, June 9, 2010 5:36 PM Using the Siren Control Keyapad Tone e can be preprogrammed to trigger Manual Siren tone. The • e – Manual duration of the tone depends on the duration of pressing and holding the button. After the button is released, the Manual Siren Wail tone falls until the tone is mute. • i – Wail Procedure: • h – Yelp 1 Press e. The Manual Siren tone sounds. • g – HiLo 2 Release e when required.
O9Head_68007024014_a.book Page 104 Wednesday, June 9, 2010 5:36 PM Using the Manual Siren Button as Siren Types Selector e can also be preprogrammed as siren types selector. For example, pressing the button changes the current siren tone to another siren tone. The Response Selector is mainly designed to control the lightbar. The recommended application of Response Selector for the lightbar is as below. • Turn to 0 – the lightbar is off. Procedure: • Turn to 1 – the lightbar is in take down mode.
O9Head_68007024014_a.book Page 105 Wednesday, June 9, 2010 5:36 PM Using External Alarms (Horn and Lights) The Universal Relay Controller (URC) is a versatile relay module that controls how the patterns on the Light Bar operate. All control heads can be equipped for external alarms (horn and lights) that are activated when a Call Alert page, Private Conversation call, or phone call is received.
O9Head_68007024014_a.book Page 106 Wednesday, June 9, 2010 5:36 PM Using Permanent Horn and Lights Using the Gun Lock If Permanent Horn and Lights is enabled, horn and lights will automatically turn on when the radio powers up. This feature enables the radio to control from up to three gun locks. There are four configurations on the programmable buttons for this feature. Procedure: 1 Press the Menu Select button directly below H/L once to turn off the alarm(s).
O9Head_68007024014_a.book Page 107 Wednesday, June 9, 2010 5:36 PM OR Without relock timer, or the relock timer is set to zero: Without relock timer: 1 Press and hold the required preprogrammed Gun Lock 1 Press and hold the preprogrammed Gun Lock Button. All Button. The required Gun Lock opens. 2 Place the required gun on the Gun Lock. OR Remove the required gun from the Gun Lock. 3 Release the required preprogrammed Gun Lock Button. The Gun Lock closes. the Gun Locks open.
O9Head_68007024014_a.book Page 108 Wednesday, June 9, 2010 5:36 PM The features which Voice Announcement supports are: Procedure: • Zone You hear a voice announcement when the features below are preprogrammed in the radio. • Channel • The radio powers up. The radio announces the current zone • Scan • Monitor • Talkaround/Direct • Tx Inhibit Advanced Features Note: Voice announcements support certain number of zonechannel, but not all.
O9Head_68007024014_a.book Page 109 Wednesday, June 9, 2010 5:36 PM Activating the Action Consolidation Activities This feature allows the radio to execute a series of actions by pressing a preprogrammed button or by turning the Response Selector. Procedure: Features allowed for Action Consolidation are as below.
O9Head_68007024014_a.book Page 110 Wednesday, June 9, 2010 5:36 PM Deactivating the Action Consolidation Activities When the radio is running activities of the Action Consolidation, the following interruptions shall end the Action Consolidation activities. Advanced Features Procedure: Press H. The display shows Action Consolidation Cancelled. The radio ends the transmission and reverts to Home mode. OR Press PTT button to transmit. The display shows Action Consolidation Cancelled.
O9Head_68007024014_a.book Page 111 Wednesday, June 9, 2010 5:36 PM Helpful Tips Caring for Your Radio The following are suggestions to assist you in troubleshooting possible operating problems. ! Caution If radio operation is intermittent, check with other persons using the system for similar problems before taking the radio in for service. Similar problems indicate a system malfunction rather than a radio failure.
O9Head_68007024014_a.book Page 112 Wednesday, June 9, 2010 5:36 PM Antennas Accessories Accessories For a list of Motorola-approved antennas and other accessories, visit the following website: • Roof Top, 1/4 Wave, 136 – 144 MHz (HAD4006_) • Roof Top, 1/4 Wave, 144 – 152 MHz (HAD4007_) http://www.motorola.com/governmentandenterprise • Roof Top, 1/4 Wave, 152 – 162 MHz (HAD4008_) Your radio is compatible with the accessories listed in this chapter. Contact your dealer for details.
O9Head_68007024014_a.book Page 113 Wednesday, June 9, 2010 5:36 PM • Roof Top, 2 dB Wide Band UHF R1, 380 – 470 MHz (HAE6013A_) Audio • Standard Speaker 8 Ohm (HSN4031_) • Through Hole Mount, 2 dB Wide Band UHF, 380 – 520 MHz • Standard Speaker 3.2 Ohm (HSN4032_) (HAE6031_) • Motorcycle, 1/4 Wave Whip, 425 – 470 MHz (HAE6032_) • Motorcycle, 1/4 Wave Whip, 450 – 482 MHz (HAE6033_) • Motorcycle, 1/4 Wave Whip, 482 – 512 MHz (HAE6034_) • 7.
O9Head_68007024014_a.
O9Head_68007024014_a.
O9Head_68007024014_a.
O9Head_68007024014_a.
O9Head_68007024014_a.
O9Head_68007024014_a.book Page 119 Wednesday, June 9, 2010 5:36 PM State the position of the vessel in distress, using any information that will help responders to locate you, e.g.: 5 • latitude and longitude • bearing (state whether you are using true or magnetic north) • distance to a well-known landmark • vessel course, speed or destination State the nature of the distress. 6 Specify what kind of assistance you need.
O9Head_68007024014_a.book Page 120 Wednesday, June 9, 2010 5:36 PM Appendix: Maritime Radio Use in the VHF Frequency Range Operating Frequency Requirements A radio designated for shipboard use must comply with Federal Communications Commission Rule Part 80 as follows: • on ships subject to Part II of Title III of the Communications Act, the radio must be capable of operating on the 156.
O9Head_68007024014_a.book Page 121 Wednesday, June 9, 2010 5:36 PM Table A-1: VHF Marine Channel List (Continued) Table A-1: VHF Marine Channel List (Continued) Frequency (MHz) Transmit * 157.150 24 157.200 161.800 25 157.250 161.850 26 157.300 161.900 27 157.350 28 157.400 60 Frequency (MHz) Receive Channel Number Transmit Receive 161.750 75 *** *** 76 *** *** 77** 156.875 – 78 156.925 161.525 161.950 79 156.975 161.575 162.000 80 157.025 161.625 156.025 160.
O9Head_68007024014_a.book Page 122 Wednesday, June 9, 2010 5:36 PM Term Glossary Carrier Squelch Feature that responds to the presence of an RF carrier by opening or unmuting (turning on) a receiver’s audio circuit. A squelch circuit silences the radio when no signal is being received so that the user does not have to listen to “noise.” Central Controller A software-controlled, computer-driven device that receives and generates data for the trunked radios assigned to it.
O9Head_68007024014_a.book Page 123 Wednesday, June 9, 2010 5:36 PM Term Definition A visual tracking marker (a blinking line) that indicates a location on the display. CP Codeplug Deadlock Displayed by the radio after three failed attempts to unlock the radio.The radio must be powered off and on prior to another attempt. DEK Direct Entry Keypad or Keyboard Digital Private Line (DPL) A type of coded squelch using data bursts. Similar to PL except a digital code is used instead of a tone.
O9Head_68007024014_a.book Page 124 Wednesday, June 9, 2010 5:36 PM Term Monitor Multi-System Talkgroup Scan List Definition Check channel activity by pressing the Monitor button. If the channel is clear, you hear static. If the channel is in use, you hear conversation. It also serves as a way to check the volume level of the radio, since the radio “opens the squelch” when the monitor button is pressed. A scan list that can include both talkgroups (trunked) and channels (conventional).
O9Head_68007024014_a.book Page 125 Wednesday, June 9, 2010 5:36 PM Term A feature that allows you to call a select individual, intended to provide privacy and to eliminate the annoyance of having to listen to conversations of no interest to you. Any digital P25 traffic having the correct Selective Switch Network Access Code and the correct talkgroup. Squelch Special electronic circuitry, added to the receiver of a radio, that reduces, or cuts off, unwanted signals before they are heard in the speaker.
O9Head_68007024014_a.book Page 126 Wednesday, June 9, 2010 5:36 PM Term Glossary Zone 126 English Definition A grouping of channels.
O9Head_68007024014_a.book Page 127 Wednesday, June 9, 2010 5:36 PM Limited Warranty MOTOROLA COMMUNICATION PRODUCTS I. WHAT THIS WARRANTY COVERS AND FOR HOW LONG: MOTOROLA INC.
O9Head_68007024014_a.book Page 128 Wednesday, June 9, 2010 5:36 PM INABILITY TO USE SUCH PRODUCT, TO THE FULL EXTENT SUCH MAY BE DISCLAIMED BY LAW. III. STATE LAW RIGHTS: SOME STATES DO NOT ALLOW THE EXCLUSION OR LIMITATION OF INCIDENTAL OR CONSEQUENTIAL DAMAGES OR LIMITATION ON HOW LONG AN IMPLIED WARRANTY LASTS, SO THE ABOVE LIMITATION OR EXCLUSIONS MAY NOT APPLY. This warranty gives specific legal rights, and there may be other rights which may vary from state to state. Commercial Warranty IV.
O9Head_68007024014_a.book Page 129 Wednesday, June 9, 2010 5:36 PM VI. PATENT AND SOFTWARE PROVISIONS: Laws in the United States and other countries preserve for MOTOROLA certain exclusive rights for copyrighted MOTOROLA software such as the exclusive rights to reproduce in copies and distribute copies of such MOTOROLA software.
O9Head_68007024014_a.
O9Head_68007024014_a.