PROFESSIONAL SERIES CA 1150 Owner’s Guide Vehicle Security and Keyless Entry System IMPORTANT NOTE: The operation of the Security and Convenience System as described in this manual is applicable to most vehicles. However, due to the configuration of some vehicles, some functions AND/OR SAFETY PRECAUTIONS may not apply. Please see your installing dealer for more information. 2009 Audiovox Electronics Corporation. All rights reserved.
Table of Contents Using Your Remote Control ............................................................... 3 Arming the Security System ............................................................ 3 Bypassing the Shock Sensor .......................................................... 3 Disarming the Security System ........................................................ 3 Two Stage Door Unlock (optional) ................................................... 3 Valet Mode ....................................
Using Your Remote Control Arming the Security System To arm the system, exit the vehicle, close all doors, then press the button. The parking lights will flash 2 times, indicating the system is armed, has locked the doors (if equipped and connected) and activated the starter disable feature. The LED status indicator will blink steadily, once per second.
To disengage valet mode: 1. Turn the ignition key to the ON position. 2. Press and release the emergency override button. 3. The LED will turn off indicating that the system has exited valet mode. Activating the Trunk Release Feature (Optional) If this feature is enabled on your system, pressing and holding the seconds will open the vehicle’s trunk or hatch.
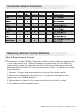
3. 90 seconds after trigger in, addition to the siren and parking lights, the system will activate the starter kill. THE SYSTEM WILL REMAIN IN THIS STATE UNTIL THE BATTERY IS DEPLETED. OVERRIDE THE SYSTEM TO TURN OFF CAR JACK MODE: Turn the ignition OFF then On and press the valet button within 10 seconds. LED and Siren/Horn Indications LED Display Indications LED Function OFF DISARMED SLOW FLASH ARMED FAST FLASH PASSIVE ARMING ON (SOLID) VALET MODE 2 FLASH...
Transmitter Button Functions Replacing Remote Control Batteries 1-Way 4 Button Remote Control: The batteries (model CR2016) inside each remote control should last approximately 1 year under normal use. When the batteries become weak you will notice the remote control range (the distance from the vehicle the remote control will work) deteriorate and the small LED on the remote control will dim. To replace the remote control batteries: 1. Remove 3 screws and disassemble the halves of the remote control. 2.
Code Systems, Inc. Limited Lifetime Warranty Code Systems Inc.
Audiovox Electronics Corporation. Customer Service 1-800-421-3209 WWW.CODE-ALARM.COM FCC COMPLIANCE This device complies with Part 15 of the FCC rules and with RSS-210 of Industry Canada. Operation is subject to the following two conditions: 1. This device may not cause harmful interference, and 2. This device must accept any interference received, including any interference that may cause undesired operation.