
User guide


Charnwood Dynamics Ltd.
Coda cx1 User Guide – Reference IV-1
CX1 USER GUIDE - COMPLETE.doc 26/04/04
119/162
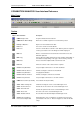
Display Input Signal Graphs
Opens a Real-time Signal data View, which displays a graphical
scrolling chart of analogue, digital or force plate signals (if configured).
Display CX1 data
Used for demonstration and testing individual cx1 cameras.
Opens a Real-time cx1 data View, which displays the signals from a
cx1 camera unit as a bar-chart updated in real time. Camera A, B, or C
may be selected. The correlation peak may be superimposed.
Use the CodaView Options dialogue [Views: CodaView Options…]
to select the Coda and marker numbers.
Display CX1 text data
Opens a Real-time cx1 data View (text), which displays tabulated ABC
cx1 camera data in real time. (For debug purposes only).
Display Video
Opens a Real-time Video View to show live video, if configured.
Use the Video Setup dialogue to select the video source and to set the
format, size, and display parameters (brightness, contrast, colour, etc.)
Available only if video data-acquisition hardware is installed in the PC.
Display IR interference
For diagnostic purposed only.
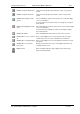
Acquisition setup...
Opens the Acquisition Setup dialogue in which the data acquisition
options may be selected (acquisition rate, period, marker numbers,
EMG mode, force, digital, auto-start, sound, triggering, etc.)
Force-plate setup…
Opens the Force-plate Setup dialogue in which the force-plate data
acquisition options may be selected (sampling rate, zero set, etc.)
EMG setup…
Opens the EMG Setup dialogue in which the EMG data acquisition
options may be selected (transmitters, sampling rate, EMG control
panel, etc.)
Video setup...
Opens the Video Setup dialogue to setup the Video Acquisition options
(display parameters, video format, frame rate, colour resolution, size
resolution, synch. offset time, etc.)
Acquire data...
Ctrl + A
Acquire data from Coda using the current acquisition options.
Displays the Ready to Acquire message-box which summarizes the
current acquisition options.
Data acquisition (Standby) starts when the OK button is pressed.
No data is acquired if the Cancel button is pressed.
Multiple Acquire & Save...
Acquire several sets of data from Coda with automatic saving.
Opens the Multi-Acquire dialogue in which the parameters for a
multiple acquisition run may be specified (file name root & sequence
start number).
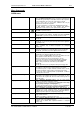
Align Coda...
For use in single or multi-Coda alignment with overlapping Codas.
(Overlapping such that the markers defining the co-ordinate axes are
made visible to all Codas).
Re-align the Coda coordinate axes to new axes defined by markers.
Opens the Align Coda coordinates dialogue in which the markers
used to define the coordinate axes are specified.
In a multi-Coda system, one or more Codas may be aligned at the
same time. A message is displayed when the alignment transform is
stored.
Align Multi-Coda system…
For use in multi-Coda alignment with partially overlapping Codas.
Re-align the Coda coordinate axes to new axes defined by markers.
Opens the Multi-Coda co-ordinate Alignment dialogue in which the
markers used to define the co-ordinate axes are specified together with
the alignment marker separations and the Coda alignment positions.
A message is displayed when the alignment transform is stored.
Define Marker Origin...
Define the coordinate origin from a current marker position.
Opens the Origin dialogue in which the marker number may be
specified. The coordinate origin is set at the marker position when the
OK button is pressed. A beep sounds if the origin is set successfully.
If the marker is not fully in view, a warning message is displayed and
the origin is not changed.
Clear Origin Offset
Remove the marker origin offsets (resets back to Coda intrinsic origin).
Force-plate Reset
Resets the force-plate(s) including the force-plate zero set.
Define Trigger 1...
Opens the Digital Trigger Setup dialogue in which to define an
acquisition digital output trigger from a marker position transition.
Define Trigger 2...
Define a second acquisition digital output trigger.
Set Digital outputs…
Opens the Digital outputs dialogue in which the digital outputs may be
switched On/Off.
Available only when a Real-time digital data View is open and
selected.