USER’S MANUAL version 1.
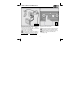
AWMR-210 MINI BUILT-IN DIMMER/SWITCH D A C B * A: Search mode button B: Wall switch connector C: Lighting connector D: Indicator (voltage and connection status) * Picture of the AYCT-102 (not included) 1
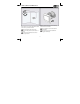
AWMR-210 MINI BUILT-IN DIMMER/SWITCH [1] Switch off the mains power. [2] Remove the existing switch from the wall.
AWMR-210 MINI BUILT-IN DIMMER/SWITCH 230 VAC [3] Disconnect the two power wires (brown and black) from the wall switch. [4] Connect the 2 switch wires from the built-in dimmer to the terminals of the wall switch. It does not matter which wire is connected to which terminal on the wall switch.
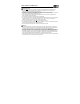
AWMR-210 MINI BUILT-IN DIMMER/SWITCH 1 2 230 VAC [5] Connect the wires you disconnected earlier to the built-in dimmer: [1] L: “hot wire" (brown, coming from the central junction box), [2] : “Switch wire” (black, coming from the light). Push the builtin dimmer into the wall box. If in doubt, ask your installer! Connect a load with a power consumption of minimum 40 Watts and maximum 210 Watts. Do not connect anything that may not be dimmed! [6] Switch on the mains power.
AWMR-210 MINI BUILT-IN DIMMER/SWITCH [7] Briefly press the search mode button with a pointed object. The indicator will begin to flash. [8] Send an "on" signal with your transmitter; for example: press the desired on button of a remote control or wall switch. The indicator on the built-in dimmer stops flashing as soon as the connection has been made. There is now voltage on the wires.
AWMR-210 MINI BUILT-IN DIMMER/SWITCH [10] Re-install the wall switch in the wall box (in which the dimmer is located). [9] To confirm, the built-in dimmer switches on and off two times. The code of the transmitter is stored in the memory of the built-in dimmer. You can continue to use the wall switch for manual operation. Now you can also use the wall switch for dimming (see "Reminders").
AWMR-210 MINI BUILT-IN DIMMER/SWITCH 3x [11] Press the on or off button on the transmitter to operate the switch. [12] Dimming: (1) Press once: light switches on. (2) Press again: The light intensity changes continuously. (3) Press a third time as soon as the desired light intensity has been reached.
AWMR-210 MINI BUILT-IN DIMMER/SWITCH Remarks Reminders • This product is suitable for installation in a wall box, behind the existing wall switch, and must be used in combination with at least one COCO transmitter. • The wall box must have depth of at least 40 mm. • This product is a dimmer/receiver: control lights (or other suitable devices) remotely, without complicated wiring. You can continue to use the existing wall switch for manual operation.
AWMR-210 MINI BUILT-IN DIMMER/SWITCH Safety instructions • Wa rning: Even if the product is switched off, voltage may still be present at the switched socket! • Never use COCO products for life support systems or other applications in which equipment malfunctions can have life-threatening consequences. • Do not connect any lights or other equipment that consume a total of less than 40 Watts or more than 210 Watts. Connecting incorrect equipment can cause defects, a short circuit and fire.
AWMR-210 MINI BUILT-IN DIMMER/SWITCH This product complies with the essential requirements and other relevant provisions of the applicable European directives. The Declaration of Conformity (DoC) is available at www.coco-technology.com. If possible, submit this product for recycling after use. Do not dispose of the product with household trash. Warranty and copyright This device is covered by a two-year warranty that begins on the day of purchase. Visit www.cocotechnology.
AWMR-210 MINI BUILT-IN DIMMER/SWITCH PAN-TRADE INTERNATIONAL B.V. P.O. BOX 126 4760 AC ZEVENBERGEN THE NETHERLANDS www.coco-technology.