DASH2208 DASH2308 DASH2216D DASH2316D CCDC4500 USER MANUAL Table of Contents Record your Ride 1|Page ©2018 Cobra Electronics Corporation Part No.
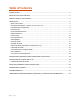
Table of Contents INTRODUCTION ............................................................................................................................... 3 DRIVE HD DASH CAM FEATURES..................................................................................................... 3 PRODUCT SERVICE AND SUPPORT .................................................................................................. 4 YOUR DEVICE.................................................................................
INTRODUCTION Congratulations! You’ve made a smart choice by purchasing a Drive HD Dash Cam from Cobra. Drive HD DASH Series cameras provide peace of mind by continuously recording the road in beautiful 1296P Super HD video. With cutting edge features, phenomenal video quality, and an industry-leading focus on user experience, Drive HD Dash Cams are the best solution to Record Your Ride.
Simple Installation - Mount the unit on the windshield, apply power, and forget about it. Drive HD cameras will automatically start recording without the need for complex configuration. Ready to Use - Includes a MicroSD memory card, vehicle power adapter, and adhesive windshield mount so the unit is ready to use out-of-the-box. SnapShot - The SnapShot button is always available so that you can capture a still image at any time. Built-in Microphone & Speaker - Records and plays back audio along with video.
YOUR DEVICE WHAT’S IN THE BOX • • All Models • Dash Cam • MicroSD Card (size varies by model) • Adhesive Windshield Mount • 12V Vehicle Power Adapter • 10ft Micro USB Cable (for power only) • 1.5ft Micro USB Cable (for connection to computer) Dual View Models Only • CAM2 2nd Camera • 13ft Extender Cable for CAM2 • Y-Splitter Cable OPTIONAL ACCESSORIES – available at www.cobra.com • • • • • Low Profile Adhesive Mount: CA-Mount-001 – Great for discreet and semi-permanent installations.
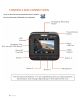
CONTROLS AND CONNECTIONS Silver for Non-Bluetooth (DASH2200 Series) Models Blue for Bluetooth (DASH2300 Series) Models 6|Page
SINGLE CAM INSTALLATION 1 MOUNT To install the Adhesive Windshield Mount, slide the dash cam onto the mount and twist to tighten the cam in desired location. Clean the spot on your windshield where you would like to mount the camera and confirm the placement. Reminder, this is an adhesive mount so it is important to mount correctly the first time. Next, peel the plastic film off the 3M adhesive and press the mount FIRMLY onto the windshield.
DUAL CAM INSTALLATION 1 MOUNT CAM 1 - Slide the dash cam onto the adhesive mount and twist to tighten the cam in desired location. Clean the spot on your windshield where you would like to mount the camera and confirm the placement. Reminder, this is an adhesive mount so it is important to mount correctly the first time. Next, peel the plastic film off the 3M adhesive and press the mount FIRMLY onto the windshield. CAM 2 – Attach CAM 2 to the windshield using the adhesive.
3 DRIVE! Drive HD Dash Cams are designed to set and forget. After initial setup the unit will turn on and start recording as soon as power is applied. When the Micro SD Card is full the oldest footage will be deleted to make way for the new. If you witness something that you don’t want to be deleted simply press the Emergency Record button and it will be saved forever.
INITIAL SETUP When the Dash Cam is powered on for the first time it will ask you to enter basic setup information. You will be asked to set the Year, Month, Day, Time Zone, Daylight Saving Time, and Time. This information is needed so that file names will be created correctly and time stamps will be accurate in your videos.
VIDEO SCREEN The Video Screen is the home screen for the device. STATUS BAR ICONS: A B C D E F G A. B. C. D. E. F. Recording Icon. When recording dual camera videos the icon will appear. Indicates the recording time of the current clip. The hazard icon appears if an Emergency Recording is active. Indicates whether the mic is active or muted. Shows if Parking Mode is on.
BUTTON OPTIONS (While Recording): • For the Single Cam Models, this button simply turns the screen off or on. Turning the screen off does not interrupt video recording. The red/green LED on the top left of the unit will flash to indicate that the unit is recording. For the Dual Cam Models, this button cycles through Cam1 view, Cam2 view, Screen Off, and Split Screen View. • • • Toggles the microphone on/off.
VIDEO SETTINGS Video Resolution: This setting allows you to set the video recording resolution: Higher resolutions will give you a sharper image, but take up more memory on the card.
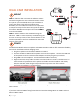
Parking Mode: Parking Mode uses the Motion Sensor and G-Sensor to optimize recording functionality while your vehicle is parked. The idea is that when you are parked, the dash cam will be “sleeping” but it will monitor the video image for motion and it will also monitor the G-sensor. If it detects motion or if it detects an impact then the unit will wake up and start recording. There are two time settings for the timeout for going into Parking Mode: 5 minutes and 10 minutes.
Lane Departure The Lane Departure Warning System (LDWS) provides audible and visual warnings as you approach a lane boundary. It will indicate whether you are departing the lane to the left or to the right. Note that this feature relies solely on analyzing video of the road ahead and, therefore, works best on clearly marked roads with good visibility. This feature is for information purposes only.
Firmware Version: Displays the device firmware version. iRADAR SETTINGS (Bluetooth Models only) Bluetooth: Turns Bluetooth on/off so the camera can connect to a smartphone running iRadar. iRadar Alerts: Select whether alerts from the iRadar app will be displayed on the dash cam or not. Speed Units: Changes the units between mph and km/h. LANGUAGE SETTINGS Allows you to set the language for the device from among the 9 supported languages.
GPS OPERATION GPS functionality embeds Location, Speed, Heading, and GSensor information into video footage recorded on the dash cam. GPS data can be received either through the iRadar App (for Bluetooth enabled models) or a GPS Mount (CAMount-002). All models covered in this manual are compatible with the GPS Mount. Operation is simple. Plug the 3.5mm plug from the GPS mount into the Accessory Port on the left side of the unit. A gray GPS icon will appear indicating that GPS is plugged in.
Cobra iRadar® APP CONNECTION The DASH2308, DASH2316D, and CCDC4500 use a Bluetooth® connection to the Cobra iRadar® smartphone app. Smartphone integration allows for: 1. Embedding Location, Speed, Heading, and G-Sensor Information into video footage recorded on the dash cam. 2. Displaying iRadar driver awareness alerts on the dash cam display including: DOWNLOADING IRADAR APP AND CONNECTING TO DASH CAM Download the app from the App Store or Google Play.
CONNECTING TO A COMPUTER OR TV This device can connect to a computer or television via the USB or HDMI ports located on the side of the unit. • • • • Use the USB port on the side of the device to connect the device to your computer. When connected you will be given two options: Connect to Computer or Power Only. Select Connect to Computer to access the device via your computer. Your device connects to your computer in Mass Storage mode, and acts like a flash drive.
DASH CAM FIRMWARE UPDATE INSTRUCTIONS For optimal performance, check www.cobra.com periodically for firmware updates. • Connect the Dash Cam to your computer using the included USB to Micro-USB cable. • Power on the Dash Cam and select Connect to Computer using the record/select button. • The camera will be listed as DRIVEHD in Windows Explorer. • Download the update file from www.cobra.com and save it somewhere you will remember it. It will be called SD_CarDV.bin.
CAMERA SPECIFICATIONS 21 | P a g e
TROUBLESHOOTING If your unit does not appear to be operating properly, please follow these troubleshooting steps: • • • Make sure the power cord is properly connected. Make sure the socket of your vehicle’s cigarette lighter is clean and free of corrosion. Make sure the power cord’s cigarette lighter adapter is firmly seated in your cigarette lighter, and the LED indicator is on. For detailed and up-to-date FAQ’s, please visit www.cobra.com/support/faqs.
TRADEMARKS ACKNOWDLEGEMENT, WARNINGS, and REGULATORY INFORMATION Cobra, the snake design, Drive HD™, the d design, and Record your ride™ are proprietary trademarks of Cobra Electronics Corporation, USA. Other trademarks and trade names are those of their respective owners. Cobra Electronics Corporation™ is a trademark of Cobra Electronics Corporation, USA.