
How to Guide


8 | Page
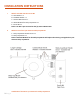
1) Remove (F) the Sticky Cup Mount Thumb Screw and Flat Washer that came with your detector.
2) Replace the carriage bolt from your detector Sticky Cup Mount with the longer ○
E
45mm M1
Bolt.
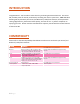
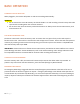
3) Sandwich the (C) Camera Mount Arm with the (A) Lock Washer and (B) Standard Washer as
shown in the image above.
4) Mount the Camera Mount Arm and washers onto the (D) 45mm M1 Bolt and tighten with ○
H
Sticky Cup Mount Thumb Screw.
Note: Be careful not to lose the flat washer that came with your detector. Also, save the carriage
bolt that came with your detector. You will need this if you decide to use the detector alone
without the M1 camera in the future.
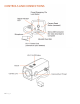
III. Mounting the Sticky Suction Cup in your vehicle and adjusting the detector and M1 angles
1) Remove the backing from the Sticky Cup mount, if not already removed.
2) Make sure the M1 is centered on your windshield and not the detector. This will ensure a
symmetrical recording view to capture both edges of the windshield. Remember to mount the
detector and the M1 away from windshield wipers and heavily tinted areas that might obstruct
the radar antenna, laser and camera lenses.
3) Firmly press the Sticky Cup onto windshield and flip the locking clamp to secure.
4) Slide the detector onto the mounting bracket until it’s fully engaged. If you have the magnet
type mount, the magnet inside holds the detector in place.
5) Loosen the ○
H
Sticky Cup Mount Thumb Screw to adjust the detector mounting angle. For
optimum detection and performance, mount the detector level and high enough to provide
clear view of the road from front and rear. Once the detector is properly adjusted, tighten the ○
H
Sticky Cup Mount Thumb Screw to secure the detector.
6) Next, loosen the ○
C
Camera Mount Thumb Screw and adjust the camera to be level with the
detector and retighten the screw.
IV. Connecting Power to your M1 dash cam and Detector
1) Connect the pigtail RJ-11 power cord coming out from the M1 to your Detector.
2) Plug your Detector’s SmartCord into the RJ-11 receptacle on the M1 and connect the cigarette
lighter plug to the 12V power outlet of your vehicle.
3) Turn the ignition key ON and both the Detector and M1 will power up and become operational.