IntelliLink™ Wireless Remote Series 12-Band™ S-XRS™ Maximum Performance Digital Radar/Laser Detector with Red Light/Speed Camera GPS Locator*
Introduction Important Information and Customer Assistance Important Information • Safe Driving Motorists are expected to exercise all due caution while using this product, and to obey all applicable traffic laws. Do not attempt to change settings of the unit while the car is in motion. Federal Laws Governing the Use of Radar Detectors It is not against federal law to receive radar transmissions with your Cobra® radar/laser detector.
Introduction Controls, Indicators and Connections The XRS R7 provides detection capabilities for radar, laser and strobe signals. The XRS R9G has all the features of the XRS R7 plus a GPSL module which provides alerts when approaching photo-enforced intersections and roads with fixed red light/speed cameras. The XRS R9G can store up to 1,000 additional user-programmable Location Alerts.
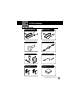
Introduction In This Package In This Package • 12V Power Cord with In-line Fuse for Hardwired Installation 12V Power Cord with In-line Fuse and Cigarette Lighter Plug 12V to 5V USB Power Adapter USB to Mini-USB Retractable Cable RDU Holster and Vent/Visor Clips GPSL Cable (R9G Only) Optional Hook and Loop Strips for Mounting Holster MDU Power Cord Clips and Pre-cut Adhesive Tapes Nothing Comes Close to a Cobra® A3
Introduction Contents Introduction Important Information . . . . . . . . . .A1 Customer Assistance . . . . . . . . . . .A1 Controls, Indicators and Connections . . . . . . . . . . . . . . . .A2 In This Package . . . . . . . . . . . . . . .A3 Product Overview . . . . . . . . . . . . . . .2 Installation Overview . . . . . . . . . . . .4 Your Detector Installation . . . . . . . . . . . . . . . . . . . .7 Controls and Display . . . . . . . . . . .15 Getting Started . . . . . . . . . . . . . . . .
Introduction Product Overview Cobra XRS R7 and XRS R9G • WARNING Modifications or parts not approved by Cobra Electronics Corporation may violate FCC Rules and void authority to operate this equipment. Read and understand the information in the Installation Overview and Installation sections of this manual for best operation. The XRS R7 consists of a Main Detector Unit (MDU) and a wireless Remote Display Unit (RDU).
Introduction Product Overview Remote Display Unit (RDU) The RDU is a wireless remote controller/display module that shows alerts detected by the MDU. The RDU display uses an Extreme Bright DataGrafix™ (Organic Light Emitting Diode) Display to show large graphical alerts as signals are detected. The RDU uses a rechargeable lithium-ion (LiON) battery and is supplied with a holster and clips for mounting on heating/air conditioner vents or sun visor.
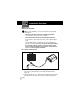
Installation Overview Introduction Mount Unit Main Detector Unit (MDU) Note: To power the MDU, use one of the two power cords provided (See Page A3). • 12V Power Cord with In-line Fuse for Hardwired Installation: For connection to vehicle’s fuse box or battery, or • 12V Power Cord with In-line Fuse and Cigarette Lighter Plug: For connection to 12-volt vehicle accessory outlet (cigarette lighter plug). Fuse box hard wiring is recommended. Use this configuration to provide a more discreet installation.
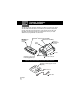
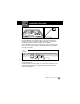
Introduction Installation Overview Figure B Figure C Mount the MDU high on windshield to right of rear view mirror (Figure B). The MDU must have a clear view through the windshield, be parallel to the road (Figure C) and have clearance to snap into the “up” position. Position the MDU for easy access to power switch, cable connections and for mirror movement. Mount the MDU on the windshield close to the headliner. (See page 7 for details.
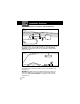
Introduction Installation Overview Global Positioning System Locator (GPSL) - (XRS R9G Model Only) Figure E Internal View Mount GPSL module close enough to the MDU for supplied cable to connect both modules (Figure E). Mount GPSL with proper side (“This Surface Toward Sky” wording embossed in unit case) attached to windshield and exposed to the sky. Figure F Internal View IMPORTANT: Some States and municipalities prohibit mounting any object on the windshield.
Your Detector Installation Main Detector Unit (MDU) 1. Position MDU before actual mount. • Do not attempt to adjust MDU bracket. • Hold unit in place. • Using non-permanent pen, mark two opposite corners. 2. Peel off film from two-piece fastener strips. Align with two corner markings made in step 1. Press MDU bracket against windshield. • Fastener strips cannot easily be removed. Strength of adhesive strips increases with time. • Do not pull on MDU for first 20 minutes.
Your Detector Installation 1. Loosen MDU (gray) bracket Not In Use. adjust knob. Stored/Concealed Position. 1 Bracket Adjust Knob 2. Adjust module to a position parallel to the road. Lower to Operating Detection Position. Loosen 2 3 3. Tighten knob to set proper horizontal detection position. The MDU mounting bracket has two detent positions: • one for detection operation (horizontal position) • one for storage or concealment (up position). Makes MDU less visible from outside.
Your Detector Installation 4. Attach power cord to MDU. Use power cord clips to route to fuse box or lighter/accessory outlet, depending on the selected power cord. Surfaces must be clean and free of dirt, oil and dust. Plug in the power cord.
Your Detector Installation Remote Display Unit (RDU) Battery Installation 1. Turn RDU over and slide battery cover off of RDU body. 2. Carefully plug battery wire connector into the battery connection port in RDU. Connector only fits one way. 3. Replace battery cover. Battery Charging The unit is shipped with a sealed lithium-ion (LiON) battery pack that is rechargeable. IMPORTANT: Avoid temperature extremes (hot and/or cold) to help prolong battery life and performance.
Your Detector Installation 1. Attach 12V to 5V retractable USB power cable to bottom of RDU and to 12V power adapter. 2. Connect 12V power adapter to vehicle accessory outlet (cigarette lighter plug). 3. Initial charge for battery is two (2) hours. (RDU may be used while charging.) WARNING This lithium-ion (LiON) battery should only be recharged inside the RDU. Do not substitute any other type of charging adapter or charging base to charge the battery. Battery damage, fire or explosion may result.
Your Detector Installation RDU Holster A holster is provided to allow you to position the RDU for best driver visibility and access while charging the battery. A vent or visor clip will attach to the rear of the holster. Self-adhesive hook and loop strips are also included for alternative mounting locations.
Your Detector Installation Global Positioning System Locator (GPSL) (XRS Model R9G Only) • 1. Position GPSL before actual mount. • Hold GPSL unit in place with USB cable connected to MDU. • Using non-permanent pen, mark two opposite corners. IS CE TH FA DS R R U A S W Y K TO S 2. Peel off film from two-piece fastener strips. Align with two corner markings made in step 1. Press GPSL bracket against windshield. • Fastener strips cannot easily be removed. Strength of adhesive strips increases with time.
Your Detector Installation GPSL Initial Satellite Lock The GPSL module now needs to detect the Global Positioning satellites. 1. With vehicle running and parked in an area clear of obstructions to the sky, turn on the power to the MDU with GPSL connected. 2. Keep the MDU turned on for at least 15 minutes. This will allow fast satellite acquisition in subsequent power-ups. GPSL Icon IMPORTANT: This procedure may need to be repeated if the unit has not been used for a prolonged period of time.
Your Detector Controls and Display RDU Controls MUTE/ Button Press for Standby Status Screens. Mutes an alert. Selects features in Menu mode. DIM/ Button Press for display brightness. Navigates Menu Screens. Adjusts volume DOWN in Volume mode. MENU/SAVE Button Press to enter Menu screen. Press and hold to save User Location (XRS R9G only). CITY/ Button Toggle between Highway and City modes. Navigates Menu Screens. Adjusts volume UP in Volume mode.
Your Detector Controls and Display RDU Display Standby Screen The IntelliMute (I-Mute) symbol shows only if the feature is activated. Symbol changes to indicate if above or below Set-point when IntelliMute is turned on. (Refer to page 24.) The RDU link indicators show the the MDU is connected to the RDU by the wireless link. The indicator changes to show a lost connection. When arrow is displayed, you can go to the next Standby Control screens by pushing MUTE/ button.
Your Detector Getting Started Power On/Off • 1. Press power button on RDU. 2. Unit cycles through power on/self test. Displays Standby screen when process completed. 3. Display changes to Auto Dark operating screen after 30 seconds (factory default). 4. Press, hold power button on RDU for more than two seconds to turn off unit.
Getting Started Your Detector Standby Screens Press Mute/ while the Standby screen is displayed to cycle through different Standby screens. The Standby screens will be displayed in the following order: Main Standby Screen RDU Battery I-Mute City/Hwy Mode Car Voltage Latitude/ Longitude Speed Compass Compass, Speed and Latitude/Longitude screens only display if GPSL is connected to system. NOTE: Last Standby screen viewed will be displayed when exiting Auto Dark mode.
Your Detector Getting Started Screens display only if GPSL is connected. Compass Compass Indicates driving direction. NW Speed Speed 55 Shows speed of vehicle (may be changed to km/h in Menu). mph Lat / Lon 41º54'53"N 87º47'22"W Lat/Lon Displays latitude and longitude of present location.
Your Detector Getting Started Auto Dark When Auto Dark screen is engaged, a small dot displays at bottom of screen to show that power is on. Touch any button to recall Standby screen. Highway/City Mode IntelliShield® Tri-level City mode has a Highway mode and three City mode levels: City X, City X Beep Off and City X+K. • • IntelliShield® Tri-Level City Mode Toggle from Highway to City mode for three levels of Audio Alert suppression.
EasySet Programming Your Detector Programming Overview • Begin all programming or setup with MENU/SAVE button. Select this to change USER or ALERT settings. USER settings customize how system handles alert filtering, audio-related options, visual options and system-related options. ALERT settings determine which ALERT types are activated. ALERT settings on the XRS R9G model include GPS-related features.
Your Detector Program Navigation Program Flow Diagrams User Settings Diagram • Screens display in the following order when cycling through User Settings menu. Speed Units screen displays only if GPSL is connected to system. Pair RDU screen displays only if system detects a missing RDU connection. User Settings City Default Pair Remote NOTE: Only shown if RDU lock is lost. 22 English Intelli Mute Restore Factory Settings Auto Mute Speed Units NOTE: Only shown when GPSL is connected.
Your Detector Program Navigation Alert Settings Diagram Screens display in the following order when cycling through Alert Settings menu. Speed Alert, Display GPS Database Version and Delete ALL User Locations screens display only if a GPSL is connected to system. Alert Settings POP Delete All User Locations X Band K Band Display GPS Database Ku Band Speed Alert VG-2 Spectre Low Car Voltage Safety Alert These screens display only if GPSL is connected.
Your Detector Settings Programming User Settings IntelliMute® Mode • Set IntelliMute to mute alerts when vehicle is stopped or moving slowly. Intellimute senses engine RPMs and mutes alerts. IntelliMute does not mute strobe signals from emergency vehicles. IntelliMute works with City and Auto Mute modes. Set an RPM activation point to start IntelliMute. IntelliMute begins muting alerts when engine RPMs fall below set RPMs.
Your Detector Settings Setting IntelliMute From the IntelliMute Setup screen: 1. Press MUTE/ button to start setup. 2. Press and hold the vehicle accelerator at desired engine RPMs. 3. Press DIM/ button to complete setting process. System stores engine RPM setting and displays a completion message and a tone or voice message. Unit must sense a usable pulse within three seconds or a set RPM point within 30 seconds of beginning of setup, or IntelliMute detects an error and turns off.
Your Detector Settings Display Setup Display Setup determines how long RDU button backlight and display stays on before RDU screen switches to Auto Dark mode. Set RDU display time for 15 seconds, 30 seconds, one minute, three minutes or Always On. Factory default is 30 seconds. NOTE: If selecting “Always On” setting, RDU battery will need charging more frequently. Smart Power Mode SmartPower feature turns system off five minutes after car’s engine is turned off.
Your Detector Settings Programming Alert Settings POP Alert • With Pop Detect mode on, signals are detected and an alert given. During alert unit continues to detect other signals. Factory setting is Pop Detect Off. X Band Alert With X Band Detect mode on, signals are detected and an alert given. During alert unit continues to detect other signals. Factory setting is X Band Detection On. K Band Alert With K Band Detect mode on, signals are detected and an alert given.
Your Detector Settings Spectre 1 Audio Mode Spectre 1 Audio mode is only available if Spectre 1 Alert is on. Alerts are audio and displayed on screen. Safety Alert radar signals are detected and alerts given when Safety Alert mode is on. Factory setting is Spectre 1 Audio Off. Safety Alert When Safety Alert mode is On, Safety Alert radar signals are detected and an alert is given. During alert unit continues to detect other signals. Factory setting is Safety Alert On. Low Car Voltage Warning Many U.S.
Your Detector Detection Alerts Detection Alerts Alert Screens • All alerts have a unique tone and a vocal alert if the Voice Alert feature is activated. Radar Alerts RADAR RADAR X1 Ku1 RADAR K1 RADAR Ka1 Radar alerts for X band, Ku band, K band and Ka band generate a screen display “RADAR,” signal type and a number (1-5) indicating the signal strength. A unique tone sounds with a vocal alert if the Voice Alert feature is activated.
Your Detector Detection Alerts Emergency Vehicle Alerts EMERGENCY EV Emergency vehicle alerts are indicated by “EV” and the label “EMERGENCY.” Road Hazard Alerts ROAD HAZARD Road Hazard alerts show “RH” and “ROAD HAZARD.” RH Railroad Alerts RAILROAD Railroad alerts generate “RR” and “RAILROAD.” RR Low Car Voltage Alert WARNING CAR VOLTAGE LOW 30 English The detector emits a car battery low alert when voltage drops below 11.9 volts.
Your Detector Detection Alerts The following screens are shown only if a Global Positioning System Locator (GPSL) is connected to the system. A detector system with a GPSL also receives alerts based on vehicle location and information in its databases. Photo Enforcement Alerts An alert to a Photo Enforcement area is indicated by a camera surrounded by a circle. As you get closer to the location, the circle and the camera get progressively larger and you hear a unique chime.
Your Detector Radar and Laser Understanding Radar and Laser Radar Speed Monitoring Systems • Four band frequencies have been approved by the Federal Communications Commission (FCC) for use by speed monitoring radar equipment: X band K band Ka band Ku band 10.525 GHz 24.150 GHz 33.400 – 36.000 GHz 13.435 GHz Your detector detects signals in all four radar bands. VG-2 and Spectre 1 VG-2 and Spectre 1 are “detector detectors” that work by detecting low-level signals emitted by most radar detectors.
Your Detector Radar and Laser Strobe Alert Special strobes mounted on the light bars of authorized emergency vehicles (fire trucks, police cars, ambulances) automatically change traffic signals as the vehicle approaches an intersection. These strobes and the special strobe detectors located on the traffic signals are already in use in more than 1000 cities nationwide. Cobra’s exclusive Strobe Alert detector detects these special strobes and sounds an emergency vehicle alert.
Your Detector Radar and Laser Pop Radar Guns The Pop Mode Radar Gun is a single-pulse Doppler radar that is a feature of a K and Ka (Bee III Ka radar gun) band Instant-On radar gun. It uses a single, short-time pulse to measure the target vehicle’s speed. The Pop mode receiver senses Pop signals beyond the effective range of Pop radar guns. As the Pop mode receiver is so sensitive, you should limit the use of Pop Detect mode to highway and rural driving.
Your Detector Maintenance Maintenance Detector is designed and built to give years of trouble-free performance without service. No routine maintenance is required. • Follow these steps if unit is not operating properly: I Make sure power cord is properly connected. I Make sure lighter/accessory outlet of vehicle is clean and free of corrosion. I Make sure power cord’s accessory adapter is firmly seated in lighter/accessory outlet.
Your Detector Specifications Band and Frequencies • Band Frequencies X Band 10.525 ± 0.050 GHz K Band 24.125 ± 0.125 GHz Safety Alert Traffic Warning System 24.070 ± 0.010 GHz 24.110 ± 0.010 GHz 24.190 ± 0.010 GHz 24.230 ± 0.010 GHz Ka Band 34.700 ± 1.300 GHz Ku Band 13.435 ± 0.050 GHz Laser 910 ± 50 nm Strobe 700 ± 300 nm This radar detector is covered by one or more of the following U.S. patents: 5,497,148; 5,594,432; 5,612,685; 6,078,279; 6,094,148; 6,621,447.
Warranty Warranty Warranty COBRA ELECTRONICS CORPORATION warrants that its products, and the component parts thereof, will be free of defects in workmanship and materials for a term of one year from the date of first consumer purchase. This warranty may be enforced by the first consumer purchaser, provided that the product is used solely within the U.S.A and Canada.
Warranty Warranty All implied warranties, including warranties of merchantability and fitness for a particular purpose are limited in duration to the length of this warranty. COBRA SHALL NOT BE LIABLE FOR ANY INCIDENTAL, CONSEQUENTIAL OR OTHER DAMAGES; INCLUDING, WITHOUT LIMITATION, DAMAGES RESULTING FROM LOSS OF USE OR COST OF INSTALLATION.
User License User License User License • This document and the software and data described in it are furnished under license and may be used or copied only in accordance with such license. Except as permitted by such license, the contents of this document, software and data may not be disclosed to third parties, copied or duplicated in any form, in whole or in part, without the prior written permission of Cobra Electronics Corporation.
User License User License QUALITY, ACCURACY, TITLE AND FITNESS FOR A PARTICULAR PURPOSE. NO ORAL OR WRITTEN ADVICE OR INFORMATION PROVIDED BY COBRA AND/OR ITS LICENSORS OR ANY OF THEIR AGENTS, EMPLOYEES OR THIRD PARTY PROVIDERS SHALL CREATE A WARRANTY AND USER IS NOT ENTITLED TO RELY ON ANY SUCH ADVICE OR INFORMATION. THIS DISCLAIMER OF WARRANTIES IS AN ESSENTIAL CONDITION OF THE AGREEMENT.
Customer Assistance Product Service Product Service • For questions about operating or installing this new Cobra product, or if parts are missing…CALL COBRA FIRST…do not return this product to the store. If this product should require factory service, call Cobra before sending the product. This will ensure the fastest turn-around time on any repair. If Cobra asks that the product be sent to its factory, the following must be furnished to have the product serviced and returned. 1.
Customer Assistance Trademark Acknowledgement Trademark Acknowledgement Cobra®, 6 Band®, 9 Band®, DigiView®, EasySet®, Extra Sensory Detection®, IntelliMute®, IntelliShield®, LaserEye®, Nothing Comes Close to a Cobra®, Safety Alert® Traffic Warning System, Strobe Alert®, VG-2 Alert®, Xtreme Range Superheterodyne® and the snake design are registered trademarks of Cobra Electronics Corporation, USA.
Customer Assistance Optional Accessories IS CE TH FA DS R R U A S W Y K TO S Dual Port Power Adapter Includes adjustable plug (up to 90˚) and fuse GPS Locator (w/cable) Upgrade Kit (for Model XRS R7 Only) Item #RDA GPSL Item #CLP-2B LiON Replacement Battery Pack Replacement RDU Item #RDA LIBP Item #RDA RDU Nothing Comes Close to a Cobra® 43
Customer Assistance Accessories Order Info Ordering From U.S.A. Call 773-889-3087 for pricing or visit www.cobra.com. For Credit Card Orders Call 773-889-3087 [Press one from the main menu] 8:00 a.m. to 6:00 p.m. Central Time, Monday through Friday. Make Check or Money Order Payable To Cobra Electronics, Attn: Accessories Dept., 6500 West Cortland Street, Chicago, IL 60707 U.S.A. To Order Online Please visit our website: www.cobra.
The Cobra line of quality products includes: CB Radios microTALK® Radios Radar/Laser Detectors Safety Alert® Traffic Warning Systems Handheld GPS Receivers Mobile GPS Navigation Systems HighGear® Accessories CobraMarine® VHF Marine Radios CobraMarine® Chartplotters Power Inverters Accessories Nothing Comes Close to a Cobra® For more information or to order any of our products, please visit our website: www.cobra.