EXPLORER 510 User manual
Document number: 98-143082-A Release date: 17 December 2014 Disclaimer Any responsibility or liability for loss or damage in connection with the use of this product and the accompanying documentation is disclaimed by Thrane & Thrane A/S. The information in this manual is provided for information purposes only, is subject to change without notice and may contain errors or inaccuracies. Manuals issued by Thrane & Thrane A/S are periodically revised and updated.
Safety summary 1 The following general safety precautions must be observed during all phases of operation, service and repair of this equipment. Failure to comply with these precautions or with specific warnings elsewhere in this manual violates safety standards of design, manufacture and intended use of the equipment. Cobham SATCOM assumes no liability for the customer's failure to comply with these requirements.
Antenna safety instructions Antenna safety instructions 2 Use only manufacturer supplied antennas. Antenna minimum safe distance: 0.6 m Antenna gain Directional, with maximum gain of 11 dBi (with reference to isotropic). The Federal Communications Commission has adopted a safety standard for human exposure to RF (Radio Frequency) energy which is below the OSHA (Occupational Safety and Health Act) limits.
About this manual About this manual 3 Intended readers This manual is a user manual for the EXPLORER 510. The manual is intended for anyone who is using or intends to use the EXPLORER 510. No specific skills are required to operate the EXPLORER 510. However, it is important that you observe all safety requirements listed in the Safety summary in the beginning of this manual, and operate the EXPLORER 510 according to the guidelines in this manual.
Contents Chapter 1 Introduction to EXPLORER 510 General description .................................................................................................................. 1 Features and interfaces of the EXPLORER 510 ............................................. 2 Your EXPLORER 510 terminal ......................................................................................... 3 Chapter 2 To get started To unpack and assemble the EXPLORER 510 ..................................................
Contents To enter the SIM PIN in the web interface ...................................................33 To control data connections from web interface (BGAN) ................34 Status information ..................................................................................................................35 The Control panel ....................................................................................................................36 To use the logs ............................................
Contents App. B Conformity CE (R&TTE) ......................................................................................................................................89 IC .............................................................................................................................................................89 FCC .........................................................................................................................................................
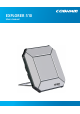
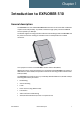
Chapter 1 Introduction to EXPLORER 510 1 General description The EXPLORER 510 is the smallest EXPLORER BGAN terminal ever and is the ideal combination of performance and portability. It provides simultaneous high quality voice and broadband access at speeds up to 464 kbps. The durable magnesium casing and a dust and water resistant design makes the EXPLORER 510 the perfect choice when working off the beaten track but still dependent on a reliable connection.
Chapter 1: Introduction to EXPLORER 510 The EXPLORER 510 can withstand severe environmental conditions such as humidity, dust, extreme weather and changing temperatures. It is small in size and fits easily into a backpack or similar.
Chapter 1: Introduction to EXPLORER 510 Your EXPLORER 510 terminal EXPLORER 510 overview The EXPLORER 510 is a compact unit comprising transceiver and antenna in one unit.
Chapter 1: Introduction to EXPLORER 510 User interfaces The web interface is a built-in web interface for easy configuration and daily use. The web interface is accessed from a computer, smartphone or tablet connected to the EXPLORER 510, using an Internet browser. No installation of software is needed. For further information on the web interface, see The web interface on page 29. A smartphone app, EXPLORER Connect, is also available for iPhone and for Android phones.
Chapter 2 To get started 2 This chapter describes: • To unpack and assemble the EXPLORER 510 • To switch the EXPLORER 510 on or off • To connect your WLAN-enabled device • To connect to LAN • To access the web interface • To access the network • To start and stop data connections • To make phone calls over BGAN • External power To unpack and assemble the EXPLORER 510 Initial inspection Inspect the shipping carton immediately upon receipt for evidence of damage during transport.
Chapter 2: To get started What’s in the delivery The following items are included in the delivery: • EXPLORER 510 terminal • AC/DC adapter • USB to LAN Converter Cable • EXPLORER softbag • Getting started booklet The EXPLORER Connect app If you want to use your smartphone with the EXPLORER 510, install the EXPLORER Connect app, which is available for iPhone at the Apple Store and for Android phones at Google Play.
Chapter 2: To get started To remove the SIM card Note When the SIM card is removed you cannot make calls or data sessions, but you can still use the built-in web interface to set up the terminal. To remove the SIM card, do as follows: 1. Loosen the two screws holding the SIM cover. 2. Lift the cover. 3. Push the SIM card gently and let it pop out. 4. Remove the SIM card. 5. Close the cover and tighten the two screws gently. To switch the EXPLORER 510 on or off Do as follows: 1.
Chapter 2: To get started To connect your WLAN-enabled device Do as follows: 1. Check that the WLAN LED is on (green or yellow), meaning that WLAN is ready in your EXPLORER 510. 2. Place your WLAN-enabled device (computer, tablet or smartphone) close to the EXPLORER 510, but not in front of the BGAN antenna. 3. On your device, search for available WLAN networks. 4. Select the EXPLORER 510 WLAN access point when it appears in your list of available wireless networks. The default name is EXPLORER510.
Chapter 2: To get started To access the web interface If you are not using the EXPLORER Connect app, you can use the built-in web interface for configuration and operation of the EXPLORER 510. To access the web interface, do as follows: 1. Start up the terminal. For details, see To switch the EXPLORER 510 on or off on page 7. 2. Connect your computer or smartphone to the terminal, e.g. using WLAN as described n the previous section. 3.
Chapter 2: To get started Pointing (BGAN) Note You can choose to cancel pointing from the pointing page in the EXPLORER Connect app or the web interface. In this case you cannot communicate on the BGAN network, but you can access all terminal settings. Before pointing the antenna you can use the coverage map below to find your approximate location in relation to the satellites. The Inmarsat satellites are positioned above the equator, at the centre of each “footprint”.
Chapter 2: To get started To point the antenna To obtain optimum bandwidth and operating time on the BGAN network, adjust the position of the EXPLORER 510 with great precision. Do as follows: 1. Find the approximate direction of the satellite. See Pointing (BGAN) on page 10 for a map with the location of the satellites. 2.
Chapter 2: To get started For details on how to enable or disable the pointing sound, see To enable or disable the pointing sound on page 50. To repoint the antenna You may need to point the antenna again later, e.g. if the terminal has been moved or the signal is blocked. To start the pointing process again, do as follows: 1. From the EXPLORER Connect app, select Pointing. 2. Go through the pointing process as described in the previous section To access the network on page 9.
Chapter 2: To get started To start and stop data connections By default, you must activate your data connection from the EXPLORER Connect app or from the web interface before you can access the Internet. However, you can enable automatic activation of a data connection. See To set up the connection mode on page 47. To start and stop data connections on your EXPLORER 510, do as follows: 1.
Chapter 2: To get started Default data connection types By default, the following connections are available: Name Type of connection Standard data Several users can share the data connection. This type of connection is ideal for TCP/IP traffic such as e-mail, file transfer, and Internet/intranet access. The user pays for the amount of data sent and received.
Chapter 2: To get started To make phone calls over BGAN To connect a phone Your smartphone or IP handset can be set up to make and receive calls over the BGAN network, using the terminal’s phone number. Note Make sure your phone has an integrated SIP client. Cobham SATCOM offers the EXPLORER Connect app with a built-in SIP client that is ready to use with the EXPLORER 510. You can also find other SIP applications on the Internet.
Chapter 2: To get started First time SIP setup If you do not have the EXPLORER Connect app and it is the first time you connect your phone to the EXPLORER 510 for making calls, you must first set up the SIP server details in your phone. For information how, see the user documentation for your phone and for the SIP application. You may be asked to enter some of the following details: • SIP server address and port: Default address: 192.168.0.
Chapter 2: To get started External power When you connect external power to the DC input, the battery is charged while maintaining normal operation. Refer to Power input on page 83 for specifications and pin-out for the DC Power input. To power the terminal or to charge the battery, connect one of the following external power sources to the DC input: • 10-32 VDC • The supplied AC/DC adapter connected to 100240 V Mains • A solar panel (min.
Chapter 2: To get started Semi-fixed installation You can mount the EXPLORER 510 on a standard camera tripod. For this purpose, the EXPLORER 510 has a 1/4 - 20 UNC thread that should fit most standard camera tripods. Do as follows: 1. Mount the EXPLORER 510 on a tripod using a 1/4 - 20 UNC bolt or thumb screw. Note The bolt or thumb screw must penetrate maximum 7 mm into the thread in the EXPLORER 510. 2. Start up the EXPLORER 510 and point the antenna as described in Pointing (BGAN) on page 10. 3.
Chapter 3 Operation 3 This chapter describes daily use and basic setup. For information on configuration, see Configuration on page 28. This chapter describes: • BGAN or cellular network • Connection to the EXPLORER 510 • Data connection • Phone calls • Alerts • Status of the EXPLORER 510 • Tracking BGAN or cellular network The EXPLORER 510 is a BGAN terminal.
Chapter 3: Operation Data connection Router function The terminal has a router function which routes traffic between the local network connected to the terminal and the BGAN network connection. The router contains NAT (Network Address Translation) which allows sharing of a public IP address between a number of local network users. Standard or Streaming data The BGAN network supports different classes of data connection to the Internet. The main classes are Standard data and Streaming data.
Chapter 3: Operation PPPoE (Point-to-Point Protocol over Ethernet) Note You cannot see in the EXPLORER Connect app nor in the web interface if a PPPoE connection is active! Overview You can establish a PPPoE connection to the BGAN network using the EXPLORER 510 system. Use PPPoE if you want to control your connection independently of the web interface.
Chapter 3: Operation To configure the connected equipment for PPPoE How to configure your equipment depends on the type of equipment. Refer to the user documentation of the equipment. As a minimum, you need to configure the following parameters in your equipment in order to make PPPoE work with the terminal: • User name and password. The user name and password can be left blank (or insert user name: void and password: void).
Chapter 3: Operation To access the terminal using AT commands 1. Connect your computer to the EXPLORER 510 terminal. You may connect directly to the terminal or use a remote connection as described in the next sections. 2. On the connected computer, start a Telnet session. 3. Select TCP/IP and type in the IP address and port number. • For local connection, use the local IP address of the EXPLORER 510 (default 192.168.0.1) and port number 5454.
Chapter 3: Operation To activate a data connection with an SMS To be able to activate a data connection on the terminal from a remote location, the terminal must be set up as described in Remote access with SMS on page 62. Send an SMS to the mobile number of the terminal.
Chapter 3: Operation Phone calls Call types Definition The phone connection can be either a Standard voice connection or a 3.1 kHz audio connection. • For outgoing calls, the call type is Standard voice by default. You can change the call type for your call to 3.1 kHz audio by dialling 2* before the number. Example: 2*004539558800 • For incoming calls, you can set up in the web interface (IP handset page) which call types you want to receive on your smartphone or IP handset.
Chapter 3: Operation To make a call to the EXPLORER 510 To make a call to a phone connected to the EXPLORER 510, dial + • + is the prefix used in front of the country code for international calls. This is 00 when calling from countries in Europe and from many other countries. • Mobile number. The first part of the mobile number is always 870, which is the “country code” for the BGAN system. For information on the mobile numbers, refer to your airtime subscription.
Chapter 3: Operation Status of the EXPLORER 510 • EXPLORER Connect app: Select Dashboard to see status information • Web interface: If the screen for the web interface is large enough, it shows a status field at the bottom of the page or in the right side of the page. If not, click to show the status page. Click again to return to the previous page. The Status page shows information such as terminal status, network status, position status and ongoing communication.
Chapter 4 Configuration 4 This chapter describes how to use the web interface or the Terminal Access part of the EXPLORER Connect app to operate, set up and configure your system.
Chapter 4: Configuration The EXPLORER Connect app If you are using a smartphone to configure your EXPLORER 510, you can use the EXPLORER Connect app, which is available for iPhone (from the Apple Store) and for Android phones (from Google Play). For an overview of the functions of the EXPLORER Connect app, see The EXPLORER Connect app on page 6. To access the configuration settings, start the EXPLORER Connect app and select Terminal Access.
Chapter 4: Configuration To change the language When you have access to the web interface, if you want to display a different language than English, do as follows: 1. Select the Control panel in the top-right corner. 2. Select Terminal settings. 3. At Language, select a language from the drop-down list and click Save. You can change the language to French, German, Russian, Spanish, Chinese or Japanese.
Chapter 4: Configuration Icons in the icon bars The icon bars are always available at the top and bottom of the web interface. Some of the icons are permanent while others are temporary. Icon Explanation Power status. The icon changes according to status. Click to see detailed battery status. Battery level Battery charging Signal level of the external network (BGAN or cellular). If EXPLORER Cellular Modem is connected, click to select the network to use (BGAN or EXPLORER Cellular Modem).
Chapter 4: Configuration To point the antenna (BGAN) Before you can use the BGAN network, you must point the antenna in the direction of the satellite and find the best possible signal strength. For detailed information on the pointing procedure, see To access the network on page 9. You can use the EXPLORER Connect app or the web interface to help you with the pointing process. Pointing in web interface To start the pointing procedure from the web interface, do as follows: 1.
Chapter 4: Configuration To enter the SIM PIN in the web interface Note Whether you are using the BGAN network or a cellular network, you need a SIM card to access the network. If you are using BGAN, the SIM is inserted in the terminal and if you are using the EXPLORER Cellular Modem the SIM card is inserted in the modem. The method for entering the PIN is the same for both types of network. Do you need a SIM PIN? Note You may not have to enter a SIM PIN to access the terminal.
Chapter 4: Configuration To control data connections from web interface (BGAN) The startup page of the web interface is used to start and stop data connections and to set up the data connections. Note If you are using the EXPLORER Cellular Modem instead of the BGAN network, see Optional: To set up cellular network for data on page 64.
Chapter 4: Configuration Default data connection types By default, the following connections are available: Name Type of connection Standard data Several users can share the data connection. This type of connection is ideal for TCP/IP traffic such as e-mail, file transfer, and Internet/intranet access. The user pays for the amount of data sent and received.
Chapter 4: Configuration The Control panel The Control panel is used for accessing the settings and functions of your EXPLORER 510. To open the Control panel, click from the bottom right corner of the web interface.
Chapter 4: Configuration To use the logs To access the logs To access the Logs, select and select Logs from the menu. The Logs page contains: • Call log: A list of all incoming, outgoing and missed calls since the log was last cleared. • Data log: A list of all data sessions since the log was last cleared. • Total counters: Totals for each type of service since the log was last cleared. Date and time is the international UTC time, received from the satellite.
Chapter 4: Configuration Total counters The total counters show: • Call session totals shows the total duration (hh:mm:ss) for each call type since the log was last cleared. It also shows the estimated call charge for each call type (if Call charges have been entered). • Data session totals shows totals for each data connection type since the log was last cleared.
Chapter 4: Configuration To set up the interfaces WLAN interface setup Note The Internet settings entered in the Terminal settings page also apply for the WLAN interface. See Internet and LAN connection modes on page 48. To configure the WLAN interface, do as follows: 1. In the Control panel , click the WLAN tile. 2. To enable the WLAN interface, select Enable. Important If you disable WLAN you may not be able to access the EXPLORER 510.
Chapter 4: Configuration The encryption key must normally be a hexadecimal code. However, if you are using WPATKIP or WPA2-AES encryption (default) you can choose to use a text string, which may be easier to memorize. 9. Type in the Encryption key for the selected Security standard (not applicable if security mode = None). The default encryption key is the serial number of the EXPLORER 510. You can find the serial number under Control panel > Support > About or on the label on the EXPLORER 510. 10.
Chapter 4: Configuration USB interface setup Note that the USB interface is a Host interface, primarily used for charging devices such as tablets or smartphones and for recovery software upload. To configure the USB interface, do as follows: 1. In the Control panel , click the USB tile. 2. To enable the USB interface, select Enable. Note • • It may take some seconds to enable the interface. on the USB tile means the interface is disabled. on the USB tile means the interface is enabled. 3.
Chapter 4: Configuration To manage smartphones Overview This section describes how to manage smartphones connected to the EXPLORER 510. The terminal supports connection of up to 16 phones through the WLAN interface. Each phone must have a local number in the range 0501 to 0516 as well as a unique password. For details, see the next section. For details on SIP settings and how to connect your phone to the WLAN interface, see To connect a phone on page 15.
Chapter 4: Configuration Support features To open the Support page, select (Control panel) > Support. To view the Alerts When an alert is registered, the web interface shows a warning icon in the icon bar as long as the alert is active. The Alerts list only shows alerts that are currently active. 1. To view the alerts, click from the icon bar at the top of the web interface, or select Alerts from the Support page.
Chapter 4: Configuration 3. Select Download report. 4. Choose a location for the file and save it. To update software Important If the battery power is 25% or less you must connect DC power to the terminal before starting the software update. Once connected, do not remove DC power until the software update is completed. To update the software in the EXPLORER 510, do as follows: 1. Download the new software1 or acquire the software from Cobham SATCOM and save it on your computer. 2.
Chapter 4: Configuration To reset the administrator password If you have forgotten the administrator password, do as follows: 1. Contact your supplier for a reset code. Report the serial number and IMEI number of the terminal. You can find the serial number under Control panel > Support > About and the IMEI number under Control panel > Support > Extended status. 2. After receiving the reset code from your supplier, select Reset password from the Support page. 3.
Chapter 4: Configuration Terminal settings To configure the terminal settings, select (Control panel) > Terminal settings.
Chapter 4: Configuration Power-up mode with external power You can set the terminal to automatically power up when external power is applied. 1. In the Terminal settings page, locate Power-up mode when using external power. 2. Select Automatic or Manual. • Automatic means the terminal powers up automatically when external power is applied. • Manual means you must use the power switch to power the terminal. 3. Click Save.
Chapter 4: Configuration • Cellular if available: The EXPLORER 510 uses cellular network if it is available at startup (that is if the EXPLORER Cellular Modem is inserted and the cellular network is found) • User selection: Every time the EXPLORER 510 starts up you must select which network you want to use. You cannot access any network until you have made the selection.
Chapter 4: Configuration 2. At Internet connection mode, select Modem mode or Router mode. Router mode is the default setting and is recommended for most purposes. • Select Router mode if one or more computers are connected and the EXPLORER 510 should act as a router. When Router mode is selected, the EXPLORER 510 uses the builtin NAT module for making the necessary address translations.
Chapter 4: Configuration 6. If you want to change the Network mask for the local network of the terminal, type in the new network mask. The default network mask is 255.255.255.0. 7. Under DHCP range start and DHCP range end, type in the range of IP addresses that should be assigned to locally connected equipment. 8. Click Save. To enable or disable the pointing sound The EXPLORER 510 can make a sound to guide you through the pointing procedure (default enabled).
Chapter 4: Configuration To set up your data connection packages (BGAN) To change a connection package To change a connection package, click in the right side of the tile with the connection package that you want to change. If you want to Do as follows Change the name of the connection package Click Properties, type in the new name and click Save. The new name is shown on the tile on the startup page. Delete a connection package Click Delete packagea Note: You cannot delete Standard data. a.
Chapter 4: Configuration 3. Click Click here to create connections. 4. Select the connection type you want for your new connection package. 5. Click Save package. The new package should now appear as a new tile on the startup page. To change the APN for a connection package By default a connection package is set to use no IP Header compression and to use the APN (Access Point Name) from the SIM card. This is suitable for most applications. Note It is recommended to leave IP Header compression disabled.
Chapter 4: Configuration To set up tracking You can set up the EXPLORER 510 to report to a server at certain time intervals. To set up tracking, do as follows: 1. From the Control panel , select Tracking. 2. To enable tracking of the EXPLORER 510, select Enable tracking. 3. Select the Report type. • Compressed. Only latitude and longitude are reported. • Extended. Apart from latitude and longitude, heading and altitude are also included. • ECEF.
Chapter 4: Configuration • Server port: Port number on the server. Default number is 7474. • Client port: Port number on the EXPLORER 510. Default number is 7475. • Encryption key: A supplied 128 bit key which must match on both the client and server side. 5. Under APN, select the source of the APN. • SIM default (recommended): The APN is taken from the SIM card. • Network assigned: The APN is assigned from the network. • User defined: APNs are provided from the Airtime Provider.
Chapter 4: Configuration Advanced settings First time use The first time you access the EXPLORER 510 web interface the administrator password is disabled, so you have access to all settings. If you want to use an administrator password, you can enable it as described in the next section. Administrator password To enable the administrator password If the administrator password is disabled and you want to protect the advanced settings with a password, do as follows: 1.
Chapter 4: Configuration To change the administrator password To change the administrator password, do as follows: 1. Log in as administrator 2. Under Advanced, select Change admin password. 3. Type in the Old password. 4. Type in the New password and retype it on the next line. 5. Click Save. At the next login the new password is required. To log out as administrator If you have not entered anything for 30 minutes under Advanced, you are logged out automatically.
Chapter 4: Configuration To restore factory settings To restore the factory settings of the EXPLORER 510, do as follows: 1. Under Advanced, select Factory reset. Important All configuration will be lost and the EXPLORER 510 will return to the default configuration. 2. Click OK. The terminal will now reboot and start up with the factory settings. To enable or disable the use of a SIM PIN To enable or disable the use of a PIN to access the terminal, do as follows: 1.
Chapter 4: Configuration SIM lock The SIM lock feature can be used by suppliers to lock your SIM card to a specific provider or distribution partner. For further information, contact your supplier. To save or load a configuration If you need to reuse a configuration in another terminal of the same type and software version, you can save your current configuration to a file, which can then be loaded into the other terminal.
Chapter 4: Configuration Link monitoring You can monitor the external IP connection of the EXPLORER 510 system using the link monitoring feature. With this feature activated, the terminal will send out ping commands (ICMP Echo Requests) to a server of your choice. Note The data connection must be activated before link monitoring can start. See To start and stop data connections on page 34. To set up link monitoring, do as follows: 1. Under Advanced, select Link monitoring. 2.
Chapter 4: Configuration 3. Type in the amount of data or time allowed and select the appropriate units. 4. Select Enable. 5. Click Save to save the settings. Call charges Note Cobham SATCOM does not take responsibility for the correctness of the estimated charges. This calculation is only a rough estimate of the charge, based on the tariff entered by the user. Also, the Airtime Provider may have different methods of measuring the airtime used.
Chapter 4: Configuration Remote management You can set up the terminal so that it can be controlled from a remote location. To set up the terminal for remote management, select Advanced > Remote management from the Control panel.
Chapter 4: Configuration Remote access with IP 1. From the Remote management page, select Enable access to web server and/or Enable access to AT commands. 2. Type in the Incoming port numbers to use for the web server and for AT commands. The default port numbers are: • web server: 80 • AT commands: 5454 Note The port number must be available at your service provider. 3. Under Trusted IP addresses, click Add IP address and type in the IP address of the device you want to give access to the terminal. 4.
Chapter 4: Configuration 4. Enter the password. It can be up to 32 characters long. The characters 0-9, a-z and A-Z are allowed. The password is mandatory and must match the password in the SMS. See To activate a data connection with an SMS on page 24. 5. Enter at least one trusted mobile number from which the terminal accepts an SMS. If no numbers are entered the feature is disabled automatically. Use the wild card * to accept a range of trusted numbers.
Chapter 4: Configuration Optional: To set up cellular network for data The EXPLORER 510 is a BGAN terminal by default. However, if you are within coverage of a cellular network, you may want to acquire an EXPLORER Cellular Modem as an alternative to the BGAN network. Note that you need a separate SIM card for the cellular network, the EXPLORER 510 SIM card can only be used for the BGAN network.
Chapter 4: Configuration Select on the tile to change the name or the APN of your cellular connection. For details, see the next section. When the connection is established, an “M” on the signal bar in the top right corner indicates that it is a cellular (Modem) connection, and the icon on the tile turns green. The data connection is automatically established when set up correctly, so you cannot start and stop the cellular connection from the tile as you can with the BGAN connections.
Chapter 5 Maintenance and troubleshooting 5 Support Contact information Should your Cobham SATCOM product fail, please contact your dealer or installer, or the nearest Cobham SATCOM partner. You will find the partner details on www.cobham.com/satcom where you also find the Cobham SATCOM Self Service Center webportal, which may help you solve the problem.
Chapter 5: Maintenance and troubleshooting Software update Connect DC power to the terminal before starting the software update. Important To update software with the web interface To update the software in the EXPLORER 510, do as follows: 1. Download the new software or acquire the software from Cobham SATCOM and save it on your computer. 2. Connect your computer to the EXPLORER 510. 3. Open the web interface in your browser and enter the Control panel . 4. Click Support > Update software. 5.
Chapter 5: Maintenance and troubleshooting 3. Rename the file name to "tt3711a.tiif". 4. Remove the USB memory stick from the computer. To upload the software to the EXPLORER 510 Note The USB interface must be enabled in the EXPLORER 510 (default enabled). See USB interface setup on page 41 for details on how to enable the USB interface. 1. Insert the USB memory stick with the new software into the EXPLORER 510 USB connector.
Chapter 5: Maintenance and troubleshooting Restore the settings of the EXPLORER 510 The EXPLORER 510 has a restore button that has three functions: To restore all settings to factory settings, to restore WLAN settings only or to put the EXPLORER 510 into safe mode for recovery software upload. Action Function Push and hold the Restore button for 2-10 seconds WLAN settings are restored to default. The WLAN LED lights yellow.
Chapter 5: Maintenance and troubleshooting Maintenance Normal use of the battery It is recommended not to partially charge/discharge the battery several times in a row. Partial charging/discharging affects the accuracy of the capacity measurement. Never leave the EXPLORER 510 fully discharged for a longer period of time. If the EXPLORER 510 is not to be used for a shorter period of time (1 month), charge the battery to minimum 20 to 30%.
Chapter 5: Maintenance and troubleshooting Troubleshooting Troubleshooting guide Problem Possible cause Remedy The EXPLORER 510 cannot be switched on, or does not stay on when powered by the battery. The battery needs recharging. Recharge the battery. Check the battery indicator in the web interface. The EXPLORER 510 cannot be switched off. The Power button was not held long enough. When you switch off the EXPLORER 510, hold the power button until the light indicator flashes rapidly yellow.
Chapter 5: Maintenance and troubleshooting Problem Possible cause Remedy The web interface shows Insert SIM. The SIM card is not present. Insert the SIM card in the SIM slot according to the instructions in the section To insert the SIM card on page 6. The SIM card is not inserted properly. Remove the SIM card and reinsert it according to the instructions in the section To insert the SIM card on page 6. The EXPLORER 510 is unable to register on the network, because the GNSS position is unknown.
Chapter 5: Maintenance and troubleshooting Problem Possible cause Remedy The web interface shows External control. The EXPLORER 510 is currently controlled by an external application, e.g. LaunchPad or an AT command interface. If you want to use the built-in web interface, stop the external application and restart the EXPLORER 510. Then open your browser and access the web interface. The EXPLORER 510 cannot obtain its position using GNSS. There is no GNSS signal, or the signal is weak.
Chapter 5: Maintenance and troubleshooting Problem Possible cause Remedy A LAN connection cannot be established. The cables are not properly connected. Connect the cables. The cable type(s) or connector type(s) are not correct. Note that you must use the USB to LAN Converter Cable from Cobham SATCOM. The WLAN interface is disabled in the EXPLORER 510 Enable the interface by accessing the web interface and selecting Control panel > WLAN > Enable.
Chapter 5: Maintenance and troubleshooting Status signalling Means of signalling The EXPLORER 510 system provides two methods for signalling the status of the system. • Light indicators next to the SIM slot • Messages shown in the web interface. Light indicators The EXPLORER 510 has two light indicators showing status and WLAN.
Chapter 5: Maintenance and troubleshooting WLAN indicator Indicator pattern Meaning Green flashing Rx/Tx traffic Green flashing slowly In use - has WLAN registration(s) Green constant Ready - customized configuration Yellow constant Ready - factory default configuration Blue flashing Safe mode - see Restore the settings of the (together with Status LED) EXPLORER 510 on page 69.
Chapter 5: Maintenance and troubleshooting Displayed text Explanation Remedy Connection closed. Data or time limit exceeded. The data connection is closed because a data limit defined in the web interface is exceeded. Restart the connection e.g. from the Dashboard in the web interface. See To start and stop data connections (BGAN) on page 20. The data limit may be set to avoid unintentional use of bandwidth, e.g. if you forget to close a connection after use.
Chapter 5: Maintenance and troubleshooting Displayed text Explanation Remedy Not registered to the network The terminal is not registered You can only make a on the satellite network. connection if the terminal is registered on the satellite network. Make sure that: • The SIM card is present. • The PIN has been entered (if used). • The terminal is pointed. See To get started on page 5 for details.
Chapter 5: Maintenance and troubleshooting Displayed text Explanation Remedy Satellite signal lost The system no longer receives a signal from the satellite. Make sure the antenna has a clear view to the satellite. SOS calls only The SIM card is not accepted Enter the PIN and wait for by the network. Only network approval. If the emergency calls are allowed. problem persists, contact your airtime provider.
Chapter 5: Maintenance and troubleshooting Log files To create a diagnostics report The diagnostic report contains relevant information for troubleshooting. When contacting your distributor for support, please enclose this file. To generate a diagnostic report, do as follows: 1. Select Terminal access from the EXPLORER Connect app, or access the web interface. 2. Select (Control panel) at the bottom of the page. 3. Select Support. 4. From the Support page, select Diagnostics report. 5.
Chapter 5: Maintenance and troubleshooting To reset the administrator password If you have forgotten the administrator password, do as follows: 1. Contact your supplier for a reset code. Report the serial number and IMEI number of the terminal. You can find the serial number on the label on the EXPLORER 510 or under (Control panel) > Support > About and the IMEI number in the web interface under (Control panel) > Support > Extended status. 2.
Appendix A Technical specifications A General specifications Item Specification Type EXPLORER 510, BGAN Class 2 terminal Max. IP data rate, Rx/Txa 464 kbps/464 kbps (simultaneously) Streaming data 32, 64, and 128 kbps Voice Standard voice 4 kbps Premium voice 3.1 kHz audio, 64 kbps Physical dimensions 197 x 197 x 40 mm 7.8 x 7.8 x 1.6 inches Weight 1.4 kg / 3.1 lbs (incl.
Appendix A: Technical specifications Battery specifications (internal battery) Item Specification Battery type Lithium Ion, rechargeable Time between recharging Stand-by 24 h (0 to 55°C/ 32 to 131°F) Tx time, max 2 h 25 m @ 128 kbps (25°C / 77°F) Rx time, max 4 h 40 m @ 128 kbps (25°C / 77°F) Charge time without precharging Less than 4 hours Charge time including precharging 12 to 24 hours (battery completely discharged) Charge temperature 0 to 45C,/ 32 to113F (Japan: 10 to 45C/ 50 - 113F)
Appendix A: Technical specifications WLAN access point Item Specification Standard IEEE 802.11 b/g Antenna Built-in Frequencies 2.4 GHz ISM band USB (Host) interface Connector pin-out Pin Function 1 VBUS 2 D- 3 D+ 4 GND Specifications Item Specification Version USB v2.0 Host Connector type Type A Charge current available 0.5 A or 1.0 A, user selectable Max. cable length 5 m / 16.
Appendix A: Technical specifications Built-in BGAN antenna Item Specification Type Directional patch array, manually adjustable Polarization RHCP, Right-hand circular polarization for both tx and rx Frequencies Inmarsat I-4 Transmit Receive 1626,5 MHz - 1660,5 MHz 1525 MHz - 1559 MHz Inmarsat Alphasat (EMEA) Transmit Receive Extended L-band (XL)a: 1626,5 MHz - 1660,5 MHz and 1668 MHz - 1675 MHz 1518 MHz - 1559 MHz GNSS GPS, GLONASS, Beidou-2/Compass EIRP Nominal: 15.
Appendix A: Technical specifications 202 51.
Appendix A: Technical specifications 98-143082-A Outline drawing 87
Appendix A: Technical specifications Satellite coverage The EXPLORER 510 uses the Inmarsat I-4 satellites and the Alphasat satellite for satellite communication. The drawings below show the coverage areas for these satellites. Inmarsat I-4 coverage 90° 80° 70° 60° 50° 40° 30° 20° 10° 0° 10° 20° 30° 40° 50° 60° 70° 80° 90° 180° 160° 140° 120° 100° 80° 60° 40° 20° 0° 20° 40° 60° 80° 100° 120° 140° 160° 180° Inmarsat Alphasat coverage Alphasat uses extended L-band.
Appendix B Conformity B CE (R&TTE) The EXPLORER 510 is CE certified (R&TTE directive). The “Declaration of Conformity with R&TTE Directive” will be enclosed in electronic copy at the end of this appendix when ready. The WLAN interface is CE certified through the manufacturer of the WLAN card. Use of WLAN: The WLAN interface requires that the user enters the current country of operation. See WLAN interface setup on page 39.
Appendix B: Conformity turning the equipment off and on, the user is encouraged to try to correct the interference by one or more of the following measures: • Reorient or relocate the receiving antenna • Increase the separation between the equipment and receiver • Connect the equipment into an outlet on a circuit different from that to which the receiver is connected • Consult the dealer or an experienced radio/TV technician for help NOTICE: This device complies with Part 15 of the FCC Rules.
The “Declaration of Conformity with R&TTE Directive” will be inserted here when ready
Glossary Glossary A APN Access Point Name. The Access Point Name is used by the terminal operator to establish the connection to the required destination network. B BGAN Broadband Global Area Network. A satellite network based on geostationary satellites, delivering broadband data and telephony to virtually any part of the earth, with full UMTS (3G) compatibility. BGAN enables users to access e-mail, corporate networks and the Internet, transfer files and make telephone calls.
Glossary I IC Industry Canada (French: Industrie Canada) is the department of the Government of Canada with a mandate of fostering a growing, competitive, knowledge-based Canadian economy. ICMP Internet Control Message Protocol. An Internet protocol mostly used for diagnostics. IMSI International Mobile Subscriber Identity. A number used to identify the user of a cellular network. It is a unique identification associated with all cellular networks. IMSO International Maritime Satellite Organisation.
Glossary connection between them and then securely transport data packets over the connection. R RF Radio Frequency. Electromagnetic wave frequencies between about 3 kHz and about 300 GHz including the frequencies used for communications signals (radio, television, cell-phone and satellite transmissions) or radar signals. S SIM Subscriber Identity Module.
Index Index A C AC⁄DC adapter specifications, 85 access remote, 23 access to settings limit in web interface, 56 access using AT commands, 23 admin password change, 56 disable, 55 enable, 55 log in, 55 log out, 56 reset, 45, 81 advanced settings, 55 alerts view in web interface, 26, 43 Alphasat coverage area, 88 frequencies, 85 antenna connector, 88 short description, 4 APN set up for BGAN, 52 AT commands access with IP, 23 remote access with IP, 24 audio assisted pointing, 11 automatic activation, 49 aut
Index D data limits, set, 59 log, 37 Standard, definition, 20 Streaming definition, 20 total usage, 38 data connections start and stop in web interface, 34 DC input connector, 83 default IP address, 9, 29 delivery contents, 6 diagnostics report create, 43, 80 disposal, 70 E Event log, 43 extended L-band coverage area, 88 frequencies, 85 IC compliance, 89 IMEI number, 44, 80 IMSI number, 44, 80 included items, 6 indicator, Status LED, 75 indicator, WLAN, 76 initial inspection, 5 insert SIM card, 6 interne
Index network cellular or BGAN, 9 select startup mode, 47 P password change, 56 disable, 55 enable, 55 log in, 55 log out, 56 reset, 45, 81 permissions setting for users, 56 phone connect to WLAN, 15 SIP settings, 16 phone call, 25 PIN changing, 57 enabling or disabling, 57 enter in web interface, 33 ping command from the terminal, 59 point the antenna again, 12 pointing audio assisted, 11 pointing process restarting, 12 port forwarding, 40 position troubleshooting, 73 Power connector, 83 power supply AC⁄
Index U update software, 44, 67 USB, 67 usage calls and data, 38 USB charge smartphone or tablet, 27 configure, 41 connector, 84 update software, 67 user permissions setting up in web interface, 56 W warning messages, 26, 43 warranty, 66 web interface accessing, 29 change language, 50 definition, 29 navigating, 31 what’s in the delivery, 6 WLAN automatic activation of, 49 configure, 39 98-143082-A 98
98-143082-A www.cobham.