
User's Guide
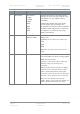

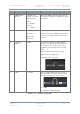
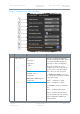
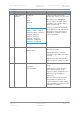
Table Of Contents
- 0. Preface
- 1. Systems Description
- 2. Getting Started
- 2.1 Identifying your Device
- 2.2 Unpacking your Nano Transmitter
- 2.3 Unpacking your HD Nano Transmitter
- 2.4 About the Labels on your Nano Transmitter
- 2.5 Planning the Hardware Installation
- 2.6 Identifying the Variants of Nano Transmitter
- 2.7 Identifying the Options of Nano Transmitter
- 2.1 Identifying the Variants of HD Nano Transmitter
- 2.2 Identifying the Options of HD Nano Transmitter
- 2.3 About the Software with your Nano Transmitter
- 3. Controls, Connections and Indicators
- 3.1 About Controls, Connections and Indicators
- 3.2 Exploring the Top Panel – Nano Transmitter
- 3.3 Exploring the Bottom Panel – Nano Transmitter
- 3.4 Exploring the Side Panel – Nano Transmitter
- 3.5 Exploring the Top Panel – HD Nano Transmitter
- 3.6 Exploring the Bottom Panel – HD Nano Transmitter
- 3.7 Exploring the Side Panel – HD Nano Transmitter
- 4. Setting up your Nano Transmitter
- 5. Basic Operation
- 6. Advanced Operation
- 7. Advanced Setup
- 7.1 About Advanced Setup
- 7.2 Installing the Nano TX Controller on your PC
- 7.3 Connecting your PC to the Nano TX using Serial
- 7.4 Exploring the Nano TX Controller Main Window
- 7.5 Performing a Quick Setup
- 7.6 Working with the Unit Status Panel
- 7.7 Working with the Switch Panel
- 7.8 Working with the Unit Tab
- 7.9 Working with the Modulation Tab
- 7.10 Working with the Audio Tab
- 7.11 Working with the Video Tab
- 7.12 Working with the Misc Tab
- 8. Appendix A – Cautions and Warnings
- 9. Appendix B - Care and Maintenance
- 10. Appendix C-Glossary
- 11. Appendix D – Reference Material

Solo7 Nano Transmitter
Commercial in
Confidence
Video, Transmitters, Solo7 Nano
Transmitter
100145
Revision: 8.0
Commercial in
Confidence
Page 7-60
No
Name
Options
Notes
4
MPEG Audio
Bit rate
Available rates
depend on current
audio encoder.
Layer I:
64 – 448kbps
Layer II:
32 – 384kbps
This is the MPEG audio encoding bit-rate.
Generally the higher the number the better
the quality.
5
Encoder Mode
Stereo
Left mono
Right mono
Dual mono
Select the audio mode you want to use.
Dual mono allows for different Gain values
on the left and right channel. Stereo uses
just one.
6
Analogue
Audio
Graphic
Note how the Analogue Audio graphic
changes to reflect the Encoder mode you
have chosen. The arrows point to the
applicable gain value(s) in the selected
mode.
Stereo and Left mono uses left gain.
Right mono uses right gain.
Dual mono uses both gains.
7
Gain
0 to 66dB
You can apply different levels of gain to
each channel as required. Encoder mode
determines which gain value is used.
0=+4dBU
6=-2dBU are useful examples.
Table 7-12 – Audio Settings Key