
User's Guide
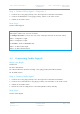
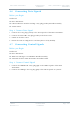
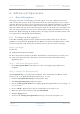
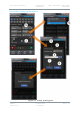
Table Of Contents
- 0. Preface
- 1. Systems Description
- 2. Getting Started
- 2.1 Identifying your Device
- 2.2 Unpacking your Nano Transmitter
- 2.3 Unpacking your HD Nano Transmitter
- 2.4 About the Labels on your Nano Transmitter
- 2.5 Planning the Hardware Installation
- 2.6 Identifying the Variants of Nano Transmitter
- 2.7 Identifying the Options of Nano Transmitter
- 2.1 Identifying the Variants of HD Nano Transmitter
- 2.2 Identifying the Options of HD Nano Transmitter
- 2.3 About the Software with your Nano Transmitter
- 3. Controls, Connections and Indicators
- 3.1 About Controls, Connections and Indicators
- 3.2 Exploring the Top Panel – Nano Transmitter
- 3.3 Exploring the Bottom Panel – Nano Transmitter
- 3.4 Exploring the Side Panel – Nano Transmitter
- 3.5 Exploring the Top Panel – HD Nano Transmitter
- 3.6 Exploring the Bottom Panel – HD Nano Transmitter
- 3.7 Exploring the Side Panel – HD Nano Transmitter
- 4. Setting up your Nano Transmitter
- 5. Basic Operation
- 6. Advanced Operation
- 7. Advanced Setup
- 7.1 About Advanced Setup
- 7.2 Installing the Nano TX Controller on your PC
- 7.3 Connecting your PC to the Nano TX using Serial
- 7.4 Exploring the Nano TX Controller Main Window
- 7.5 Performing a Quick Setup
- 7.6 Working with the Unit Status Panel
- 7.7 Working with the Switch Panel
- 7.8 Working with the Unit Tab
- 7.9 Working with the Modulation Tab
- 7.10 Working with the Audio Tab
- 7.11 Working with the Video Tab
- 7.12 Working with the Misc Tab
- 8. Appendix A – Cautions and Warnings
- 9. Appendix B - Care and Maintenance
- 10. Appendix C-Glossary
- 11. Appendix D – Reference Material

Solo7 Nano Transmitter
Commercial in
Confidence
Video, Transmitters, Solo7 Nano
Transmitter
100145
Revision: 8.0
Commercial in
Confidence
Page 6-28
6. Advanced Operation
6.1 About Encryption
The target is focused on intercepting your radio signal. To do this, all that they need is a
radio receiver that operates in the same mode and on the same frequency you are using to
transmit. The mere fact that you are operating gives them valuable information. It tells them
that you are in the area and by the number of stations operating on the same frequency
they can estimate the size of the operation against them. If your radio net is operating in the
clear, the target specialists can see or hear exactly what is being transmitted for even more
information. When analysing the traffic patterns, the target can work out which station is the
net control station and identify the headquarters.
6.2 Setting up Encryption
If the AES scrambling option has been purchased for the SOLO system in use, then it is
possible to encrypt the link. Both AES128 and AES256 are licence-controlled features. You’ll
need to encrypt the traffic leaving the transmitter and set up the receiver for decrypt.
Before you Begin
You’ll need:
A fully powered Nano Transmitter
The correct license loaded on the Nano Transmitter for the Encryption you want to use.
A PC connected to the Nano Transmitter with the latest Nano Transmitter Control
Application open.
Step 1: Select the Encryption Mode
1. In the Encryption Mode drop-down box select an encryption type. (AES128 for
example).
Step 2: Change the Encryption Key
The encryption key is a 128bit value for AES128 and a 256bit value for AES256, and is
entered as 32 or 64 ASCII hexadecimal characters (0..9, A..F).
1. Click the Encryption Key Entry button (the blue key).
2. The Encryption Key Entry dialog box opens.
3. Ensure the Encryption mode box is displaying the Encryption Mode you set in Step 1. If
not, set it now.
4. In the <Mode> key text box, type the encryption key you want to use.
5. When you have entered the key, click the Check Mark.
6. Click the Apply button.
7. You’ll see the Setting Encryption Keys message, then your encryption is set.