
User manual


OG3-FR User Manual (V1.0) 2-27
• Using a Phillips screwdriver, secure the faceplate using the four screws removed
during step 1.
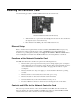
Replacing the Filter and Door
Replacing the Frame Air Filter
Should you need to replace the frame air filter in your OG3-FR series frame, you can order the Air
Filter Kit (AFK-OG3) from your openGear sales representative.
To replace the frame air filter
1. Remove the old air filter from the frame door as follows:
• Using a Phillips screwdriver, remove the four 3/16”screws (#850-091R) screws that
secure the faceplate. Set the screws aside.
• Ensure that the side door tabs are disengaged from the door.
• Remove the faceplate by gently pulling it towards you while avoiding the Diagnostic LED
Display, the toggle button, and the monitoring LED.
• Gently remove the air filter off the metal protective screen that separates the filter from
the fans.
2. Install the new filter into the frame door as follows:
• Place the new air filter across the metal protective screen, orienting it in the same position
you found it in during step 1.
• Install the faceplate by gently fitting it back onto the frame door, ensuring the faceplate
does not interfere with the Diagnostic LED Display, the toggle button, and the monitoring
LED on the frame door.
• Verify that the side door tabs are seated properly in the cutouts on the frame door bracket.
• Using a Phillips screwdriver, secure the faceplate using the four screws removed during
step 1.