
User manual


2-26 •
••
• Installation OG3-FR User Manual •
••
• (V1.0)
Fan Filter Maintenance
Routine maintenance of the fan filter installed in the OG3-FR series frame is highly recommended to
ensure proper airflow through the chassis.
Cleaning the Frame Air Filter
The OG3-FR series frame has a single air filter that is used to prevent dust and airborne particulates
from contaminating the frame. This filter should be cleaned at least once a year; but may need to be
cleaned more frequently in some environments.
To clean the frame air filter
1. Remove the air filter from the frame door as follows:
2. Locate the four 3/16”screws (#850-091R) on the frame door faceplate. See below for screw
locations.
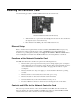
OG3-FR Series Frame — Faceplate Screws Location
• Using a Phillips screwdriver, remove the four screws that secure the faceplate. Set the
screws aside.
• Ensure that the side door tabs are disengaged from the door.
• Remove the faceplate by gently pulling it towards you while avoiding the Diagnostic
LED Display, the toggle buttons, and the monitoring LED.
• Gently remove the air filter off the metal protective screen that separates the filter
from the fans.
3. Brush any loose dust off of the filter.
4. Place the filter under warm running water to remove any remaining dust. On one side of the
filter is a foam filter material. When rinsing, water should flow out of this side.
5. Remove the filter from the water and thoroughly pat dry with a towel to remove any moisture.
6. Replace the clean, dry filter into the frame door as follows:
• Place the clean air filter across the metal protective screen, orienting it in the same
position you found it in during step 1.
• Install the faceplate by gently fitting it back onto the frame door, ensuring the
faceplate does not interfere with the Diagnostic LED Display, the toggle button, and
the monitoring LED.
• Verify that the side door tabs are seated properly in the cutouts on the frame door
bracket.