
User manual


OG3-FR User Manual (V1.0) 2-17
To install a Rear Module in an openGear frame
1. Ensure that the frame is properly installed.
2. Locate the card frame slot on the rear of the frame you wish to install the openGear card in.
• Refer to the manual that accompanied your openGear card to determine if the card
requires installation in a specific slot and which rear modules are supported by your card.
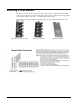
• Determine the type of rear module you have. When installing a split rear module,
remember that this module still requires two slots even though it accommodates two
cards.
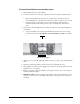
3. Seat the bottom of the Rear Module in the seating slot at the base of the frame back plane as
shown below.
• If you are installing a rear module in the OG3-FR series frames, there are two seating
slots. Refer to the section “Rear Modules for the OG3-FR Series Frames” for details.
Rear Module Installation
4. Align the top screw of the Rear Module with the screw hole on the top edge of the frame back
plane.
5. Ensure the module aligns with the desired card slot before tightening the screws.
6. Using a Phillips screwdriver and the supplied screw, fasten the rear module panel to the frame
back plane. Do not over tighten.
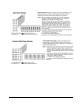
7. Ensure proper frame cooling and ventilation by having all rear frame slots covered with rear
modules or blank metal plates.
8. Blank Rear Modules (metal cover plates with mounting screw supplied with frame) are used
when the slot does not have a card installed. This helps to ensure proper frame cooling and
ventilation.