
User manual

Phase 1: Making the connection
Cobalt Qube 3 User Manual 17
• If the Qube 3 auto-configures successfully, it acts as a DHCP server and
assigns to the clients IP addresses in the range 10.6.18.30 through
10.6.18.249, a subnet mask of “255.255.255.0”, a primary DNS server
address of “10.6.18.1” and a gateway or router address of “10.6.18.1”.
• Once you have completed the browser-based setup of the Qube 3, change the
TCP/IP settings for the clients on your network to “Use a DHCP server”
(Apple) or “Obtain an IP address automatically” (Windows).
Continue the setup process with “Phase 2: Setting up with the Web browser” on
page 20.
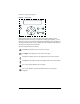
Configuring the Qube 3 manually
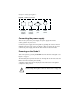
If the Qube 3 is unable to find a DHCP server on the network and you do not
choose the auto-configuration option, the LCD display reads:
PRIMARY IP ADDR:
0
00.000.000.000
A blinking cursor appears on the second line of the LCD display. The following
steps explain how to enter the required network information for the primary
network interface. The secondary network interface is configured through the
Web browser as described in the next section.
☞
Important: In this phase, you configure only the primary network
interface. To complete this phase, you must know:
• the IP address assigned to the Qube 3
• the subnet mask of your network
✍
Note: A gateway or router address is not required for a Qube 3 that
is only connected to a local area network (LAN). If you connect to
another network through the Qube 3, you require a gateway
address. If you connect to the Internet with a modem, you do not
require a gateway.