
User manual

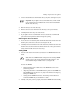

Adding components to the Qube 3
Cobalt Qube 3 User Manual 217
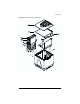
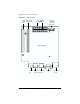
3. Unscrew the thumbscrews that hold the drive(s) in place. See Figure 106, #3.
4. Slide the drive(s) out of the drive bay.
5. Remove the four screws that attach the drive bay to the system chassis.
6. Carefully lift the drive bay out of the chassis.
7. If your Qube 3 has an external SCSI connector, detach the external SCSI
port from the back panel and slide it through the opening.
Removing the CPU riser board
1. Locate the screw on the back panel which holds the bracket for the CPU riser
board in place, and remove this screw. See Figure 106, #5.
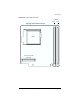
2. Carefully remove the bracket for the CPU riser board, and then the CPU riser
board from its slot in the I/O board. Lift the board out of the system chassis
(along with the SCSI connector if necessary).
Adding DIMM
1. Once the CPU riser board is removed, insert the new DIMM module on the
board.
To insert the DIMM:
• Push the locking arms on both sides of the DIMM slot to the down
(unlocked) position.
• Align the guide marks on the DIMM with the guides on the DIMM slot.
The DIMM fits into the slot one way only. If the marks do not align, try
turning the DIMM over.
• Gently push the DIMM into the slot. The locking arms should close
around the DIMM and you should hear a “click”.
2. Visually verify that you have properly inserted the DIMM and locked it fully.
☞
Important: If your Qube 3 has two hard disk drives, make careful
note of which drive is installed in Slot A and which is installed in
Slot B of the drive bay.
✍
Note: If the new DIMM module is larger than the existing DIMM
module, remove the existing module and install it in slot 2. You
must install the larger module in slot 1; see Figure 108.