
User manual


Appendix C: Upgrading the Qube 3
216 Cobalt Qube 3 User Manual
Opening the Qube 3
To open the Qube 3:
1. Power down the Qube 3. See “Power down” on page 203.
2. Unplug the Qube 3.
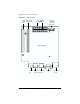
3. Remove the power cord from the rear panel of the Qube 3. The power
connector is located at the bottom right corner. See Figure 1 on page 2. To
remove the cord, simply hold the Qube 3 in place and gently pull the
connector out.
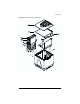
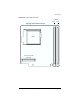
4. Remove the single screw at the top of the back panel to release the blue
plastic top cover from the system chassis.
5. Carefully remove the blue plastic top cover. See Figure 106, #1.
6. Carefully lift the sheet metal top cover by lifting the tabs at the back of the
Qube 3. See Figure 106, #2.
Adding components to the Qube 3
To add memory or a PCI card, you must remove the CPU riser board. If your
Qube 3 has an external SCSI connector, you must detach the external SCSI
connector itself from the back panel of the Qube 3 and remove it along with the
CPU riser board.
Due to the size of the heat sink on the CPU riser board, you must remove the hard
disk drive(s) and the drive bay in order to detach the external SCSI connector.
To add a component to your Qube 3:
1. If you are just replacing a failed hard disk drive, go to “Replacing a hard disk
drive” below.
If you are changing the DIMMs or adding a PCI card, continue with the next
step.
2. Remove the hard disk drive(s). Detach the power cable(s) and IDE ribbon
cable(s) from the drive(s).
!
Caution: You MUST power down the Qube 3 before opening the
unit.