
User manual

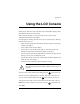

Appendix A: Using the LCD Console
198 Cobalt Qube 3 User Manual
Set up primary
To set up the primary network interface on the Qube 3:
1. On the LCD console, hold down the button for approximately two
seconds. The LCD screen displays:
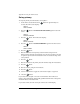
SELECT:
SETUP NETWORK
2. Press the button until
ADVANCED NETWORK
appears in the LCD
screen:
SELECT:
ADVANCED NETWORK
3. Press the button. The LCD screen displays:
SELECT:
REVIEW SETTINGS
4. Press the button until
SETUP PRIMARY
appears in the LCD screen:
SELECT:
SETUP PRIMARY
5. Press the button.
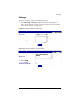
6. Enter the IP address of the primary network interface using the arrow
buttons. The left and right arrow buttons move the cursor position to the left
or right. The up and down arrow buttons increase or decrease the digit at the
cursor position.
7. Press the button.
8. Enter the Netmask of the primary network interface using the arrow buttons.
9. Press the button.
10. Enter the Gateway using the arrow buttons.
11. Press the button.
12. Use the arrow buttons to toggle the cursor between [S]ave or [C]ancel.
13. Press the button.
If you select Save, the Qube 3 saves the new information. The LCD screen
returns to the normal display with the fully qualified domain name on the top line
and the IP address on the bottom line.
If you select Cancel, the LCD screen just returns to the normal display.