
User manual

RaQ XTR setup
Cobalt RaQ XTR User Manual 13
RaQ XTR setup
The setup process occurs in two phases.
• “Phase 1: Making the connection” explains the physical connection of the
RaQ XTR to a power source and the network.
• “Phase 2: Setting up with the Web browser” explains the network integration
process. It also allows the RaQ XTR Administrator to select services on the
server and configure the level of RAID on the hard disk drives, using a
computer with a valid Web browser.
Phase 1: Making the connection
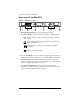
Installing the RaQ XTR
You can place the RaQ XTR on a flat surface or mount it in a standard19-inch
equipment rack. The RaQ XTR is designed to allow you to mount it in an
equipment rack either at the front or middle of the server. To mount the server in
an equipment rack, you must first attach the mounting ears included with the
server.
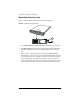
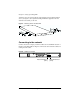
To attach the mounting ears, align the mounting ears over the four exposed screw
holes on each side of the server chassis. To mount the server in the middle of the
equipment rack, ensure that the mounting ears are aligned with the protruding
edges facing the back end of the server; to mount the server towards the front of
the equipment rack, ensure that the ears are aligned with the protruding edges
facing towards the front of the server.
Warning:
Due to the size and weight of the RaQ XTR, it is highly
recommended that you have a second person help you mount the
server in an equipment rack.