
User manual


Appendix E: Domain Name System
250 Cobalt RaQ XTR User Manual
Adding a secondary domain
To add a secondary name-server authority for a domain:
1. Select Server Management > Control Panel. The “Service Settings” table
appears.
2. Click the green pencil icon next to the DNS service in the “Service Settings”
table. The “DNS Settings for <sitename>” table appears.
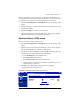
3. Select Secondary Name Service for Domain from the Add... pull-down
menu.
4. Enter the domain name to be serviced and the IP address of the primary DNS
server.
5. Click Update List.
6. Click Save Changes.
Adding a secondary network
To add a secondary name-server authority for a network:
1. Select Server Management > Control Panel. The “Service Settings” table
appears.
2. Click the green pencil icon next to the DNS service in the “Service Settings”
table. The “DNS Settings for <sitename>” table appears.
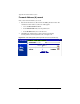
3. Select Secondary Name Service for Network from the Add... pull-down
menu.
4. In the first field, enter the IP address of a member on the network (for
example, 192.168.1.1) whose DNS information is served by the IP address
in the third field.
5. In the second field, enter the subnet mask corresponding to the IP address for
the specified network authority.
6. In the third field, enter the IP address of the primary DNS server for the
specified network.
7. Click Update List.
8. Click Save Changes.