
User manual


Installing additional memory
Cobalt RaQ XTR User Manual 221
Installing additional memory
1. Power down and remove the RaQ XTR from the equipment rack by
reversing the installation procedure in Chapter 2.
2. Place the RaQ XTR on a stable, flat surface.
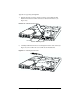
3. Remove the mounting brackets from each side of the chassis. Each bracket is
attached to the chassis with four screws (see Figure 105).
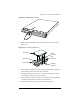
Figure 105.
Mounting brackets and cover fasteners
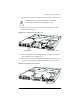
4. Unfasten the eight screws that attach the cover to the RaQ XTR chassis
(three screws on each side and two screws at the rear of the chassis).
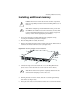
5. Working from the rear of the chassis, slide the cover back approximately
three inches (see Figure 106).
6. Lift up the rear of the cover first and then remove the cover from the chassis.
!
Caution:
The chassis contains electrostatic-sensitive components.
Observe proper ESD precautions whenever the RaQ XTR’s cover is
removed.
✍
Note:
Before attempting to install additional memory, ensure that
the DIMM to be installed is less than 0.158 inches (4.0 mm) thick.
Contact Cobalt Technical Support to receive a listing of approved
memory vendors and the appropriate part numbers.
✍
Note:
Ensure that the front panel is completely slid back into the
chassis before attempting to remove the cover.
C
o
b
a
l
t
N
e
t
w
o
r
k
s
a
n
d
C
o
b
a
l
t
R
a
Q
a
r
e
t
r
a
d
e
m
a
r
k
s
o
f
C
o
b
a
l
t
N
e
t
w
o
r
k
s
,
I
n
c
.
w
w
w
.
c
o
b
a
l
t
.
c
o
m
P
/
N
5
5
0
-
0
0
2
0
0
-
0
1