
User manual

Chapter 5: Server Management
144 Cobalt RaQ XTR User Manual
ASP Administrative Server
To access the ASP Administrative Server UI:
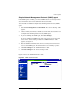
1. Select Server Management > Control Panel. The “Service Settings” table
appears. If the ASP Administrative Server service is disabled, the pencil icon
is grayed-out.
2. Click to enable the check box next to ASP Administrative Server.
3. Click Save Changes. The screen refreshes and the pencil icon is now
enabled (a green pencil).
4. Click the green pencil icon for ASP Administrative Server. A confirmation
dialog appears, asking for the user name and password for the ASP
Management server at <hostname.domainname:5100>.
5. Enter the user name and password of the RaQ XTR Administrator.
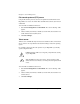
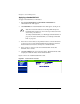
6. Click OK. A separate browser window opens with the UI for the ASP Server
Administration screen. The link for “documentation” on the left guides you
through the functionality of Chili!Soft ASP.
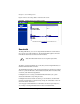
Figure 64 shows the UI for the ASP Administrative Server.
Figure 64. ASP Administrative Server UI