
User manual

Chapter 5: Server Management
130 Cobalt RaQ XTR User Manual
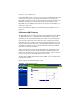
To add a virtual site:
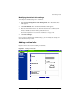
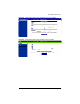
1. Select Server Management > Site Management. The “Virtual Site List”
table appears.
2. Click Add Site. The “Add New Virtual Site” table appears.
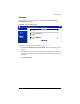
3. Enter the information for the site; information from the virtual site default
settings is displayed here. Click the check boxes to enable (check mark) or
disable (no check mark) a particular service.
For an explanation of the fields in this table, see “Overview of virtual sites”
on page 120.
4. Verify the settings and click Confirm New Site.
Adding a name-based virtual site
If you are adding a name-based virtual site, you must have DNS records for that
site before you can access the site. For more information, see “Definition of a
virtual site” on page 113.
If you administer your DNS records on the RaQ XTR, refer to Appendix E,
“Domain Name System” for more information about creating DNS records. If
your Internet service provider (ISP) administers your DNS records, ask your ISP
to create the DNS records for the new name-based virtual site.
You can also enable the Automatic DNS configuration feature when creating a
name-based virtual site. If this feature is enabled, the server automatically creates
DNS records for this virtual site and the RaQ XTR server acts as the primary
DNS server for this site.
✍
Note: To preview a name-based virtual site, you must first configure
its DNS records and make those DNS records available to your
workstation and the RaQ XTR server.
Requests to the IP address are directed to the first name-based site
created on that IP address.