
Instruction Manual

4 • Important: Always read and follow instructions.
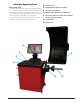
★Balancing Your First Tire
1. Turn the machine OFF then ON
(resets machine).
The machine wakes up using
standard clip-on wheel weight
locations (Clip 1 & Clip 2) and
wheel dimensions.
2. Mount a tire/wheel onto
balancer that will use standard
clip-on wheel weights.
Use the most appropriate mounting method.
3. Always remove any weights
already attached to the wheel.
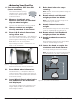
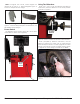
4. Enter A & D wheel dimensions
using offset arm.
For Automatic Measurement — pull offset arm
out to the wheel, hold it still at clip-on weight
position against wheel flange, and wait for
BEEP. Return arm to home position.
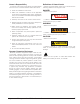
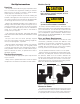
Clip-on Weight Location — viewed on a cut-
away rim for clarification.
Figure 2 - Clip-On Weight Location
Note the value entry of A & D dimension.
5. Enter Width wheel dimension.
For Manual Entry — Use plastic calipers to
measure wheel width. Press W key. Press Up
or Down arrow to enter Width value (between
2.0 and 14.0 inches).
6. Lower Wheel Guard; wheel spins
and unbalances are measured
and displayed.
The corrective weight amount appears in the
weight display window for inboard and out-
board weight locations.
7. Raise hood after tire stops
rotating.
Note: Wait for wheel to stop before raising the
wheel guard.
8. Rotate wheel until Inboard
weight position bar blinks.
Note: If an inboard corrective weight is not
required then go to step 10.
9. Attach inboard corrective
weight.
Attach specified weight amount at top-dead-
center on inside flange of wheel (clip 1).
10. Rotate wheel until Outboard
weight position bar blinks.
11. Attach outboard corrective
weight.
Attach specified weight amount at top-dead-
center on outside flange of wheel.
12. Lower the hood to respin the
tire/wheel and check balance.
The weight readings should now be 0.00.
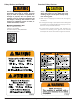
Note: Throughout this manual tire dimensions
are referred to as A, W, and D, see figure 3.
Figure 3 - A, W, and D Tire Dimensions