
Installation Guide


Barn Door hardware installation
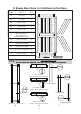
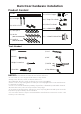
Product Content
1.1,
2.1,
3.1,
3.2,
3.3,
Rail
Anchor
Lag Bolt
Wall Spacer
4 x Door Screw
2 x Hanger
2.2,
(For concrete wall)
(For wood stud)
4.2, T-Shape Floor Guide
4.3, Roller Floor Guide
4.1, 2 x Door Stopper
4.4, 2 x Rubber End
1 x Handle Pull and Flush5.1,
Please retain these instructions for future reference.
• Do not stand on or use any part of this item as a step ladder.
• Firmly secure all bolts, screws, and knobs before use.
• Reconfirm that all bolts, screws, and knobs are secure every 90 days.
• Fasten screws loosely during initial assembly. Do not firmly tighten the screws until the item
is completely assembled.
· Do not use or store this item in the proximity of open flame or flammable/combustible chemicals.
• Be aware that som
e parts are heavy and have sharp edges.
· If any parts are missing, broken, damaged, or worn, stop using this item until repairs are made
and/or factory replacement parts are installed.
· Do not use this item in a way inconsistent with the manufacturer’s instructions as this could
void the product warranty.
Tools Needed
NOTICE
5,
Level
Tape Measure
8,
Drill
6,
1,
Pencil
Wrench
2,
4,
Plumb Bob
3,
Phillips Screwdriver
7,
Drill Bit
Ø / ”
Ø / ”
6