
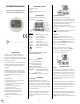
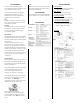
Instructions


2
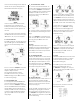
The fan icon remains flashing even if the beeps are
silenced. The icon only stops flashing when the
CO2 level fall below the lower limit (Fig.3)
SETUP
There are 4 setup modes: P1-CO2 alarm levels,
P2-temperature (C or F), P3-date/time, and
P4-factory reset. When you press “SET” the setup
mode will be shown in the lower right corner of
the screen.
To enter setup, while in normal mode, hold down
the “SET“ button for 3 seconds. To exit setup, press
“ESC“ while P1.
0
, P2.
0
, P3.
0
, or P4.
0
is displayed.
P1.
1
SET CO2 GOOD LEVEL
Press “SET“ to display P1.
0
and ”CO2” (Fig.4) on the
LCD. Press “SET“ again to set the CO2 GOOD level.
The current set value will be blinking on LCD
(Fig.5).
Press “▲“ to increase or “MIN/MAX▼“ to decrease
the value. The GOOD alarm range is from 0 to
700ppm in 100ppm increments.
Once the preferred CO2 level is selected,
press ”SET“ to continue on to P1.
2
to set the
NORMAL level (Fig.6 ) or press “ESC“ to return to
P1.
0
without saving changes.
P1.
2
SET CO2 NORMAL LEVEL
P1.
2
is the upper limit of the CO2 NORMAL level.
The current value will flash on the LCD (Fig.6).
Press “▲“ to increase or “MIN/MAX▼” to decrease
the value. The NORMAL level can be set between
700 and 1,000ppm. Once the preferred value is
selected, press ”SET“ to save P1.
2
and continue on
to set the P1.
3
POOR + ALARM threshold setting
(Fig.7) or press “ESC“ to return to P1.
0
without
saving changes.
P1.
3
SET CO2 POOR LEVEL + ALARM
P1.
3
is used to set the CO2 alarm threshold. The
current set value will blink on the LCD (Fig.7). Press
“▲“ to increase or “MIN/MAX▼“ to decrease the
value. The POOR level can be set between 1,000 to
5,000ppm. Press “SET “ to confirm P1.
3
and
continue to P1.
4
(Fig.8) or press “ESC“ without
saving to return to P1.
0
P1.
4
SET ALARM ON/OFF
P1.
4
is used to set alarm on and off. When entering
P1.
4
, the default “On“ will be blinking on the LCD
(Fig.8).
Press “▲“ or “MIN/MAX▼“ to switch the alarm to
“Off “. Then press “SET “ to confirm P1.
4
and return
to P1.
0
(Fig.4) or press “ESC“ to return to P1.
0
without saving.
CAUTION:
Although the TIM10 alarm can be set up to
5,000ppm, the accuracy of the CO2 reading is only
specified up to 2,000ppm. Alarm values higher
than 2,000ppm are for reference only and should
not be used for personal safety.
P2.
0
SET TEMPERATURE UNITS
Hold down the “SET” button for at least 3 seconds
to enter setup mode, then press “▲“ in P1.
0
mode
to access P2.
0
to set the temperature scale (Fig.9).
Press “SET“ again to show temperature in
o
C or
o
F
on the display (Fig. 10). Press “▲“ or “MIN/MAX▼
“ to change units, then press “SET “ to save or “ESC”
to exit without saving and return to P2.
0
P3.
0
SET REAL TIME CLOCK
The TIM10 can display time in either 24 hour or 12
hour (am/pm) format. Hold down the “SET”
button for at least 3 seconds to enter setup mode,
then press “▲“ twice to access the P3.
0
real-time
clock (rtc) setup (Fig.11).
To start, press “SET “ to display P3.
1
with “rtc” and
the blinking year digits (Fig.12) in the lower left
corner of the display. To change the year, press “▲
“ or “MIN/MAX▼“ to change the value, then press
“SET “ to save the year and continue, or press “ESC
“ to exit without saving.
Continue to press “SET“ to change to the month,
and then the day. After you press “SET”, press “▲
“ or “MIN/MAX▼” while the year, month or day
values are flashing to set the correct date. Press
“SET“ to save and move forward to set the time, or
press “ESC “ to return to P3.
0
mode without saving.
To set the clock, in P3.
4
mode with the hours
flashing, press “▲“ or “MIN/MAX▼“ to change
from 12 to 24 hour time format (Fig11). Press
“SET“ to save and move forward to P3.
5
mode to
set the time, or press “ESC “ to return to P3.
0
mode without saving.
While in P3.
5
mode, the current hour setting will
blink (Fig.14). To change the setting, press“▲“ or
“MIN/MAX▼“ to adjust the time. Press “SET“ to
save the setting or press “ESC “ to return to
P3.
0
.mode without saving.
P4.
0
RESET
Hold down the “SET” button for at least 3 seconds
to enter setup mode, then press “▲“ 3 times to
access P4.
0
mode to revert the meter to the
factory default state (Fig.15).
Press “SET“ to go to P4.
1
mode. “No” will be
blinking on the display (Fig.16). Press “▲”
or ”MIN/MAX▼” to change to “Yes”, then press
“SET “ to save the setting. Press “ESC” to return to
P4.
0
C without saving.
If you choose “Yes”, the meter is reset to the
following factory defaults: