
User`s manual


UC-7400-LX Plus User’s Manual Getting Started
2-13
Connecting to the 3G Network
You can connect to 3G networks over a ppp connection.
#/etc/init.d/3g.sh nozomi start
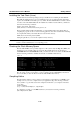
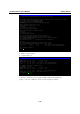
After the connection is established, you can type ifconfig to check the ppp0 interface.
192.168.3.127 – PuTTY
root@Moxa:~# ifconfig ppp0
ppp0 Link encap:Point-to-Point Protocol
inet addr: 221.120.39.32 P-t-P:10.64.64.64 Mask:255.255.255.255
UP POINTPOINT RUNNING NOARP MULTICAST MTU:1500 Metric:1
RX packets:13 errors:0 dropped:0 overruns:0 frame:0
TX packets:14 errors:0 dropped:0 overruns:0 carrier:0
Collisions:0 txqueuelen:3
RX bytes 382 (382.0 B) TX bytes:337 (337.0 B)
root@Moxa:~#
The IP address of the ppp0 interface is 221.120.39.32, and it connects to a remote gateway with IP
address 10.64.64.54.
NOTE
The dial-out script uses /etc/ppp/ppp-umts.chat to chat with a 3G card. You would need to modify
this file to change the advanced configuration. The default SVN server in this chat script is set as
“internet”. This value varies between network service providers. Be sure to use the right SVN
server to connect the card.
Use the following command to stop 3G connection.
#/etc/init.d/3g.sh nozomi stop
Test Program—Developing Hello.c
In this section, we use the standard “Hello” programming example to illustrate how to develop a
program for the UC-7400-LX Plus. In general, program development involves the following seven
steps.
Step 1:
Connect the UC-7400-LX Plus to a Linux PC.
Step 2:
Install Tool Chain (GNU Cross Compiler & glibc).
Step 3:
Set the cross compiler and glibc environment variables.
Step 4:
Prepare the code and compile the program.
Step 5:
Download the program to the UC-7400-LX Plus
through FTP or NFS.
Step 6:
Debug the program
Æ If bugs are found, return to Step 4.
Æ If no bugs are found, continue with Step 7.
Step 7:
Back up the user directory (distribute the program to
additional UC-7400-LX Plus units if needed).
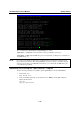
x
x86
Cross
Compiler