
Installation Guide


- 12-
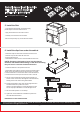
Tool
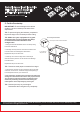
6. Install the Sink
- To protect the cabinet finish, temporarily put painter's tape
around the cabinet cutout.
- Applyabead of silicone around the cutout.
- Carefully lower the sink into the cabinet.
Be sure to wipe away any excess silicone sealant.-
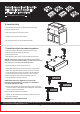
7. Install the clips from under the cabinet
- Slide three clips into either side of the back rail of the sink.
- Slide two clips into each side rail of the sink.
- Evenly space the clips.
- Assemble the screws into theUchannel fasteners as shown.
Screws are designed to insert into the channel
fasteners with backward threading, so that when mounting
they will turn inacounter-clockwise direction.
NOTE:
-
-
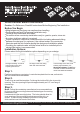
Position the fasteners claw under the top edge as shown.
Locate the fastener in position as shown.
CAUTION: Improper tightening of channel
fasteners could result in improper installation
or cause damage to sink.
A. PlaceUchannel fasteners equally spaced and with one at each
end of channel bar, hand tighten channel fasteners, starting at the
center and working toward sides.
B. Re-check sinks position on countertop.
C. Tighten all channel fasteners an additional quarter turn with a
flat head screwdriver.
IMPORTANT! DO NOT OVERTIGHTEN.
Haveaquestion? DON'T GO BACK TO THE STORE, WE CAN HELP, just call 1-800-626-3525, 8 a.m. to 5 p.m. EST Monday-Friday,
or send an email to Help@cmiproduct.com.
Locate the fasteners in the position as shown.
Hand tighten each fastener onto the channel so that the clamp
“teeth” point in the same direction as theUchannel. To install
U channel fasteners in channel bar: SlideUchannel fasteners
in channel bar from either open end and /or slots in channel.
For Top-Mount Use Only
Retrofit Apron Front Farm Sink
With Dual Mount Capability
Installation Instructions