
User`s manual


6
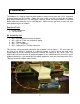
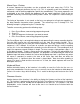
Figure 1
1. Make sure all power is removed and all cables unplugged from the Color Computer.
2. Remove all screws on the bottom of the computer. Note that the shorter screws are
removed from the front of the computer by the keyboard, longer screws will be placed in
the rear. Damage will occur to the case if you place the long screws in the front of the
case.
3. Remove the keyboard from it’s mounting position and motherboard connection.
4. Plug the PS/2 interface into the CoCo’s mylar keyboard connector. Inspect the pins to
ensure they are aligned with the contacts on the mylar connector.
5. Optional - Plug the CoCo keyboard into the pass-through connector on top of the
interface. Ensure that the conductive strips on the mylar film line up with the pins on the
connector. By using the pass through, both the PS/2 and CoCo keyboards can be used
at the same time.
6. Route the PS/2 keyboard cable to exit out the cartridge port or back by the RESET
switch. To get the case to close without binding. A small notch can be cut into the lower
half of the case. This is undetectable when the upper case is placed back on.
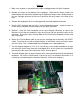
7. The red alligator clip goes to +5V. On a CoCo III this is most readily available on a large
resistor which stands away from the circuit board (R19, far left side of the circuit board;
connect to the pin nearest the front of the CoCo), refer to figure 2.
8. The black alligator goes to ground. Attatch to the metal grounding plate for the keyboard
located on the CoCo3’s circuit board. If you're not sure, ask someone who knows as a
mistake here could damage the interface and/or the CoCo, refer to figure 2.