
User guide
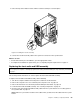
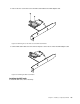
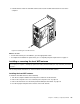

6.RemovethescrewthatsecuresthefrontaudioandUSBassemblybrackettothechassistoremove
thebracketfromthechassis.
Figure34.RemovingthescrewthatsecuresthefrontaudioandUSBassemblytothechassis
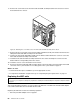
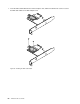
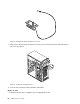
7.RemovethetwoscrewsthatsecurethefrontaudioandUSBassemblytoitsbracketandremovethe
failingfrontaudioandUSBassemblyfromthebracket.
8.InstallanewfrontaudioandUSBassemblyintothebracketandinstallthetwoscrewstosecurethe
frontaudioandUSBassemblytothebracket.
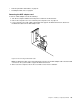
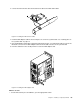
9.InstallthefrontaudioandUSBassemblybracketintothechassisandalignthescrewholeinthe
bracketwiththecorrespondingholeinthechassis.
10.Installthescrewtosecurethebrackettothechassis.
11.ReconnectthefrontaudioandUSBassemblycablestothefrontaudioconnectorandthefrontUSB
connectoronthesystemboard.See“Locatingpartsonthesystemboard”onpage12.
Whattodonext:
•Toworkwithanotherpieceofhardware,gototheappropriatesection.
•Tocompletetheinstallationorreplacement,goto“Completingthepartsreplacement”onpage71.
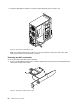
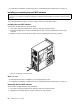
ReplacingtheWiFiunits
Attention:
Donotopenyourcomputerorattemptanyrepairbeforereadingandunderstandingthe“Importantsafetyinformation”
onpagev.
ThissectionprovidesinstructionsonhowtoreplacetheWiFiunits.TheWiFiunitsincludeaWiFiadapter
card,aWiFicardmodule,andarearWiFiantennacable.
ReplacingtheWiFiunitsinvolvesthefollowingoperations:
•“RemovingtheWiFiadaptercard”onpage61
60ThinkCentreM73UserGuide