
Instructions / Assembly


7
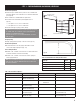
Fig. 5-A
C-clamp
Step 5-1: Remove Existing Door Springs
NOTE: Garage doors use springs to balance door weight. Springs are
one of two types – extension or torsion. Each of these is available in
either a standard or EZ-SET
®
assembly option.
■
Use illustrations in STEP 4 to determine which springs existing door
has. If existing door's spring type is not found, please consult spring
manufacturer.
! WARNING
Serious injury could result from an uncontrolled release of spring forces
if spring tension has not been released before other work begins.
! WARNING
To avoid pinch and other crushing injuries, keep hands and fingers clear
of section joints, track and other door parts while door is opening and
closing.
NOTE: Some large doors can weigh as much as 500 lbs. and single car
doors as much as 200 lbs. when spring tension is removed.
Standard Torsion Springs:
! WARNING
If present door uses standard torsion springs, DO NOT attempt to remove
door or springs yourself. They should be removed by a qualified door
service professional. Attempting to remove a torsion spring assembly
without proper training and tools may result in an uncontrolled release of
spring forces which can cause serious injury.
Standard Extension Springs:
! WARNING
Extension adjustments or removal should only be made with door in up
position. To avoid damage or serious injury from door falling, use two or
more helpers to assist in lowering door.
■
Raise door to full open position.
■
Place C-clamps or locking pliers tightly on both sides of track under door
so door is held securely in place (Fig. 5-A).
■
With door fully open, most spring tension has been removed.
■
Keeping C-clamps in place to keep door from falling, detach cable at both
ends.
■
Disassemble and remove springs and cable completely from door.
NOTE: Wood blocks should be placed underneath door when closing to
prevent fingers from being trapped.
■
Remove C-clamps from track and carefully close door.
■
Weight of door will not be apparent when you first begin to close door.
Door will feel progressively heavier as it is lowered until its full weight is
realized about one foot from floor.
EZ-SET
®
Extension Springs or EZ-SET
®
Torsion Springs:
! WARNING
To avoid damage or serious injury, use two or more helpers to assist in
lowering door. EZ-SET
®
torsion springs adjustments or removal should
only be made with door in down position.
■
With door in down position, position drill with 7/16" socket bit over
winding unit.
■
Using reverse (counter-clockwise) direction on drill, remove all tension
from spring. Repeat for each side.
■
After spring tension has been removed, detach lift cables at
both ends.
■
Disassemble and remove springs and cable completely from door.
Step 5-2: Remove Door Sections and Track
■
After removal of door springs, door can now be disassembled.
■
Starting with top section, remove hardware and unstack sections one at
a time (Fig. 5-B).
■
After all sections have been removed from opening, detach all remaining
track and hardware from jambs.
■
Hangers that attach rear ends of overhead track to ceiling (rear track
hangers) in many cases can be reused on new door. Be sure they are
made of 13 ga. (3/32") or heavier steel and are not loose or unstable.
! WARNING
To avoid installation and operation problems from using worn, damaged
or incompatible track, use only track specified and supplied with door.
DO NOT attempt to reuse old track.
Fig. 5-B
STEP 5 - REMOVE THE EXISTING DOOR
Fig. 5-B