
Instructions / Assembly


P01-R01-0704
STEP 9 - Installing Door Sections
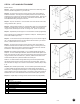
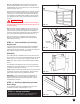
Step 9-1: Place the section in the opening so that it is against
the stop molding and centered from side to side. Place a level
on the section and use a piece of wood under one end or the
other (if necessary) to make the section level. (FIG. 9-A)
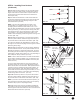
Step 9-2: Remove the level and drive a 3” nail in the jambs at
each end and bend it over the edge of the section to hold the
section in place. (FIG. 9-B)
NOTE: These nails are all that will hold the stacked door
section in place until the tracks are secured to the back jambs.
Step 9-3: With the Table 9-A below, determine the order in
which you will attach the remaining sections.
NOTE: If a lock assembly was ordered with the door, the holes
for the lock may be predrilled. (Lock templates are included in
the lock instructions for doors without predrilled holes.)
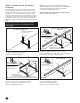
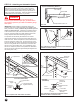
Step 9-4: Place the next section face down on the saw horses.
If your door is predrilled for a lock, this section will be the one
with holes in the center of the panel face. Identify the bottom
edge as shown in the illustration. (FIG. 9-C)
Attach a number 2 hinge to each end at the top edge using
#14 x 5/8" sheet metal screws. Remember that the number
is stamped on the side of the hinge that is to be attached to
the section. Attach a number 1 hinge to all other pre-punched
holes along the top edge of the section.
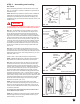
Step 9-5: Keyed Lock Installation. If you wish to install a
keyed lock, begin the lock installation now according to the
supplemental instructions included with the lock hardware. If
your door did not come with a keyed lock, install lift handle as
shown on previous page.
#2 Hinge
#1 Hinge
Bottom Edge
End Stile
#14 x 5/8" Sheet
Metal Screws
12
Table 9-A - Section Order for Various Door Heights
FIG. 9-B
FIG. 9-C
Stop Molding
: Place the section in the opening so that it is against
the stop molding and centered from side to side. Place a level
: Remove the level and drive a 3” nail in the jambs at
s.
: If a lock assembly was ordered with the door, the holes
n
FIG. 9-A
Stop Molding
1st 2nd
Door (Bottom) (Lock) 3rd 4th
Height Section Section Section* Section
6'0" 24" 24" 24" -
6'3" 18" 18" 18" 21"
6'6" 21" 18" 18" 21"
6'9" 21" 21" 18" 21"
7'0" 21" 21" 21" 21"
7'3" 21" 21" 21" 24"
7'6" 24" 21" 21" 24"
7'9" 24" 24" 21" 24"
8'0" 24" 24" 24" 24"
* Section with general safety label.