
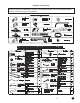
Replacement Part List


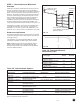


G01-R03-0906
Introduction and Opening Preparation
STEP 1 – Things to Know Before You Begin ....................................................................................................3
STEP 2 – Read Safety Information ..................................................................................................................4
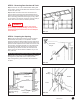
STEP 3 – Check Headroom, Backroom, Sideroom ..........................................................................................5
STEP 4 – Removing the Existing Door Springs ...............................................................................................6
STEP 5 – Removing Door Sections and Track ................................................................................................. 7
STEP 6 – Preparing the Opening ..................................................................................................................... 7
Preparing the New Door
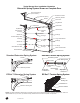
Typical Garage Door Installation Illustration .....................................................................................................8
Hardware Components ....................................................................................................................................9
Installing the New Door
STEP 7 – Preparing Bottom Section ..............................................................................................................10
STEP 8 – Lift Handle Attachment............. ......................................................................................................12
STEP 9 – Installing Door Sections.............. ...................................................................................................13
STEP 10 – Reinforcing the Top Section for Opener Attachment ....................................................................14
STEP 11 – Assembling and Installing Track ...................................................................................................15
STEP 12 – Lock Installation (if included).................. ......................................................................................17
STEP 13 – Pull Rope.......... ............................................................................................................................17
STEP 14 – Spring Installation....... ..................................................................................................................17
STEP 15 – Attaching an Automatic Opener ....................................................................................................18
Maintenance/Adjustments/Options
Painting and Windows .................................................................................................................................... 19
Maintenance ...................................................................................................................................................20
Checking and Adjusting the Door ...................................................................................................................20
Replacement Parts ......................................................................................................................................... 20
Table of Contents
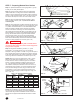
STEP 1 – Things to Know Before You Begin
• Read the instructions completely before starting the installation
of the door. Becoming familiar with the components before
assembling the door will reduce the installation time.
• Be sure all hardware components for your new door are included
before removing existing door (see pages 8,9). If your door is
missing any parts, call the toll-free Consumer Services number
listed on the front of this manual.
• Allow enough time to do the work; removing an existing door will
take approximately 1-3 hours.
• An assistant may be required for lifting the unsprung door. It can
weigh from 100 to 500 pounds.
• A typical installation takes between 9 and 12 hours to complete.
• Keep in mind when planning the installation that the garage
will be open and unsecured when disassembling the old and
assembling the new door.
• If the garage door is the only opening in the structure make sure
everything you need is inside. You will have no way of leaving the
garage until the track is assembled and installed. This will take
approximately 5 hours.
• To avoid damage to the door, you must reinforce the top section
of the door in order to provide a strengthened mounting point for
attachment of an automatic opener (see page 14).
• Low Headroom doors require special instructions. Options for
doors with low headroom can be found on page 5. Purchase
of additional hardware may be required. Check headroom
requirements in the chart on page 5 before beginning.
• To avoid installation problems which could result in personal injury
or property damage, never reuse old track or hardware.
• Doors installed in high windload regions (Florida and other high
wind prone areas) may require additional reinforcement beyond
what is detailed in these instructions. Please refer to supplemental
instructions for these areas.
• Express warranties apply only to doors installed using original,
factory-supplied sections, parts, and hardware installed in strict
accordance with these instructions.
Tools Needed
• “C” Clamps or Locking Pliers
• Hammer
• Screwdriver
• Tape Measure
• Level
• Socket wrench kit
• Pliers
• Drill, 1/4", 3/16", & 3/8" drill bits, and 7/16" socket bit
• Step ladder
• Saw horses (with carpet or other soft material on top surface;
2 needed for doors up to and includiing 9'0" wide, 3 needed for
doors over 9'0" wide) or other supports for placing section on
while assembling
• Hacksaw
• Wood Saw
• T-Square
• Additional tools may be required; see the Spring Supplement for
more information.
Additional Material Required
• Light household oil
• 1-1/4" x 1-1/4" Minimum punched angle
- 13 ga. (3/32") minimum thickness for Operator Reinforcement
(see page 14)
- 16 ga. (1/16") minimum thickness for rear track hangers on
doors weighing up to 300 lbs. that use torsion springs, or doors
weighing up to 150 lbs. that use extension springs. If your door
exceeds these weight limitations, or if you do not know the weight
of your door, 13 ga. angle should be used. (See page 16)
• Eight 3/8" x 1" bolts and nuts for rear track hangers
• Six 5/16" x 11/2" lag screws for rear track hangers
• Ten 10 d 3" nails
• Stop Molding
• Wood Block
• Rope
3