
Installation Guide

Installation Instructions
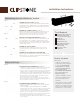
NUMBER OF FLAT STONES (see Fig.1)
Calculate wall area to be covered with stone (height X width)
and subtract area of window and door openings (if applicable).
Then add 5% - 10% additional stone material for waste due to
cutting or breakage.
NUMBER OF CORNER STONES (see Fig. 2)
Measure the height of all corner edges to determine the total
linear feet of corners needed. Add 5%-10% for waste. Also
subtract 50% of the corner linear feet from your flat stone
calculation to account for wall coverage of corners.
AMOUNT OF STARTER STRIP NEEDED (see Fig. 3)
Starter strips are required at the bottom of a wall or across the
top of all windows, doors and other openings. Measure the
total lineal dimension of all window widths, door widths and the
length of all walls to be stoned to calculate the total linear feet
of starter strip needed.
NUMBER OF OUTLET STONES
If you have electrical outlets in your wall or project space,
count the number of outlets and order an Outlet Stone for
each outlet.
NUMBER OF DECORATIVE SILLS FOR WINDOWS
Measure lineal foot dimension of window sills needed under
windows and to cap a wainscot. Divide the total linear feet by
1.6 to calculate the number of pieces.
Tools Required
1" metal roofing screw with
a hex/washer head and
corrosion resistant coating
Screw gun
2 to 4 foot level
Small torpedo level
Slap stapler (for external
applications to fasten
paper to wall)
Chop saw or other
cutting tool
FOR EXTERIOR WALL PREPARATION (see Fig. 4)
• ClipStone is designed to install over 7/16 inch or greater OSB
or plywood sheathing attached to wood or metal studs.
• If any questions as to the structural integrity of the sheathing or
framing, contact a qualified contractor or building inspector.
• Install two layers of Grade D Breathable Water Resistive Barrier
over sheathing and fasten to wall with staples or other means.
• Ensure all paper edges are flashed to substrate to prevent
moisture movement to back of WRB.
• Ensure all openings and penetrations are properly flashed.
• Ensure compliance to all local and national building codes as
they change from location to location.
FOR INTERIOR WALL PREPARATION (see Fig. 5)
• ClipStone is intended for installation over 7/16 inch minimum
plywood or OSB.
DO NOT INSTALL CLIPSTONE DIRECTLY TO DRYWALL.
• Install minimum 7/16 inch or greater OSB or plywood substrate
to wood studs to act as substrate for ClipStone installation.
• If any questions as to the structural integrity of the sheathing or
framing, contact a qualified contractor or building inspector.
• Insure plywood is attached to the structural studs behind the
drywall in accordance with local and national codes.
• For interior applications, Water Resistive Barrier or housewrap
is not required.
How to cut stone
(if needed)
ClipStone is easily cut both
horizontally and vertically with
a chop saw. PLEASE WEAR
APPROPRIATE CLOTHING,
GLOVES, EYE PROTECTION
AND OTHER SAFETY
EQUIPMENT RECOMMENDED
BY THE CUTTING TOOL
MANUFACTURER.
• ClipStone installation requires
two points of attachment per
piece for fastening to the
substrate.
• If this cannot be done, use DAP®
DynaGrip® Heavy Duty Max to
adhere stone surfaces together
where there is a dicult area for
attachment (i.e. under a sot)
Determining Amount of ClipStone
®
needed
Before You Begin
HEIGHT
WIDTH
HEIGHT
WIDTH
Fig. 1
HEIGHT
HEIGHT
Fig. 2
LENGTH
WIDTH
Fig. 3
Fig. 4
Fig. 5